|
Part 3 - Creating a new sales program |

  
|
|
Part 3 - Creating a new sales program |
|
PART 3 - CREATING A NEW SALES PROGRAM
In this section you will learn how to use the Screen editor and the Program editor to build an application called SALES. This SALES application is really a simple sales journal. You could use it to record daily sales activity including Order Number, Customer Code, Sales Amount and other pertinent information. In later parts of the tutorial, we'll learn how to add a menu and report to this application.
TAS Professional lets you create complete applications, not just simple databases. Let's take a moment to talk about what an application is. In its most basic form an application is a program combined with at least one customized data input screen and one database file.
The real significance of this is the customized data input screen. In TAS Professional the screen editor is a true WYSIWYG (What You See Is What You Get) application. You layout the screen (or form) to look exactly like you want it to when the application is run.
There are generally at least two parts to any TAS Professional application, a screen or form (extension (what the file name ends in) DFM) and a source file (extension SRC). You can have an application with multiple screens, one or more report formats and one that has no screens. However, in this case, we're going to have a single screen form and a single source file. When creating screens you can generally put most of what you want the user to see right into the field objects themselves so that little work need be done in the source file. Once you have the screen and source file you then compile the program. This creates a RWN (or Windows® Run program). When the program is run the runtime uses the RWN (compiled program) and the DFM (screen format).
NOTE: The screen form (and report forms for that matter) are not part of the compiled program for a very important reason. Once you have compiled the source file you can continue making changes to the screen/report forms and not have to recompile. As long as you don't add a field to the screen that hasn't been referred to in the program, you never have to recompile. So, you can change colors, text, location, remove fields, etc. Not only can you do that, but we also have a version of the Screen/Report editor that you can purchase for your customers that will allow them to do the same thing. Next time you have a customer that wants to change the text on a form, or move things around; all you have to do is provide them with this special program (TAS Professional User Editor) and they can do it themselves! If you don't want to provide them with this capability, just don't tell them about it!
NOTE: This section assumes that you have already worked through the CREATING A CUSTOMER DATABASE and MAINTAINING A DATABASE sections of this tutorial and are familiar with the conventions presented there. If not, you should go back and work through those sections first.
Design your Database on Paper First
The first and most important step in building a database application is to design it on paper before even turning on the computer. A little time spent thinking things through now can greatly reduce the time (and frustration) spent fixing things later on.
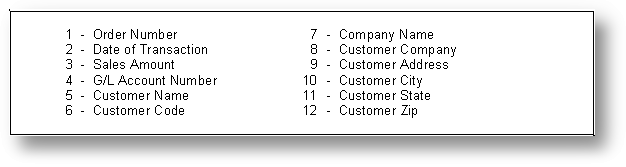
Your design doesn't have to be fancy. In fact, a good place to start is to list the types of data (information) that will make up an application. Here's a list of what you need to keep track of in our SALES example.
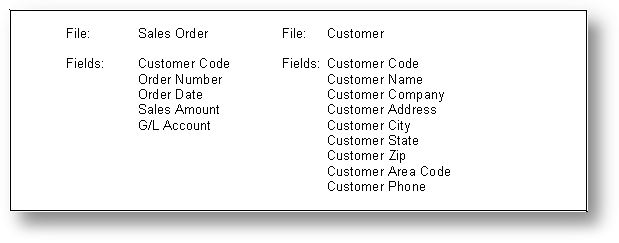
The next thing to determine is how the data is going to be stored. In this example, you will be entering sales order records based on the customers' purchases. You already have the customer records from the previous sections, so you do not need to keep the customer specific information in the sales file. You do, however, need to keep the Customer Code in the sales file so you can link (relate) the sales records to a specific customer.
This does two things for us. First, it reduces the data entry required to enter a sales order. When the Customer Code is entered, the program will find the corresponding record in the customer file and display the appropriate information. You will be adding the code to do this later.
Secondly, it reduces the amount of disk space required to store our application. Each file stores only the data required and the fields necessary to link to other files in the application.
The following table shows how the data you are keeping track of will be stored.
The Customer file already exists so you will only be entering the Sales file. The first thing you need to determine is the type and size of each field in the Sales file. The size of the field is determined by the largest entry you expect to put in that field. For example, you wouldn't make the Sales Amount field only four characters long, since that would limit the sales amount to a maximum of 9.99.
Here are the data types, lengths and key types for the SALES (name this FD "SALES") file:
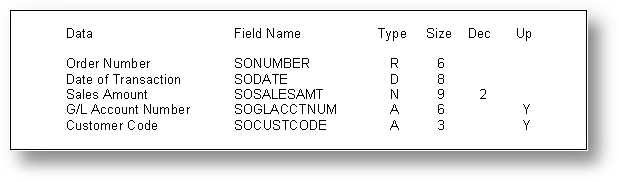
NOTE: In the field information above we don't include the Short Field Name. Just press the ENTER key when you're in that field and accept the default value.
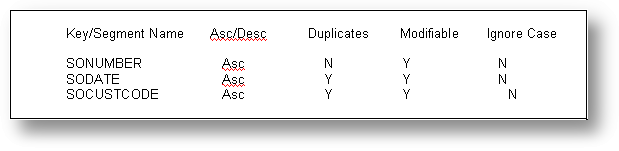
The keys specified allow searching and reporting based on the Order Number, the Date of Transaction, or the Customer Code. Note that we now allow duplicates of the Customer Code. Since you can have multiple sales for a single customer you need to allow duplicates here; however, we still don't allow the code to change for the same reasons we had when setting the Customer Code key.
The final thing to design on paper is what you want the computer screen to look like. Often you can get good ideas by looking at the paper forms around your office. For example, if you were building an invoice tracking system, you might design the computer screen so it looked like your paper invoices. With TAS Professional you have the ability to make the screen look any way you want.
Preview of Sales Screen Form
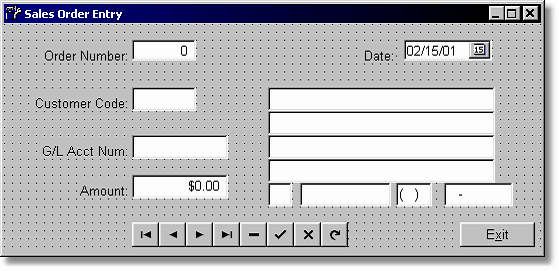
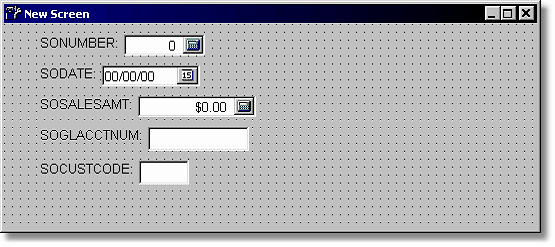
For our SALES example, we'll keep things fairly simple. The data input form will look something like this (the dots on the form display only in the screen editor):
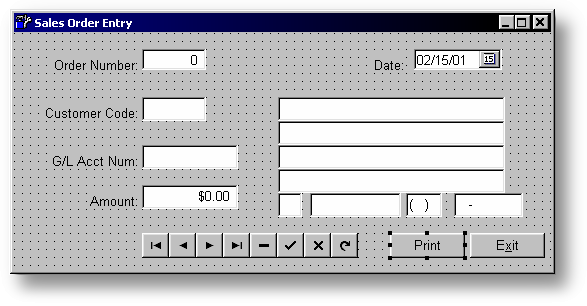
You will learn how to build this screen in the next section.
The Data Dictionary
The first step in creating your application program is to add the SALES file to the data dictionary. Review what you learned in PART 1 - CREATING A DATABASE. Using the Maintain Dictionary Program and the specifications above, enter the FD (file descriptor) for the SALES file.
Create the Screen Form
Now that you know what you are going to keep track of in your database, you are ready to use the Screen Editor to "paint" a data entry form on the screen.
From the Main Menu click on the Screen icon. A blank screen will be displayed under the menu bar. However, if you look at the status bar at the bottom of the screen you will see Screen Painter in the first section. You can always refer to this section to make sure you're at the right place.
Now click on the New icon (it's the first one in the menu bar). Something similar to the screen below will be displayed. The actual layout will depend on your screen size settings. Part of the image below has been cropped to fit on the page.
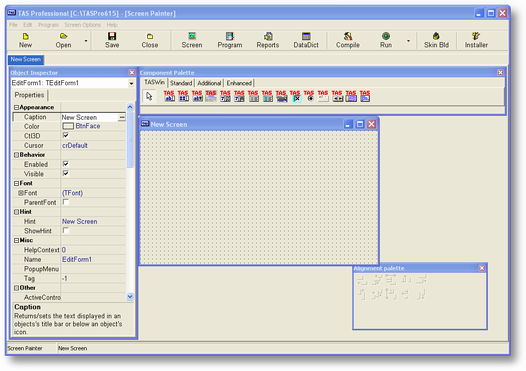
NOTE: You can run the screen editor in as little as 800 x 600, however, we don't recommend it. Your minimum resolution should be at least 1024 x 768. The higher the resolution the more you'll see without having to move things around.
The screen displayed above is basically a blank canvas. You can put anything you want on it. Above the screen is what is called an object pallet. There are four different tabs that make up this pallet. They are: TASWin all of the objects that are unique to TAS Professional ; Standard objects that might be typically part of a standard screen; and, Additional these are objects that you would use occasionally . Each of these is described below:
TASWin Page
| TASEnter - Use this object to enter any type A (alpha - string) field. There are other objects to enter numbers, dates and times. However, you can use this object to enter any value in your program. |
| TASNumEnter - Use this object to enter any numeric (N, B, I or R) type field. There are other objects to enter strings, dates and times. |
| TASDataGrid - This may be the most important object available. This will display a list of records or array field values on the form in a certain order in columns. You can allow the user to delete rows (records or array elements), insert rows (array elements only), add new rows to the end of the grid, and, through the use of the DATA_GRID command, add columns, remove columns, shift them around, etc. |
| TASComboBox - This object is similar to the TASEnter with a few extra options. You can create a list of values that the user can choose from if the click on the drop down button or as they are typing. |
| TASCheckBox - Use this object to replace a standard Y/N question. If the user checks the box the value returned to the field attached to the object will be Y; if unchecked, it will return N. You can also make the attached field a type L (logical). In that case the object will return .True. (clicked) or .False. (unclicked) as would be expected. |
| TASRadioButton - Use this object to replace a standard Y/N question. If the user checks the box the value returned to the field attached to the object will be Y; if unchecked, it will return N. You can also make the attached field a type L (logical). In that case the object will return .True. (clicked) or .False. (unclicked). The major difference between this object and the TASCheckBox is in usage. Generally, you would put two or more TASRadioButton objects on a TGroupBox. The group box allows only one radio button to be chosen at a time. Using this, you can give the user multiple choices with the knowledge that they can only choose one. |
| TASPageControl - This can be used to create a standard multi-page notebook on your form. You can place objects (including another TASPageControl) in the panel below the tabs and the objects will be seen only when the user chooses the appropriate tab. |
| TASTimeEdit - Use this object to enter/edit time values. You can also include a check box as part of this object. NOTE: The TASTimeEnter object is recommended for usage instead of this. The TASTimeEdit was retained strictly for compatibility with early versions. |
| TASComboEnter - This is a special version of the standard TASEnter object. Using this object you can allow the user to enter a value 'normally', and/or by chaining to a program routine when the user clicks on the button. |
| TASDGColTemplate - This is a duplicate of the TASDGItem (Columns) in a TASDataGrid object. Through the use of this object you can add to or update an existing grid through the use of the DATA_GRID command. This is a non-visible object. |
| TASNavigator - This is a special object that provides the user with a group of buttons that can be accessed by the user to scroll through the records in a file, delete a record, save a changed record or refresh a record from the file even after changes have been made. Use the NAVIGATOR command to link this object to a file and key. This is required before this command will have any effect. |
| TASStrList - This object can be used specifically to create a string list. To manipulate the list you can either use the appropriate property editor or the STRINGS() function. This is a non-visible object. |
![]() TASDateEdit - Use this object to enter any type D (date) field. There are other objects to enter numbers, strings and times.
TASDateEdit - Use this object to enter any type D (date) field. There are other objects to enter numbers, strings and times.
| TASTimeEnter A newer version of the TASTimeEdit object. It allows for more flexibility in entering time and hours and is the recommended object to use. |
| TASMemo This object is used in CodeBase files where you have included a Memo field as part of the FD. It acts as a small word processor and allows you to add and change memos directly to a file. |
Standard Page
| MainMenu - This object creates the menu that appears at the top of the form. The items that make up the menu are actually MenuItem objects. You create those by using the MenuItemEditor. |
| PopUpMenu - This object creates a menu that appears when the user right clicks on an object (you must specify the Popupmenu object name as the PopupMenu property). The items that make up the menu are actually MenuItem objects. You create those by using the MenuItemEditor. |
| Label - This object will allow you to put a fixed string on the form. It is the simplest of all objects that you will use and, along with TASEnter, probably one of the most used. |
| Memo - Use this object to put a mini-word processor on your form. If you want to allow your user to enter messages or notes, etc. you would use this object in connection with the STRINGS() function. This is different from the TASMemo above in that it cannot be connected to a field. |
| Button - This will display the standard Windows button on the form. The user will be able to 'click' on this button (press the left mouse button while the arrow is over the object) and have this execute an Event that will call a routine in your program. This is a common object and will probably be used often on your forms. |
| GroupBox - This object is used in connection with TASRadioButtons. When multiple radio buttons are placed on a single group box the user will be able to set only one of the options active at a time. |
| Panel - This object is similar to the Bevel in that it can put a border around other objects but it has other uses also. The types of styles available are greater than with a bevel and it 'owns' the objects placed on it. This means that if you set the Visible property of the panel to .False. all object that are on the panel, automatically become invisible also. The same applies to the Enabled property. This can be very useful when you know you want to effect a group of objects all the same way at the same time. |
NOTE: The Panel object can also be used as a button since it has a CLICK event just like a button. This is very helpful when creating forms where you want to use buttons that have a different background color than a standard button. You can also place both an image and text (Label) on the panel object.
| GlyphBtn - This will display a slightly different Windows button on the form. In this case the button can have a glyph (.bmp graphic) that is part of the button along with the caption. If you don't include the graphic this is identical to the standard Button object. The user will be able to 'click' on this button (press the left mouse button while the arrow is over the object) and have this execute an Event that will call a routine in your program. |
Additional Page
![]() Image - Use this object to display an image on the form.
Image - Use this object to display an image on the form.
| Shape - This object will allow you to draw a simple shape on the form. It can be used in the same manner as the Bevel, to put a box around an object or group of objects. Other than that, it has no other purpose. |
| Bevel - Use this object to put a bevel around entry objects or other screen objects. Even though this is a visible object there is no interface with the user other than beautifying your form. |
| StatusBar - This object is generally used to display information to the user at the bottom of the form. You can split up the bar into panels, each of which can be individually modified. The panels that make up the menu are actually StatusPanel objects. You create those by using the Status Bar Panel Editor. |
| ToolBar - This object creates a tool button bar that appears at the top of the form. The items that make up the bar are actually ToolButton objects. |
| DualListDialog - This is a non-visual object at design time that can display a very useful dialog at runtime. To execute this dialog you will use the DUAL_LIST_EXEC() function. Refer to this for an image of what the dialog will look like to the user. You will also use the STRINGS() function to determine what options the user has chosen, and perhaps, to set the options (strings) the user has to choose from. |
| AlarmClock - This object will place a clock on your form. It can be either digital or analog in shape and can be used to set an alarm that will call a routine in your program. If you want to execute an event at a regular interval you should use the RtnTimer instead of this object. |
| RtnTimer - It won't appear on your form at runtime, however, it can call a routine in your program at a semi-regular interval. If you want to execute an event only once a day at a specific time your should use the AlarmClock instead of this object. This is a non-visual object. |
NOTE: All objects start with the letter T, it has been removed in the examples above for clarity. However, the TASEnter object is really TTASEnter, Label is TLabel, etc. This is how they are referred to in the documentation.
NOTE: Not all screen objects are in the above list since we have over the years added more objects to the programmers pallet.
Object Inspector
On the left side of the screen editor is the Object Inspector. Each object has properties. These properties can generally be set either at design time (what you're doing now) or runtime (when the user is running the program). To set them at design time you enter or change the value in the field next to the property name. Each property has been defined in the help file (documentation) for this object. To display that information click on the Help menu option at the top of the screen, click again on TAS Pro Help. A standard Windows help box will be displayed. By entering the name above, the appropriate help screen will appear.
The Object Inspector will always display the information for the current object. The name of the active object, and its type, will be displayed at the top of the Object Inspector (or OI for short).
The properties in the OI are logically divided into sections. So, for example, in the Position section are items like Top, Left, Height and Width. In the TAS Pro section are properties that involve connection to the program (FieldName, Events, etc).
Adding/Moving Objects on the Form
To place an object on the screen form you click on the icon and then click at the appropriate location on the form. A default version of the object will be displayed. You can then change the size by clicking on one of the sizer (or grabber) blocks that surround the object and, while holding the left mouse button down, move the mouse as appropriate.
You can also move the object anywhere on the form by clicking anywhere inside the object and, while holding the left mouse button down, move the object where you want it. As you're moving the object an outline shape of the object will move with the mouse. When you release the mouse button the object will 'move' to the new location.
Another way to move or resize the object is to change the property values that apply. These are Top, Left, Height and Width. All values are in pixels with the top left of the screen form position Top=0 and Left=0.
Multiple Screen Forms
You can have more than one form open at a time. Each form that is opened, or created when you click on the New button, will be on their own tab. The name of the form is on the appropriate tab. To move between forms all you have to do is click on the appropriate tab.
You can also copy and paste object from one screen format to the other.
Saving/Closing Screen Forms
To save an open screen form click the Save button. If this is a new screen a standard save file dialog will be displayed and you will be able to specify a form name and path. You can also save an existing form to a new name by clicking on the File->Save As menu option. Again, the save file dialog will be displayed and you can enter a different name, and possibly a new path, for the form. This allows you to easily reuse current screen forms and create new ones with minor or major differences.
You can also close the screen form without saving it by clicking on the Close button. If the form has been changed you will be given the chance to save the screen form before it is closed. The same applies if you exit TAS Professional completely and there are forms open that have been modified.
Creating the Sales Screen Form
To add the following objects to the form you will first click on the appropriate icon on the pallet and then click on the screen form. The object will be automatically selected. If you click inside the object, and hold down the left mouse button, you will be able to drag the object anywhere on form. While you're moving the object the left and top coordinates will be displayed in a little box immediately under your mouse cursor. It will be in the form of Left,Top. Or, you can enter the appropriate numbers directly in the Left and Top properties in the OI (Object Inspector). The same applies to the Width value. As you adjust the size of the object the Width and Height values will be displayed in the form of Width x Height. As always, the numbers are in pixels.
The first step is to make the form itself the correct size. Depending on your screen resolution this will probably be making it smaller. You can do this in two ways; move the cursor to the lower right corner until it shows as a two-headed diagonal arrow. While holding the left button down (before the mouse arrow changes shape), move it toward the upper left corner. Unfortunately, this doesn't display size as your moving, however, by referring to the ClientHeight and ClientWidth values in the OI you'll see the results. The other option is to change those two values directly. Which ever works easiest for you is just fine. However, you want to end up with ClientHeight = 235 and ClientWidth = 541.
While you're still on the background form, enter "Sales Order Entry" in the Caption property. This will be displayed at the top of the screen form.
NOTE: When ever we display an alpha string to be entered into a property it will be surrounded by quotes. However, when you actually enter the value do not include the quote marks, just the value between the quotes.
NOTE: Something we won't consider here is what font to use. Obviously, in Windows the options are extensive. The default option, when adding objects to a form, is to use the same font that has been setup for the form itself. That's what we'll do. You should be aware, however, that you can change the font type, size, color, etc., for each and every object that you place on the form. Not only that, you can change those values at runtime! However, that is beyond the scope of this tutorial. You can also set the default font type and size in the setup program (TP7SETUP.EXE) so that new screens are automatically assigned that font. For more information about this please refer to the Setup information in the TAS Professional help file.
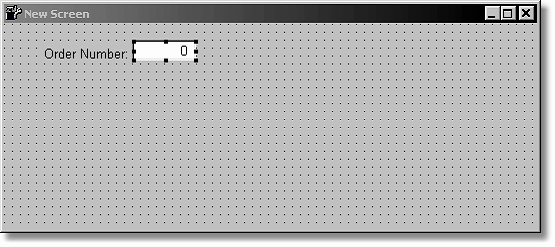
Let's put the first text and field on the screen form; we'll do the text first. Click on the Standard tab on the pallet, then click on the A icon (Label object). Move the mouse cursor anywhere towards the upper left corner of the screen form and click the left mouse button. This will put a Label object on the form with the default name of Label1. The name will also be put into the Caption property so the name will be displayed as the visible part of the text on the form. Now click somewhere on the Label1 text (inside the outline created by the grabber blocks) and, while holding the left mouse button down, drag the object so that the number under the mouse pointer is 40, 24. You can also enter the appropriate property values. If you'd rather do that then the values are Left = 40 and Top = 24.
The screen below shows what the form will look like when you first put the Label object on it. Notice the small blocks that surround the visible representation of the object. These are the grabber blocks that you can use (by dragging them with the mouse) to make the object width larger or smaller (the blocks on either end) or the change the height (the blocks on the top and bottom). By grabbing the blocks on the corners you can change the height and width at the same time.
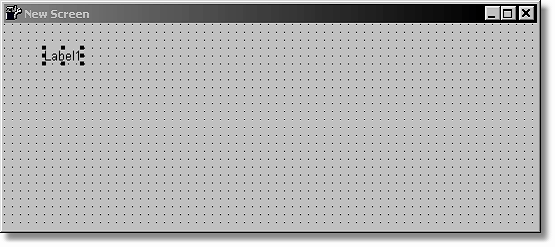
NOTE: Normally we'd change the object name to something that is more meaningful, however, the text fields (Label objects) can generally stay with the name that's assigned by the screen editor. If you wish to change them, you're more than welcome to. Obviously, you can't have two objects with the same name and you can only use numbers, alphabet characters and underscores in the object name.
Still working with the first text object let's now make it say something reasonable. In the Caption property enter the value "Order Number:" If you double clicked on the property and the property editor is activated you will need to press the OK button, otherwise you can just press the ENTER key to accept the new entry. Now the Label object on the screen form should display your text entry. We're ready to move on to the actual field object.
NOTE: If you double click in the Caption property a multi-line editor will be displayed. In every instance we'll use in this tutorial you'll only edit the first line. If you press the ENTER key and move to the second line make sure you delete that extra line by pressing the BACKSPACE key.
Click on the TASWin tab on the pallet to get back to the TAS field entry objects. Since this is a numeric type field we're going to use the TASNumEnter object. Click on the icon with the '##' inside the entry block. This should be the second icon from the left. If you move the cursor over the icon the object name should appear as a hint. As you did with the Label object after you click on the icon next click on the screen form.
NOTE: Even if you drop the TASNumEnter object right on top of the Label you won't change the Label at all. When you move the TASNumEnter the Label will reappear just like it was. In fact, stacking objects on top of one another is something you may want to do in a future program but that is beyond the scope of this tutorial.
NOTE: The TASNumEnter object automatically creates a button that can be used in your programs to lookup a value, etc. However, in this case, and in the others we use in this tutorial, we have no need for the button to appear. So, in the OI, set the ButtonWidth to 0 and it will disappear.
Set the position of the new object so that Left = 128, Top = 16 and Width = 64. The Height value does not need to change since it should be 21 automatically.
You might want to see that you can activate any object on the form by clicking on it. So, if you click on the Label object the grabber blocks will appear around the text you entered previously and the properties for that object will appear in the OI. Make sure you click back on the TASNumEnter object before you continue.
In this object there are a few extra properties that you need to be concerned with. The first we'll look at is Name. Each object you put on your screen forms will have a name. If you should need to access that object in your program this is the name the command or function refers to. You should get into the habit of naming your objects with something that is logical. So, for example, start the name of this object with "num" since it's a numeric entry field. Next, you might use something similar to the field that will interface to this object, or what it actually represents, so, in this case, use OrdNum (for Order Number). This will make the Name = numOrdNum. Using a variation of upper and lower case characters makes the name easier to read, however, it makes no difference to the program. You could've used NUMORDNUM or numordnum, each would refer to the same object. Notice that we didn't use any underscores or periods. You could use underscores if it makes more sense for you to do so. Periods are not acceptable at all since they are used to separate pieces of the object name internally. So, put "numOrdNum" into the Name property.
In the TASNumEnter object there is a special DisplayFormat property to control how the number value is displayed. Since this field will contain a value that will only be positive and there are no decimal characters you want to set DisplayFormat = 0. You will see the value in the visible representation of the object change as soon as you press the ENTER key.
Don't worry about the properties of DecimalPlaces or MaxLength since those will be set automatically. You could set MaxValue and MinValue, if you wish, but that is not necessary in this tutorial.
As you scroll down the objects in the OI you will get to the TAS Pro section. The property we're concerned with here is the FieldName. This property will tell the object which field to interface to in your program. You don't have to put a field name into the object, but if you don't you'll have a much harder time getting the information in and out and none of the events will work.
Field Name Lookup
The easiest way to choose a field name is to click on the ellipsis (3 dots in a button) that will appear in the property entry block when you click on FieldName. Do that now and the screen below should appear.

Depending on the files in your data dictionary the first FD that appears may be different than the above. If you've put the SALES FD in to the data dictionary then click on the Data Files drop down box down arrow. A list of FDs will be displayed. Click on SALES and the following should be displayed.
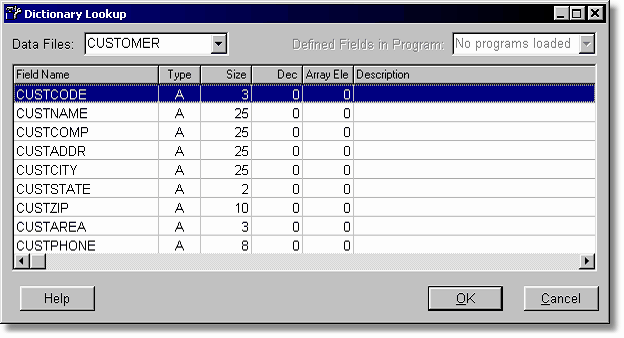
This first object is going to be connected to SONUMBER and it's already highlighted, so just click on the OK button. The field name will be automatically placed in the FieldName property.
NOTE: The next time you load the FieldName search editor the list will start with the FD you last searched. This will make putting a series of fields on your form much easier.
NOTE: Once you have chosen a field in this method you can have the editor automatically set the width of the entry object by double clicking on the Width property value. This is an approximation only. It may be wider than you need or not wide enough. But it will at least give you a place to start. If nothing happens either the field name can't be found or it's the correct size already.
With that we're now done with the first text and entry field objects on the screen form. Your form should now look something like this.
Now you need to put the rest of the objects on the screen form. The Labels are the easiest so we'll list those first. All you have to do is place them on the form, make sure they're in the right location, and enter the correct caption (use the list in the box below).

Next come the entry objects. Each object is given its own paragraph. We start with the object type and then list each of the properties and what you should set as their value. The properties are set in bold and the values are to the right of the equal sign. Any special notes will be given where necessary. In the sample screen below the default Text property values for each TASEnter object has been cleared. This is not required since those values will be cleared automatically when the file is opened and the screen is displayed.
| TASDateEdit: | Name=dateSODate YearDigits=dyTwo Left=400 Top=16 Width=88 |
FieldName=SODATE
| TASEnter: | Name=entSOCust Left=128 Top=64 Width=64 FieldName=SOCUSTCODE |
| TASEnter: | Name=entGLAcct Left=128 Top=112 Width=96 FieldName=SOGLACCTNUM |
| TASNumEnter: | Name=numAmount Left=128 Top=152 Width=96 FieldName=SOSALESAMT |
| TASEnter: | Name=entCustName Left=264 Top=64 Width=227 FieldName=CUSTNAME |
| TASEnter: | Name=entCustComp Left=264 Top=88 Width=227 FieldName=CUSTCOMP |
| TASEnter: | Name=entCustAddr Left=264 Top=112 Width=227 FieldName=CUSTADDR |
| TASEnter: | Name=entCustCity Left=264 Top=136 Width=227 FieldName=CUSTCITY |
| TASEnter: | Name=entCustState Left=264 Top=160 Width=24 FieldName=CUSTSTATE |
| TASEnter: | Name=entCustZip Left=296 Top=160 Width=91 FieldName=CUSTZIP |
| TASEnter: | Name=entAreaCode EditMask="!\(000\);0; " Left=392 Top=160 Width=39 |
FieldName=CUSTAREA
NOTE: This is the first time we used the EditMask property in a TASEnter object. The EditMask above tells the program to put parentheses at either end of the entry and, if the user enters anything, it must be a numeric character. The 0 after the first semi-colon tells the object not to save the parentheses, these are for entry only. There is a space character after the second semi-color. It's very important that you include this extra space. It tells the object to use the space character as the default input character. You must have some sort of character in this location, we chose the space character. For more information about the EditMask property refer to the help file.
NOTE: Please be very sure that there are no spaces before the leading "!" in the EditMask field. If there is your data will not display properly. If you use the built-in EditMask editor it may put an extra space at the beginning of the mask.
NOTE: Don't included the quote marks at the beginning and end of the EditMask property value. They are there strictly to show you the extra space at the end.
| TASEnter: | Name=entPhone EditMask="!000-0000;1; " Left=440 Top=160 Width=72 |
FieldName=CUSTPHONE
| TASNavigator: | Name=navSO Left=128 Top=200 Width=232 AfterActionFocus=numOrdNum ClearRecOnSave=Checked |
| TButton: | Name=btnExit Left=456 Top=200 Width=75 Caption=E&xit |
NOTE: To set the AfterActionFocus property above you must click on the drop down arrow in the property box. Then choose the numOrdNum object from the list (you'll probably have to scroll down the objects listed).
When you're done the screen should look something like this:
Saving the Sales Screen Form
The next step is to save this screen form to disk. Click on the Save button and, since this is a new screen format, the following dialog will be displayed.
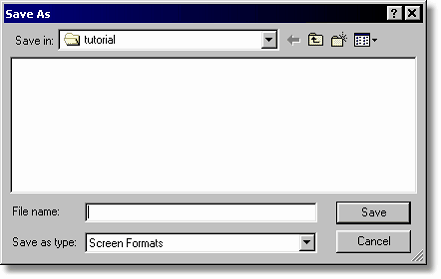
Enter SOEntry (upper or lower case does not matter) for the File name value and press ENTER or click on the Save button. The screen form will be saved to disk and the name on the tab will change to SOEntry and, if you look at the bottom of the editor screen, you will see the full path and name for this file. The extension for screen form files is .DFM.
You're done with the first part of creating this program, the screen form. The next step is to create the source file for the program that will work with the screen.
Creating the Screen Automatically (This features has been removed from the TAS7 IDE.)
There is a slightly easier way to create screens. Click on the New button to create a new screen form. Then, on the Main Menu at the top of the program, click on Screen Options. Next choose Add File Fields to Screen. The following screen should be displayed:
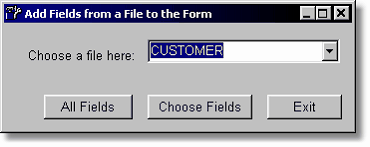
Enter the S key and click on the down arrow and the SALES file should be selected. If not, select the SALES file.
Since we want all the fields from the SALES file on the form you can now click on All Fields. If you wanted to choose which fields to add you could click on Choose Fields and a standard dual list choice box will be displayed, allowing you to specify which fields to add. If you choose All Fields the following screen should be displayed:
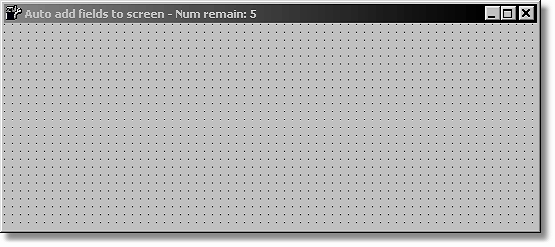
Notice at the top of the form the screen header now tells you you're in Auto add fields mode and the number of fields remaining to be placed.
There are two ways of placing fields. The first is to move the cursor approximately where you want the field and clicking the left mouse button. This will place a single field. The fields will be in the same order they are in the data dictionary.
The second method is to click the right mouse button. Starting with the mouse location all the fields will be placed on the form in order, one after another. The form below shows the result of this.
Now, all you have to do is move the fields and the labels to the correct location and enter the caption you want in the label name. The fields are sized approximately for the number of characters that can be entered so you don't even have to worry about that. In the two TASNumEnter fields you do need to set ButtonWidth to 0 to remove the buttons. The rest of the screen form design process is the same as you previously learned. This is just a short cut for adding the fields to the form. You may find it easier to start this way rather than having to add each field and label separately. Also, the objects are named in a standard fashion automatically, using the names of the fields.
Create the Program Source File
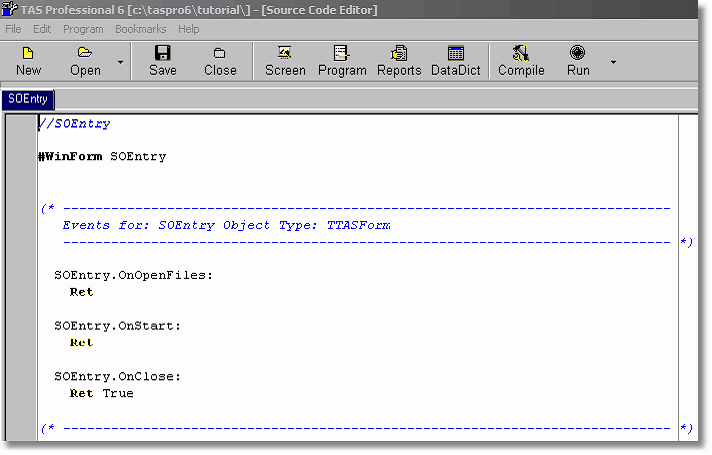
Once you have saved the screen form you can create a source file for that form easily and quickly. Click on Screen Options in the Main Menu. Next click on the Create Basic Source File. You won't see anything happen, however, a new source file has been created for this form. Click on the Program button and the screen below will be displayed.
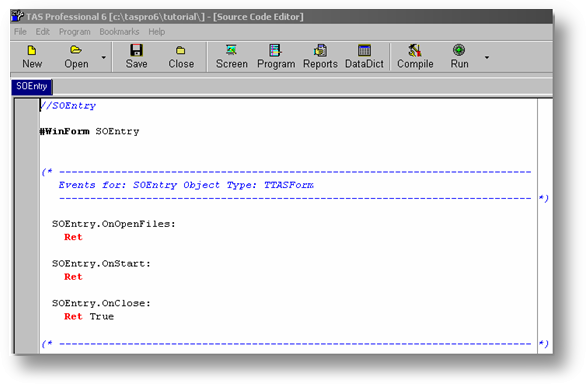
To better show the entries that have been made, just the source has been reproduced below.
On the right side of the screen you will see a tree listing of all the commands and functions for TAS Professional. As with a standard tree structure, some of the items (commands only) have a plus (+) sign to the left of the entry. If you click on this symbol the options for the command will be displayed.
If you double click on a command (or option, function, etc.) it will be inserted in your code at the current cursor location. If you double click on a command name that has sub-options, the entire command, including all the sub-options, will be inserted into your source file. You can then remove the items that you don't need.
The source editing form is very similar to a standard Windows® editor, except that the lines don't wrap when you get to a certain line length. Most of the features you would expect are part of this editor, including cut, copy and paste; drag and drop, etc. There are a couple of other options that are unique to a source code editor that you may not be familiar with, these are:
| Goto Line: | Each line in your source file has a line number. The numbering starts from 1 and the lines are numbered sequentially, including all blank lines, etc. The current line and column location are displayed in the left column immediately after the source editing area. To go to a specific line press the CTRL+G keys. A dialog box will be displayed and you can enter a line number. |
| Bookmarks: | You can put up to 10 different bookmarks in the source file. These are not saved with the source file, but, are active as long as the file is being edited. What they allow you to do is mark a specific line. Then you can return to that line by pressing the appropriate keys or choosing the bookmark from the Bookmark menu option at the top of the screen When you set a bookmark on a line a small block with the appropriate number (0-9) is placed in the gutter (space to the left of the editing area). |
To set a bookmark from the keyboard, press the CTRL+K+number keys where number must be 0-9. To return to the bookmarked line press the CTRL+Q+number key. To turn off a bookmark press the same CTRL+K+number keys you used to set it. Also, you can 'move' a bookmark to another line by doing the same on a different line than it was originally set.
| Undo/Redo: | If you make changes to the source file that you find you really don't want the easiest way to get rid of them is through the Undo feature. This option (along with Redo) is on the Edit menu. To undo changes from the keyboard enter the CTRL+Z keys, to redo (reverse the undo) enter the SHIFT+CTRL+Z keys. This is a very valuable feature and one you'll probably use often. |
| Find: | Standard Windows® find option. This is on the Edit menu. From the keyboard use the CTRL+F keys. |
| Replace: | Standard Windows® find and replace option. This is on the Edit menu. From the keyboard use the CTRL+R keys. |
| Lookup: | An option unique to TAS Professional is the ability to search for field names using the same lookup routine you first saw in the screen editor. This option is also on the Editor menu or you can enter the CTRL+L keys. The field lookup dialog is displayed. If you choose a field (double click on the field name or press the OK button) it will be inserted into the code at the cursor location. |
Convert Remarks: Remarks are messages to the future that you, or someone who might follow you, will refer to when trying to figure out what you were doing in a piece of program code. The more remarks you put the easier it will be to maintain or modify the program in the future. In TAS Professional there are two 'normal' ways of specifying remarks. If the remark is going to be short, a single line or less, you would use "//" (two forward slashes). Everything after the remark, on that same line, will be ignored when the program is compiled.
The second option is when you're going to have a remark that is going to take multiple lines. You can use the // remark at the beginning of each line or you can start the remark with "(*" (parenthesis + asterisk) and will continue over as many lines as you wish, until you put the closing characters which are the "*)" (asterisk + closing parenthesis).
In previous versions of TAS Professional the semi-colon (;) was the remark character, and that will still work in the compiler. However, the source editor doesn't recognize that as a remark. So, if you choose this option on the Edit menu, the editor will change all of the old remarks (;) to new (//).
Enter the Actual Code Lines
The actual code lines for this program are fairly simple. The code breaks down into four different sections; Form, Open Files, Finding Customers, Saving Records and Exiting the Program.
Form Section in Source Code
The screen forms (and report forms for that matter) are not incorporated directly into the final compiled program, for reasons we explained previously. However, you still need to tell the source code what the names of the screen and report forms are. This has two purposes; the first is during compilation the program will check the screen forms and will make sure that any field referred to by that form exists in the data dictionary or has been defined in the program. It also adds the field to the list of fields used in the program. The second purpose is, by the location of the screen form reference, it tells the program which screen should be loaded when the program is run.
NOTE: You don't need to have any screen forms at all in a program. For more information about this please refer to the Compiler Directive information in the help file, specifically the #FORCERWN directive.
This has been entered for us automatically already. The lines are:
//SOEntry
#winform SOEntry
If you haven't changed the defaults in the setup program you will notice that the comment is displayed in blue italics. This is to quickly give you a visual clue to the source line. If you don't like blue (or italics) refer to the Setup section in the help file for more information on how to change this and other options.
Next is the line that tells the source code to use SOEntry.DFM. Notice that name of the screen form and the source file (the comment above) are the same. This isn't required but you'll probably find it easier to maintain your programs if the screen and report forms use the same or similar names as the source file.
The "#" (pound sign) at the beginning of the line tells the compiler that this is a Compiler Directive. This isn't actual executable code but is a directive or reminder to the program of something that has to be done. In this case, this is the screen form that needs to be checked and loaded when the program is run (since it's the first screen form listed). Generally, even if you have multiple screen forms, you should list them at the top of the source file. Then you will always be able to quickly and easily check which files need to be included with the finished run program.
The "winform" is a particular directive, which tells the compiler that the next item on the line is a name of a screen form. Always put at least one space between winform and the screen form name.
Next is the screen form name of "SOEntry." Notice that there are no quote marks around the screen form name. This is what we call a "special alpha constant." They are used throughout TAS Professional in different commands. Most commands allow variables to be used and, in that case, you would've put the name surrounded by single or double quotes. However, in this case, the compiler wants the actual name, not a variable. Notice also that you don't include the path or extension. The compiler assumes both. You should always have the screen form file in the same subdirectory as the source file. And, when you run the program, you would have the screen form file in the same subdirectory as the compiled program.
Open Files Section in Source Code
Next we're going to open the appropriate files, CUSTOMER and SALES. Each screen form has four different events that can be called at different times. Two of them are executed when the screen is first displayed by the program. These are the OpenFiles and OnStart events. Events look for line labels in your program that match either what you've entered, in the case of screen forms, or a combination of the object name and event type in the case of most other objects.
The automatic source creation process added three of the four events automatically. The only one not included, OnDisplay, is generally not used and can cause strange results if you're not careful.
NOTE: For each object there is a section of the help file for that object that defines what events are available and how they are used and referred to.
In this program we are concerned with only the OpenFiles event. So, you can either ignore the OnStart and OnClose or you can delete them from the source code.
The OnOpenFiles event we want to add more code. These commands will be added between the line label (defined below) and the RET command.
SOEntry.OnOpenFiles: <- This is already in the source file.
define cust_hndl,sales_hndl type i
openv 'customer' fnum cust_hndl
openv 'sales' fnum sales_hndl
navigator 'navSO' fnum sales_hndl key sonumber
ret
The first line is the actual line label. It starts with the first non-whitespace character (whitespace characters are spaces, tabs, etc., anything that doesn't print) and continues until the colon (":"). The colon is not part of the line label but does specify that what comes before is a line label.
The define command creates two temporary fields, cust_hndl and sales_hndl, that are active while this program is run. We'll use these two fields to refer to the files elsewhere in the program. Typically these types of fields are defined as type I or integers.
The next two lines are the actual file open commands. These tell the program to access these files and get them ready to be used.
The next line is a special command that links one of the files that was just opened to the Navigator object on the screen form. By setting the fnum (or file number) and key value, in this case you want to use SONumber, when the user clicks on one of the navigator buttons the appropriate record will be found.
The most important line is the last. You must always return from an event or a subroutine with a RET, ALWAYS! The best way to remember this is to imagine that through the screen form the user controls the program (this is also known as Event Driven Programming). If you don't return (RET) from a subroutine the user will never gain back control. Sometimes you may want this to happen, however, if the user doesn't have control they can never exit the program, will get very frustrated, will start hitting CTRL-ALT-DEL, etc. Then you'll get called. So always try to keep your subroutines as short as possible and always, always return.
To complete this event you need to save the label name in the screen form. So, click on the Screen button. If you have already closed the screen form, for whatever reason, it's really easy to get it back. Click on the down arrow right next to the Open button. A list of recently opened screen form names should be displayed. Your SOEntry file should be at or near the top. Just click on that name and the screen will be loaded.
When you click back to the Screen section, or load a previously saved screen form, the form itself is active in the OI. If it isn't, just click on the form background (anywhere there isn't another object) and the form will be active.
Near the bottom of the properties for the form, in the TAS Pro section, you will find the property OpenFiles. In the entry field for that property should be SOEntry.OnOpenFiles. This was placed there automatically by the Create Source File routine. However, you can change this value at any time. Just remember to change it in the source file also.
NOTE: If you make changes to the screen form don't forget to click on the Save button. Changes made to a form are not saved until you click on the Save button. Nothing will happen to the form but the appropriate event will be called when the program is run. If the form has been modified the name of the form in the tab will be highlighted.
NOTE: If you should find that a subroutine is not called when you expect it to be make sure you have the event name correct, and, in the case of forms, that you have saved the event label name in the form, itself.
This is it for the OpenFiles section. Don't forget, if you have questions about the specific commands that we use please refer to the help file. You can search for any command using the command name as provided here.
Find Customers in Source Code
Each time the user enters a customer code (SOCustcode) you will want to find the corresponding record, if it exists, in the CUSTOMER file. This is very easy to accomplish.
Leave a couple of spaces after the last section and enter the following lines:
entSOCust.Change:
findv m fnum cust_hndl key custcode val SOCustcode
ret
The most important part of the code section above is the label at the beginning. This is a very good example of a standard event label. This one will be called each time the user makes a change to the field value. If the standard entry to this field was very long, or if there were lots of fields on the screen, you might do this a different way since each time the user enters a character this routine will be called. However, in this case there's only 3 characters that can be entered, and it will make a very large difference in the rest of the program. For example, each time the user finds a record using the Navigator the CUSTOMER record will be updated automatically.
The makeup of this label is very simple. The first part is the object name, in this case "entSOCust". The second part is the event name, in this case "Change". Between the two parts is a period ("."). At the end of the label is the standard colon (":") that defines this as a label to the compiler. This is standard event label notation and, except for changing the object name or the event name, is exactly how you will start event routines in your code.
The next line is the actual find. It tells the file manager to find a record in the file using the file number represented by the variable CUST_HNDL, this value was set in the OPENV command, and the key CUSTCODE. It needs to find the exact match using the value in SOCUSTCODE. If no record is found, no error will be displayed.
As with the previous subroutine, send control back to the screen form with the RET command.
If the record is found the CUSTOMER fields on the screen form will be automatically displayed. You do not need to do anything else.
Exiting the Program
The last section of code we're going to create is the part that tells the program to quit when the user clicks on the Exit button. You really didn't need to include this, or the button, since the user could click on the standard Windows® close button in the upper right corner. However, most "standard" programs have such a feature so we've included it here.
The code, as the others, is very simple and is listed below:
btnExit.click:
quit
ret
The event label is in standard format. In this case, the event is "click". This is the only event for the Button object.
The next line tells the program to quit or exit. And, of course, there's the RET command to return from the event.
NOTE: If you are familiar with previous versions of TAS Professional you will be used to the QUIT command. However, it was the last command in the procedure since once that command was executed everything else stopped. In TAS Professional this is a perfect example of the switch to event driven routines. In this case, the QUIT command sets certain flags, but, until you return from the event, nothing is done. If you don't return, the program won't quit.
Saving the Source File
When you get here the program should look similar to the following:

The next step is to save the program to disk. As you did with the screen form, click on the Save button. However, since you have created this program from the screen form it has already been named and will save automatically to that file name
Compiling the Source File
Before a program can be run in TAS Professional it must be compiled. The compiler checks to make sure all commands are correct, that fields not in the data dictionary have been defined, etc. It also puts the programs into a special format that allows the runtime to execute it faster and your source code is protected if you don't want to release it to the user.
To compile the program click on the Compiler button. The following screen should be displayed:
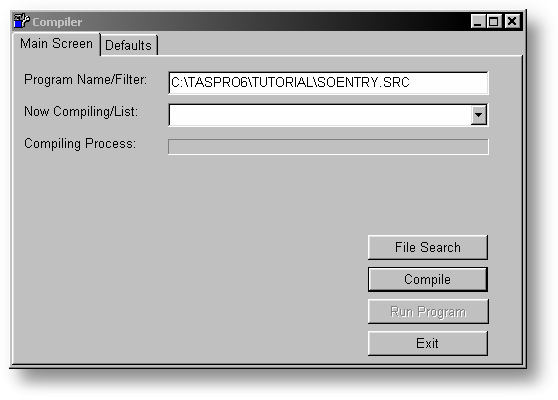
You can just press the ENTER key since the Compile button is set as the default. After the process is complete a message announcing that will appear. Press the ENTER key or click on the OK button.
A new tab will appear between Main Screen and Defaults. If you entered the code correctly it should say No Errors. If you didn't, and the compiler found an error, it will say Errors. If it does please click on that tab and you should be able to find what went wrong quickly. Fix it and recompile the program.
Once the compiler has successfully compiled the program the Run Program button will be set as the default. Again, press the ENTER key or click on the Run Program button. When you do, you should see basically the same screen you created without the dots on the screen form itself. And, the cursor should be in the first field.
NOTE: If the cursor is not in the Order Number field then you probably created the objects in a different order than we had above. No problem, just refer to the Tab Order Property Editor in the help file. It explains how to rearrange the entry order of the objects on the screen form.
Enter 101 for the Order Number and press ENTER. Click on the button to the right of the Date entry field. A calendar will be displayed with today's date highlighted. Click on the button again and the date will be set to today's date. Press the ENTER key and the cursor will move to the Customer Code field. Enter 002, press the ENTER key, and the customer information for William, Ralph V. should be displayed. Enter 500 for the G/L Acct Num and press the ENTER key. Enter 150.99 for the Amount and click on the Save button in the Navigator (looks like a check mark).
A couple of things to notice; first the SALES fields clear along with the CUSTOMER fields. If you hadn't checked the ClearRecOnSave property in the Navigator this wouldn't have happened. The other is the cursor returned to the Order Num field. Again, what you want specified by the AfterActionFocus property.
If you click on the First button in the Navigator (far left) you will redisplay the record you just saved. Even the CUSTOMER information will redisplay. This was due to the Change event we included for the Customer Code field above.
Let's say that the user wants to add a new customer. This would be a logical place to do so, but the program will save only the SALES information when they click on the Save button. Let's add the code to your program that will update the CUSTOMER file also.
Saving Changes to the CUSTOMER file
The user will save records by clicking on the check mark button in the Navigator bar. However, this will save just the record in the file that's attached to the object via the NAVIGATOR command. So, it's up to us to save the record in the CUSTOMER file via code. Fortunately, the Navigator object has an event that will let us know each time the user clicks on the save button, it's the SAVE event. The following lines will handle what's needed:
navSO.save:
custcode = socustcode
save @cust_hndl nocnf
ret true
The first line is the standard event label, in this case the Navigator name is "navSO" and the event is "save" and we've separated the object name from the event with a period ".".
The next line makes sure the customer code value in the CUSTOMER file matches what you entered for the SALES file. If you find an existing record then both values will already be the same. However, with this line here you will now be able to save new records in the CUSTOMER file.
The next line tells the program to save the record in the file represented by the file number in "cust_hndl". It also tells the command to not ask the user to confirm this save (nocnf). If this option were not included the user would get two "Save?" questions, one from the Navigator object itself, and one from this save command.
NOTE: You can even eliminate the "Save?" question from the Navigator object by going back to your screen form and clicking on the Navigator bar. Look at the properties in the OI. One of them is "ConfirmSave" and has been checked. If you un-check that property the user will never see a "Save?" question. Don't forget to save the screen form if you make a change. When you make changes like this you don't need to recompile the program! However, if you don't save the screen form the program won't know the change has been made.
The last line in this code section is a variation on the standard event return command. In this case we're actually returning a value of "true". This is what's called a Boolean value. Boolean values have only two possibilities, True or False. In the case of events that expect a Boolean value returned, generally the True value tells the event to continue, the False value tells it to stop, or not continue. If an event expects a return it is documented in the help file for that object. If you do not include the True or False value the event will act as though you returned True.
In this case always return True, since you aren't using this event to check whether or not to save the record, it's being used to save the record in the CUSTOMER file.
It doesn't matter where you put this routine in your code. You can add it to the end, or put it before the Exit routine, what ever you wish. Location is strictly dependent on what works best for you, since each routine is considered almost like a separate program
NOTE: If the user answers No to the original save question from the Navigator we'll never get to this event.
Since you've already saved the source file once you can let the compiler do that for you from now on. Just click on the Compiler button. The correct source file name should automatically appear in the program name entry box, and press the ENTER key to compile the program. Before the compiler actually does its work it checks to see of the source file is active (which it is) and if it's been modified (which is has) and saves the file back to disk before it's actually compiled. So, this saves you the work of saving the program before it's compiled. Unfortunately, this doesn't apply to screen forms. You have to save those yourself.
NOTE: Each time you run a program by clicking on the Run button or from the Compiler you create a new copy of the runtime. Don't worry, this will not occur when running directly out of the runtime as your users would, only during your development stage. However, you want to make sure you exit out of the program before your recompile, etc. or you could end up with multiple copies of the same program running. You will always be able to tell since a new button would appear on your start bar that has the TAS Professional icon and the title of TAS Pro Runtime. Should you "lose" the program by clicking on the source or screen editor you can always get it back by clicking on the button in the start bar.
You can now check your changes by running the modified program. You should be able to make changes to the existing CUSTOMER data and, when you save the SALES data, you will also save the CUSTOMER data. When you call it up the next time the changes should be there.
You can check this by clicking on the Find First button (far left) in the Navigator. It should display the Sales Order #101 and all the appropriate data, including the CUSTOMER data. Let's assume the customer moved to a new office in the same building and their address has changed. Click on the Address line (after the Company Name) and change that to 204 Maple Lane. Again, click on the Navigator Save button and answer OK to the save question. Call the record up again and you'll see the Address value has changed.
Further Modifications to the SOEntry Program
Let's make a couple of other changes to the screen form and the program. If you don't have the screen loaded then click on the Screen button. Then click on the down arrow to the right of the Open button. A list of screen forms you have edited should appear. At this time it's probably just the single screen SOEntry. Click on the appropriate file name and the screen will be loaded into the editor.
The first change to make is to have the date field default to today's date. Click on the Order Date (dateSODate) object. In the OI find the property DefaultToday. Click on the check box to the right of the property name (if it isn't checked already). Now, the next time you run the SOEntry program the date will default to today without any other entry.
Now click on the Order Number (numOrdNum) object. You're going to make three changes to this one. The first is to give the user some idea of what this entry is for. We'll put that in the Hint property. Click on the Hint property (in the Hint section). Then click on the ellipsis button (has three dots in it). The text editing dialog will be displayed. Type in the following:
This is the number that will be used when referring to this order.
When you're finished the text edit dialog should look like this:
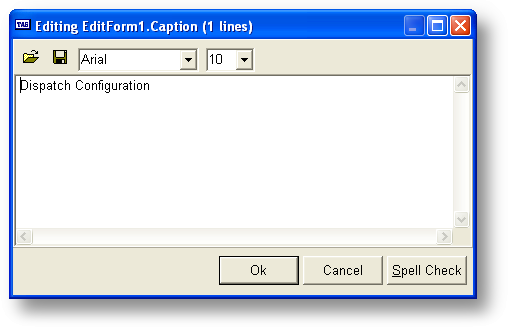
Click on the OK button to save this back to the property.
Next click on the check box in the ShowHint property. Even though you have entered a Hint above it won't display unless you set this property to checked. It will automatically turn the ParentShowHint off, don't worry about that.
Next, scroll down until you get to the ValidExpr property. In this property entry box add the following line:
SONumber<>0
As with other code, upper or lower case don't matter. What this expression will do is check to see if the SONumber, the field attached to this object, is 0 or something else. If it's 0 the expression returns False, if it's something else (anything but 0), it returns True.
In the ValidMsg property click on the ellipsis button, just like you did with the Hint property. In the text editing dialog enter the following:
You must enter a number here. This cannot be zero.
Again, click on the OK button to save the message to the property. This will display when the VALID_CHECK() function returns False. We're going to add that function to the source file.
Now save the screen form to disk by clicking on the Save button. This is very important since the compiler will not be able to see the new ValidExpr property value unless the form is saved. You might also want to close the form since it will be updated by the compiler and you don't want to save the 'old' version over the 'new' version the compiler creates. See the ValidExpr property in the help file for more information.
Now, click on the Program button. As with the screen form, if the program is not loaded you can load it by clicking on the down arrow next to the Open button and then choose the appropriate source file.
Immediately after the navSO.Save line insert the following line:
if .not. valid_check() then ret false
This line will execute the VALID_CHECK() function, and if it returns False (one of the ValidExpr property values returns False) then it will exit the save subroutine and neither of the files will be updated (by returning False from the subroutine it tells the program to not save the record in the SALES file also). If a ValidExpr evaluates to False the ValidMsg for that object will be displayed and focus will return to that object, forcing the user to enter something other than 0, in this example. The new save subroutine should look like this:
navSO.save:
if .not. valid_check() then ret false
custcode = socustcode
save @cust_hndl nocnf
ret true
Compile the program, as you did previously, and run it. Now, if you put the mouse cursor over the Order Number entry field and stop for a moment, the hint you entered above will be displayed. This is a typical Windows® response and one your users will expect to see.
Now click on the Save button in the Navigator (check mark) while the Order Number value is 0. You will get the message you entered above as the ValidMessage and the cursor will return to the Order Number field.
What's important about this? The use of the ValidExpr property/VALID_CHECK() function gives you a quick and easy way to check all important fields at one time without having to remember each and every field. In previous versions of TAS Professional you could force your user to stay in the field until a proper value was entered. With the change to an event driven system you want to give your user as much flexibility as possible. You can use the VALID_CHECK() function anywhere. If there are multiple ValidExpr's to check the program will check each one. If multiple fail the user will be returned one at a time to fix them before continuing. This is an important feature of TAS Pofessional and one that you'll probably use very often.
The last item to notice is that the date field now has today's date in it when you load the screen form instead of 00/00/00.
We've still got one missing feature. What if the user wants to find the order in a group of orders? Let's put together a quick lookup.
Add a Lookup Grid to the Sales Program
The first step is to create a new screen form. If you aren't in the screen editor then click on the Screen button now. Then click on the New button to create a new screen form. Make the size of this form 296 pixels high (ClientHeight) and 552 pixels wide (ClientWidth).
While you're on the form we'll make a couple more changes. These are:
Caption=Sales Order Lookup OnStart=SOLookupStart
Note that a line label is included for the OnStart property for this screen form. Why not just use START, since it's the default? To keep the program from calling the same subroutine for two different screen forms, unless you want it to, the program defaults to START only for the first screen form. All subsequent forms have to specify an OnStart line label, which has been done here.
NOTE: While you're placing objects on the screen form you may exceed the edges of the form and scroll bars will automatically appear. Just make the form larger and then return to the correct size and the scroll bars will disappear, also automatically.
Place a TASNumEnter object on the form at the location Left=8 and Top=8. The Width should be 80. This is going to be our FastSearch™ field. The rest of the property entries are:
Name=numOrdLU DisplayFormat=0 FastSearchType=fsRec
We don't have to assign a field to this object since it's only going to be used as a FastSearch™ field.
Next drop a TASDataGrid object on the form. The general properties are as follows:
Name=dgSOLookup Height=216 Left=8 Top=40 Width=536 FastSearchFld=numOrdLU
Click on the + next to the Navigation property name. Now check the box next to the AdvanceOnEnter subproperty. You can click on the next to he Navigation property name to close up the subproperty options.
By setting this subproperty you tell the program to do an automatic select if the user is entering characters in the FastSearch™ field and presses the ENTER key.
Now display the Option subproperties by again, clicking on the + next to the property name. Check the box next to the goDrawFocusSelected subproperty. You might experiment with this option. If you check this box a complete selection bar will cover all columns in the grid for a single row. If you don't check this box, the selection bar will start with the second column and the first column will appear differently. Try it and decide which one you like best. Always make sure this option is checked.
We now need to add the columns to the grid. To do this click on the Columns property and then click on the ellipsis button that is displayed. A special column editor will appear. It should look like this:
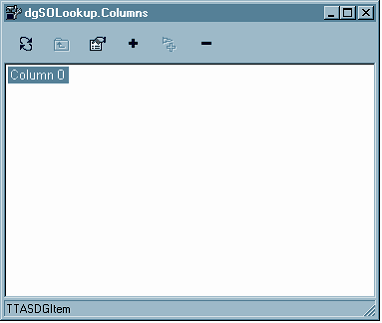
A full explanation of this property editor is in the help file.
When the property editor appears it is already on column 0 (first column in the grid). The property value entries for this column are:
Alignment=taRightJustify Name=SONum Header=Ord Num Width=78 FieldName=SONUMBER
As you modify these properties you'll see the appropriate changes to the grid, including header and width. We actually want five columns total in the grid so you need to add four more. To add a column click on the + button at the top of the column property editor box. Do that now. Column 1 should appear in the box and a new set of properties in the OI. For each column listed below don't forget to click on the + button to add the column to the grid.
NOTE: If the Alignment property is not given it should be taLeftJustify, which is the default value.
Column 1: Alignment=taCenter Name=SODate Header=Ord Date Width=76 FieldName=SODATE
Column 2: Name=SOCust Header=Cust Code Width=83 FieldName=SOCUSTCODE
Column 3: Name=SOCustName Header=Cust Name Width=111 FieldName=CUSTNAME
Column 4: Alignment=taRightJustify Name=SOAmt Header=Ord Amt Width=82 FieldName=SOSALESAMT
When you are finished creating the columns click on the close button at the upper right corner of the property editor. The properties in the OI will disappear until you click on one of the objects in the screen form (or the form itself).
When this form is loaded you will use the LOAD_MODAL_FORM() function. A modal form, in Windows® parlance, is simply one that remains active until the user does something that closes the form. To do that, you have to send a modal response to the form. This can be accomplished in two ways; you can use the SET_OBJECT command or include one or more buttons on the form that have their ModalResult value set. Then, if the user clicks that button it will send that value back to the form and the form will exit without any further action on your part. So, the last objects you're going to put on the screen form are two buttons.
| Button: | Caption=Select Name=btnSelect ModalResult=mrOK Height=25 Left=376 Top=264 Width=75 |
| Button: | Caption=Exit Name=btnLUExit ModalResult=mrNO Height=25 Left=464 Top=264 Width=75 |
When you're finished the form should look like the following:
The last step is to save the form. As with the SOEntry form click on the Save button and enter SOLookup for the file name.
Next you're going to give the user a way to call this form. You could put a button on the SOEntry screen form but this tutorial uses a different option. If the SOEntry screen is already loaded then click on the tab for that screen form. If it isn't, then load the screen form as previously described.
Click on the Order Number (numOrdNum) object. Look at the TAS Pro section in the OI. One of the properties is KeyTraps. Click on the property and then click on the ellipsis button. A Key Traps property editor will be displayed. As with all other property editors this is documented in the help file.
You're going to add a key trap to this form. Then, when the user presses the appropriate key (in this case F2), the line label you specify will be called in your program, just like a normal event.
Click on the box (also known as a cell) in the Trap Name column. A drop down box arrow should appear. You can either enter F2 directly or click on the drop down arrow and a list of available Key Trap Names will appear. Press the ENTER key and the cursor will move to the Label Name column. Enter SOLOOKUP here. The property editor should now look like the following:
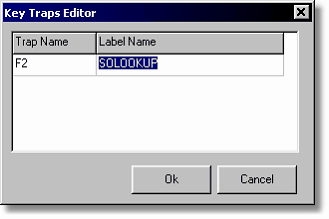
Click on the Ok button and you should see F2|SOLOOKUP in the KeyTraps property box. Next, click on the KeyTrapHint immediately above. Again click on the ellipsis button and, in the text property editor enter the following line:
Press the F2 key to lookup existing orders.
Click on the OK button to save it, click on the Save button to save the form, and you're finished with the screen changes.
Click on the Program button, and, if the SOEntry source file is not loaded, do so now.
You need to put the code in your program that will be executed when the user presses the F2 key. The following will do just that:
SOLookup:
if load_modal_form('SOLookup')<>mrOk
clr @sales_hndl
clr @cust_hndl
endif
ret
The label is the same you entered in the Key Traps editor. The LOAD_MODAL_FORM() function loads the SOLookup screen form and will not return until the user either selects one of the available order records or clicks on the Exit button. The IF command compares the returned value and, if it's not mrOK (the user clicks on the Ok button or presses the ENTER key) the records of both files are cleared before the user returns to the calling screen form. As with other event routines this one also ends with a RETURN command.
The next subroutine you need to add is to "turn on" the lookup data grid. This must be done before any records will be displayed. To accomplish this add the following lines:
SOLookupStart:
wlistf 'dgSOLookup' setup fnum sales_hndl key sonumber
ret
The line label is the same one you specified in the OnStart property for the SOLookup screen form. The WLISTF command is used in connection with the data grid when you are accessing records from a data file. This is in the OnStart event so that the grid will be active when the lookup screen form is displayed.
The last subroutine you have to add will be executed if the user presses the ENTER key. All it does is set the Modal_Result property to mrOK. The GET_FORM_NAME() function is included as part of this command line since we don't know the name of the screen form like we do for the other objects. Add the following lines:
dgSOLookup.Select:
set_object get_form_name() property 'modal_result' value \ mrOK
ret
NOTE: The SET_OBJECT command line is continued on a second line due to the width of this page. However, you will probably find that the command fits on a single line. The line extension symbol ("\") is included here for accuracy only.
There's one last change that needs to be done. There's data from both SALES and CUSTOMER files in the lookup grid. The grid knows about the SALES file from the WLISTF command, but nothing about the CUSTOMER file. So, you need to tell the program to get the appropriate record in the CUSTOMER file for each record in the SALES file. If you remember, you've done this already. Look at the routine that is called when the SOCustCode field changes. This will not have any effect here, due to a number of technical reasons, however, you can use the same routine. All you have to do is put an extra line label before the routine. Change the entSOCust.Change routine so that it looks like this:
dgSOLookup.Display:
entSOCust.Change:
findv m fnum cust_hndl key custcode val SOCustcode
ret
What this tells the program is to call the same routine for both the Display event for the lookup grid (dgSOLookup) and the Change event for the SOCustCode field (entSOCust).
NOTE: Line labels are not true executable commands. They are just pointers to a specific location in the program. This means you can put as many line labels as you need at the beginning of a subroutine. Each one will start with the first executable line after the label.
Your modifications are now complete. Save and compile the program by clicking on the Compile button. When the compilation is complete, and assuming you don't have any errors, try running the program.
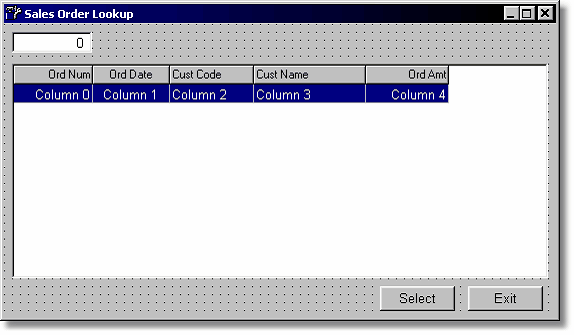
With the cursor in the Order Number field press the ALT-F1 key. The KeyTrapHint that you entered should be displayed. Press the ENTER key, or click on the Ok button, to clear the message. Now press the F2 key, the lookup screen should be displayed. An example is displayed below (we have entered a couple of new records in the SALES file):
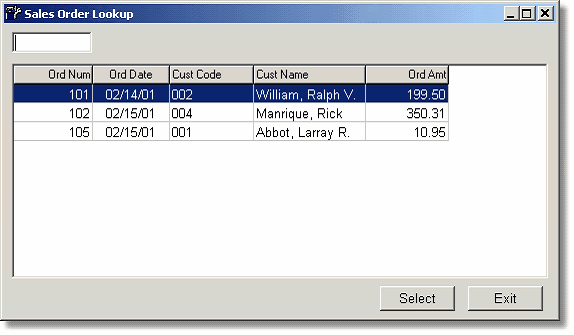
The cursor should start in the FastSearch™ field. If it doesn't then edit the Tab Order and make sure the numOrdLU comes first.
As you enter an Ord Num value the selection line will move to the appropriate record. Then if you press the ENTER key the lookup screen will disappear and the chosen record will be displayed in the SOEntry screen.
This completes part 3 of the tutorial.
Next Chapter Part 4 - Creating a TAS Professional Report
Page url: http://www.cassoftware.com/tas/manual/part3_creatinganewsales.htm