|
Part 1 - Creating a Database |

  
|
|
Part 1 - Creating a Database |
|
PART 1 - CREATING A DATABASE
In this section you will create a Customer data file using the Maintain Data Dictionary option from the Program menu (Program is one of the menu choices at the top of the screen see below).
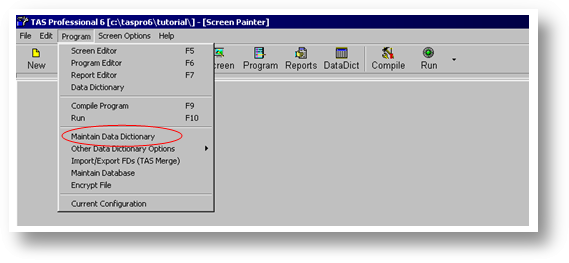
NOTE: To make a menu choice you first click on the header, in this case Program, and then enter the appropriate choice character (the character that is underscored), or click on the menu option line.
All TAS Professional files must be 'defined' in the Data Dictionary before it can be accessed by any program. This will tell the program how many fields there are, the type and size for each field, and what fields, or group of fields, are to be used as keys (or indices).
Using the Maintain Dictionary Option
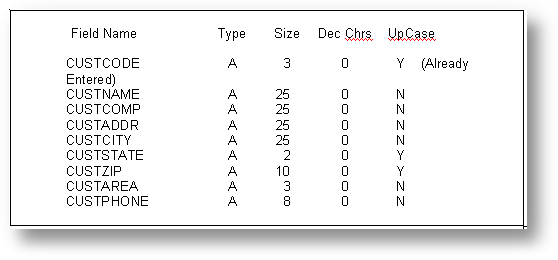
In this example you will create a database to manage the following information about your customers:
1. Code 7. Zip
2. Name 8. Area Code
3. Company 9. Phone Number
4. Address
5. City
6. State
You will use the Maintain Dictionary option to create a database with these 9 data fields. When you are finished you will have a working database. You can then add records to it. You can also change, delete or search for records and use these fields in programs or reports you create.
If you have chosen Maintain Data Dictionary from the Program menu as described previously the following screen will be displayed.
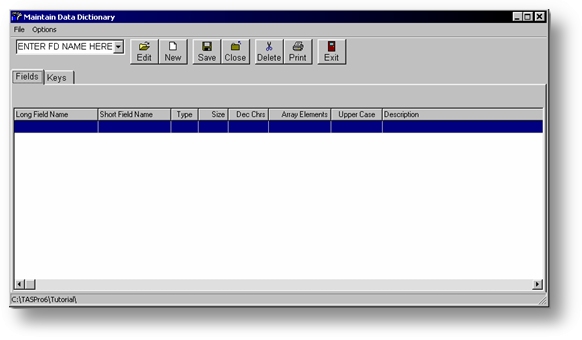
Click on the New button. The following screen will be displayed.
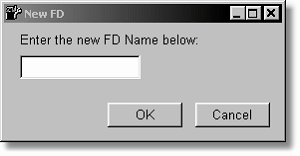
In the entry space highlighted above enter the FD name: CUSTOMER. Then click on the OK button. This is the name of the structure for the file you are creating. Through the use of the Data Dictionary you can have multiple files that use the same structure, also known as the File Descriptor (FD). In most cases, however, you will always have a file that has the same name as the FD. This isn't required but is easiest when trying to remember the FD and/or file name. In this case you will use the same name for both.
NOTE: If you have already started this process and want to edit the FD again, or add to it, enter the name in the main screen (where it says ENTER FD NAME HERE) or click on the drop down button and choose it from the list displayed. Then click on the Edit button and the current FD information will be displayed.
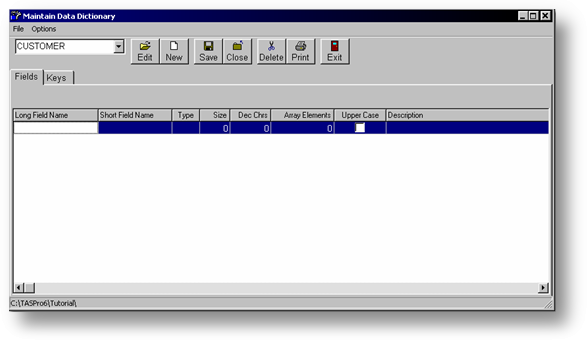
Since you're just entering a new FD there are no lines currently displayed. To enter new lines for this FD just click in the first column of the grid (the Long Field Name column). Type in CUSTCODE (the first field in this FD) and press ENTER. The cursor will automatically move to the Short Field Name column.
NOTE: The CodeBase data manager uses a standard DBF type format. This format restricts the field names to 10 characters, where TAS Professional uses a standard 15 character field name. To avoid having to reduce the number of characters in all fields to 10 we provide you with the capability to specify a long (15 character) and short (10 character) field name. If you plan on accessing the DBF files using programs other than TAS Professional you should use a name here that means something to you. These won't be used in your programs.
If you want to enter a short field name that will mean something to you in the future than do so now, otherwise just press the ENTER key and the program will automatically fill in this column.
The next entry is the field type. To get a list of the choices available click on the drop down button. The available types are A - Alphanumeric, N - Numeric, D - Date, T - Time, L - Logical, B - Byte, I - Integer, R Record, M - Memo. Since this field may contain any printable character including numbers, letters, and symbols, enter A for alphanumeric.
Next you will enter the field size. Type 3 and press ENTER. This will make the field 3 characters long.
Next is the number of decimal characters. Because this field is type A (alphanumeric), it is bypassed automatically.
The next entry is the number of array elements for this field. For this field it is 0 since you're keeping just one customer code for the record.
NOTE: A word about arrays. An array allows you to keep multiple values of the same type using the same field name and changing just the element number. This is useful when keeping track of certain types of information, for example, sales by month. You might have an array called MONTHLY_SALES with 12 elements. Element 1 (corresponding to the sales for month number 1) would be MONTHLY_SALES[1], element 2 - MONTHLY_SALES[2], etc. to element 12, MONTHLY_SALES[12]. Since you can use any legal TAS Professional expression as the element specifier (the value within the square brackets), this becomes a very flexible way of accessing field values. For example, using the same field as above the amount of a sales order might be saved in the monthly sales field as follows:
MONTHLY_SALES[month(date())] = TOTAL_ORDER_AMT
This would save the value of TOTAL_ORDER_AMT into the element of MONTHLY_SALES that corresponds to the month of the current date. (date() returns the current system date and month() returns the month number (1-12) of a date value. In this case TAS Professional first gets the current system date and then the month number of that date. This is then used for determining the element number in MONTHLY_SALES. If the date is August 10, 1992 then the element number is 8).
The next entry is Upper Case. Since this is an alphanumeric field you can force the entry to all upper case characters only. Since this is a code that you will be using to search for customers you will want to make sure that all characters are entered in upper case. The codes: abc and ABC are not the same to a computer. You might not check all the possibilities when searching for the customer and the code 'abc' would come after any ZZZ codes so you might not even see it in a list. To force the field to upper case you can either click on the check box or press the space bar, both will put a check mark in the box.
You can then enter a 40 character description for this field. This is to help you document the fields within the FD.
After you press the ENTER key at the Description field the program will move to the next line in the grid.
NOTE: If you made an error or if you want to change something, you can go back to that line by click in the appropriate row and column. You can also press the ESC key to exit the editing mode and then the UP and DOWN ARROW keys will allow you to move around the grid. You can make any changes to an FD as desired without concern since you will be allowed to decide whether to keep any changes made at the end before the program updates the data dictionary.
The program automatically moves to the next line. In this case, since you are entering a new FD, the cursor is again at the end of the list. At this point you're ready to enter the next field. Use the field specifications in the following table for the rest of the fields in the Customer data file. (The Array sizes are 0.)
NOTE: It is very easy to manipulate grid lines. To insert a new line press the ESC key to exit editing mode. Then press the INSERT key. A blank row will be displayed immediately above the current row. To delete a row again press the ESC key to exit edit mode and press the DELETE key. To return to edit mode all you have to do is press the ENTER when the cursor is in the appropriate column.
Entering Keys for CUSTOMER Database
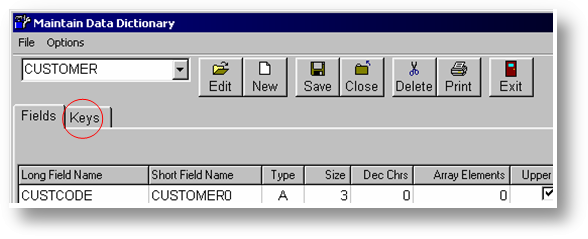
After you have entered the rest of the fields you are now ready to specify the key fields. Key fields are used to determine the way a database or file is searched or sorted. To enter the keys click on the Keys tab as shown above.
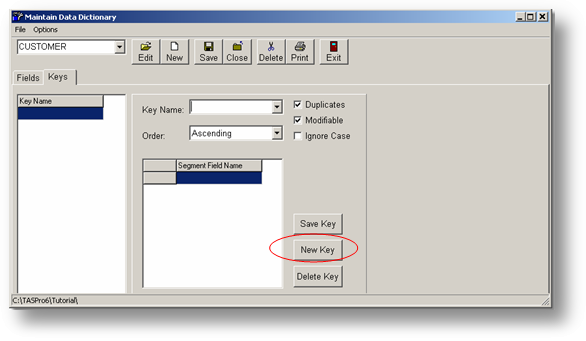
The program will display the screen above. Click on the New Key button to add a new key. This will set the Order to default to Ascending, Modifiable and Duplicates will both be set to True (there will checks in the boxes next to the option) and Ignore Case will be set to False (no check in the box).
The first step is to enter the key name. For this first one enter CUSTCODE.
NOTE: The key name does not necessarily have to be the same as a field name; however, if there is only one field as a part of the key you should use the field name. You can click on the drop down button to get a listing of fields for this FD.
The next entry is whether the key will be sorted in Ascending (increasing) or Descending (decreasing) order. Normally this would be ascending. In this case press the ENTER key to accept the default.
If you don't care whether or not a key value changes after the initial entry the Modifiable option should be checked. Press the ENTER key to move to the next option.
This next field, Duplicates, can restrict whether or not duplicate keys can be saved. Since this is the customer code you don't want to allow duplicates press the space bar or click on the check box to set this option to no duplicates allowed. Press the ENTER key to move to the segment entry grid.
NOTE: When the cursor moves to a check box the description (or, if there is no connected description the box) will be surrounded by a dashed line. If you want to check (or un-check) the box you have two options; you can click on the box with the mouse, or you can press the space bar on your keyboard. Both will reverse the current setting for the check box. When a check box is set (checked) the value associated with that box is either "Y" or True. When it is clear (un-checked) the value is "N" or False.
Then comes Modifiable. If you set this flag to False (the box is not checked), then the user will not be able to make changes to the index field once it has been saved. In this case we want to allow changes, so leave this box checked.
Press the ENTER key again and you will come to the Ignore Case flag. If you check this box then when the record is saved the program will set the index field(s) into upper case before the index itself is updated. This has no effect on the actual field, just the index. However, by setting the index into all upper case characters the records will sort as though the user entered all upper case characters. This will also make searching for the record by this index much easier. The user won't have to remember which characters are upper and which are lower case. We use this feature for the CUSTNAME index. NOTE: This only works for CodeBase type files.
Any TAS Professional file may have up to 24 different key segments. That may be 24 keys each with only 1 segment or 1 key with 24 segments. To search a file using a different method (or field) requires that you have different keys. In this case you will end up with 4 different keys, each with only 1 segment. Determining how many keys to have and how many segments will make up each key is up to you. However, we recommend that you use a few keys as possible and keep the size of each key as small as possible. This will keep the file access fast.
NOTE: If you have more than one segment in a key it sorts in the following manner: The first field is used as the primary sort and then the file is sorted further by the following segments. For example, you might have a key with two segments; the first is the customer code and the second is an invoice date. If you were to search within a file by that key you would see all records for a particular customer code in date order. Then when the search reached the end of that customer it would start with the next customer in order again, beginning with the first sale date for that particular customer. If you wanted the file to be accessed in date/customer code order also you would create a second key where the first segment would be the sale date and the next would be the customer code. Then when you accessed the file using that key you would see all sales for that date in customer order, then the next date, etc.
Press the ENTER key to put the grid in edit mode. Then enter the field name CUSTCODE. Since there is only one segment in this key (and all others in this example) when the cursor moves to the next line just click on the Save Key button. The key will be added to the key list grid (on the left side of the screen). The information you just entered will still be displayed since that key will be chosen.
NOTE: To change a key previously entered you would click on the appropriate line in the key list grid. The appropriate information will be displayed for that key. You can then make any changes you wish including moving segments around, inserting and deleting segments, and changing the key name. (Be careful about changing the key name after a file is created and part of existing programs since the key name may have been used and will cause problems the next time you compile those programs).
NOTE: To rearrange the segments click on the block to the left of the segment name, and, while holding the mouse button down, move the segment to the proper location. When you release the mouse button the segment will move to the new location.
NOTE: If you change or add a key to a FD you must either Initialize the file (if there are no records already entered, or at least none you want to keep), Reindex the file, or Restructure the file. If you have not changed the FD structure you need not Restructure the file; Reindex is the preferred method in this case.
Now enter the other three keys using the data in the following table. The entries are as follows (all are Ascending; also the key name and the only segment name are the same):

After you have entered the last key press the Save key. The program will ask if all is correct: click on the Yes button or press the ENTER key to accept the default.
Initializing the New File
Since this is a new FD, the program will automatically ask if you want to create a new file. Press ENTER or click on the Yes key.
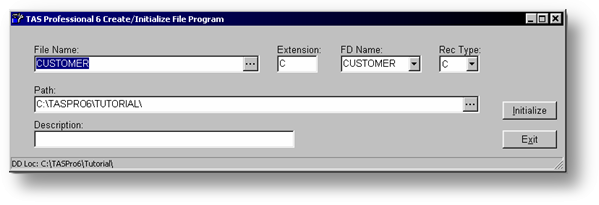
The screen above will be displayed. The fields are all self-explanatory except the Rec Type. This field tells TAS Professional what type of field this is. Btrieve files are type B, CodeBase files are type C. The initialization program defaults to type C. You can change the path by entering the correct location in the field or by clicking on the button which will bring up a path search dialog.
NOTE: In Btrieve type files the File Name and Extension are put together to get the entire file. So, if the extension was B and the Rec Type was also B the above would be CUSTOMER.B. However, CodeBase files use the extension DBF at all times. The Extension value in this case is more used for which company files are being accessed since you have the capability of keeping separate sets of files for each company. The default company code, in this case, is C. In TAS Professional file names (not including the extension) are limited to 32 characters. The path is limited to 128 characters but can be any legal Windows path.
To continue with the process, click on the Initialize button. This must be done before any data can be entered. After the initializing process is complete the fields above will be cleared. Press the Exit button to return to the Data Dictionary Maintenance program. Press the Exit button in the Data Dictionary Maintenance program (also referred to as MDD).
This completes Part 1 of the tutorial.
Page url: http://www.cassoftware.com/tas/manual/part1_creatingadatabase.htm