|
Part 2 - Maintain Database |

  
|
|
Part 2 - Maintain Database |
|
PART 2 - MAINTAINING A DATABASE
Now that you have created a CUSTOMER database with TAS Professional, you can start using it right away. You can add, edit, and delete records and generally keep things up to date. This type of activity is known as "maintaining a database."
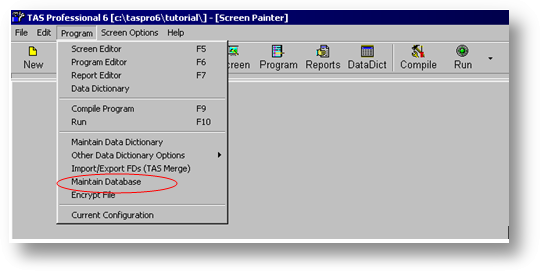
In this section you will edit the Customer data file using the Maintain Database option from the Program menu.
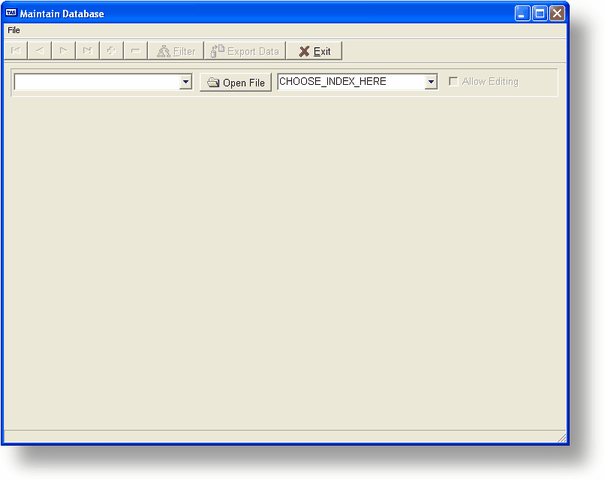
The screen above will be displayed when you choose the option from the menu. The first entry to make is the file name. Click on the down arrow and all of the files in your data dictionary will be displayed. In this case you want to choose CUSTOMER.B.
NOTE: If you have a lot of files in your database you may want to enter 1 or more characters before you click on the drop down arrow. This will start the displayed part of the list with the file that matches. You can also enter the entire file name. Don't forget the extension.
Choosing Fields to be Displayed
Once you have chosen the file, click on the Open File button. The following screen will be displayed.
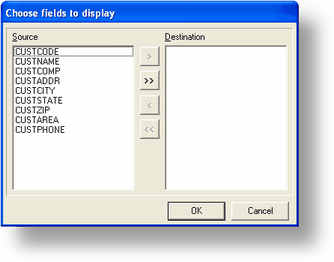
The fields in the Source list are all those available. You move them to the Destination list two ways. You can move all the fields by clicking on the double right arrow (>>). Or, click on an individual field (or fields by holding down the SHIFT or CTRL key while clicking on the field(s)) and then click on the single right arrow (>) to move that field (or fields). You can move them back by doing the same in the Destination list. You can also rearrange the fields in the Destination list by using a standard drag-and-drop process. The order the fields appear in the Destination list will determine how they appear in the editing grid. Each field is a separate column in the grid.
In this case you're going to choose all the fields so click on the double right arrow and then click on the OK button.
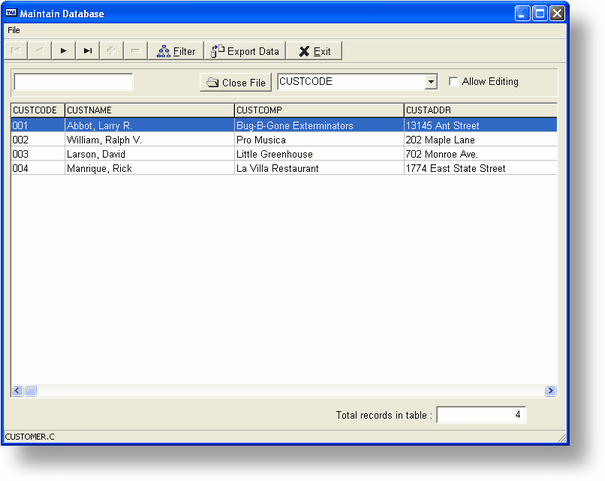
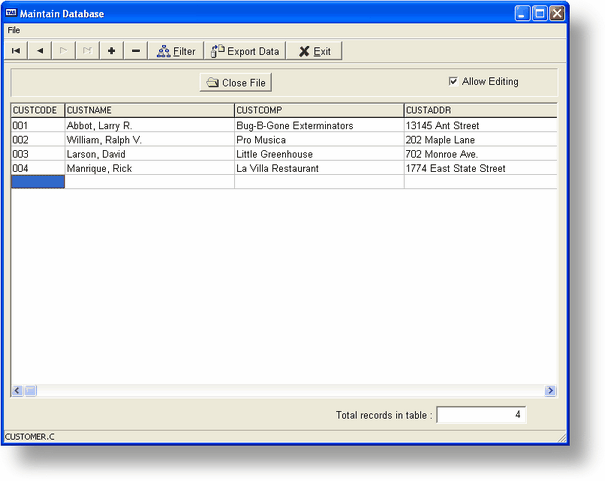
The screen above will be displayed. The fields chosen are the columns in the grid. There are no records in this file so there are no rows in the grid. The keys available for this file are in the drop down box to the right of the Close File button.
To the left of the Close File button is a FastSearch™ field. If there were records in this file you could search for them by entering characters in this field. As you enter each character the program will find the record that matches most closely. If you delete characters the search routine will move backwards.
To the right of the Key List is the Allow Editing check box. If you check this option the grid will go from search mode to edit mode and will allow you to add, change or delete records. Since you want to add new records click on the Allow Editing check box now. The FastSearch™ field box will disappear and you will be able to add records.
At the bottom of the screen (and below where the grid will be when you open a file) is a standard navigator bar. By clicking on the appropriate button you can move to different rows in the grid, save changes made to a record, delete a record or to add a new record (row) to the end of the grid. The guide to the buttons is listed below.
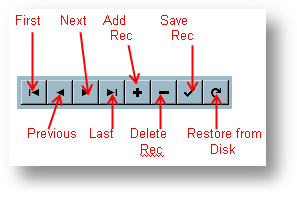
When you're in search mode the Save Record and Restore from Disk buttons have no effect. When you're in edit mode the First and Last buttons will have no effect.
NOTE: If you modify a record and save it (either by moving to another row or clicking on the Save Record button) you will not be able to move beyond the rows you have already visited. The reason for this is that if the records you have already displayed may now be in a different order. Since you might access records in the new order the program controls which records can be displayed. To eliminate the restrictions click on the First button (or press the Home key on the keyboard). The records will re-organize as appropriate and you can return to edit mode if you wish.
Add a Record to a File
After the file name is entered and fields selected the above screen is displayed. You can confirm the file that has been opened by checking the name at the bottom of the screen. The screen above has been shortened from the actual version.
To get into edit mode press the ENTER key. The cursor will start in the CUSTCODE field. Enter 001 for the CUSTCODE. After you press ENTER the cursor will automatically move to the CUSTNAME field. This should feel comfortable to you since this is very similar to the process you went through when you entered the original fields. Next enter Abbot, Larry R., then Bug-B-Gone Exterminators (CUSTCOMP), 13145 Ant Street (CUSTADDR), Tacoma (CUSTCITY), WA (CUSTSTATE), 98422 (CUSTZIP), 206 (CUSTAREA) and 555-1214 (CUSTPHONE). After you have entered the CUSTPHONE value press the ENTER key. You will be asked if you want to add a new row. If you answer Yes (or OK) the cursor will move to the next row (a new row will be added) and the previous record will be saved. If you answer No or Cancel the record will not be saved. You can, however, click on the Save button (check mark) in the Navigator bar and save the record that way.
NOTE: Some of the columns do not appear on the screen. As you enter values the grid will shift to the left and the field you are entering will always be visible.
NOTE: Until you move to a different row either by adding a new row at the end of the list as you did above, by moving to a row previously entered or by clicking on the Save Record button, the data you enter will NOT be saved to the file. This applies to both new records or changes to existing records.
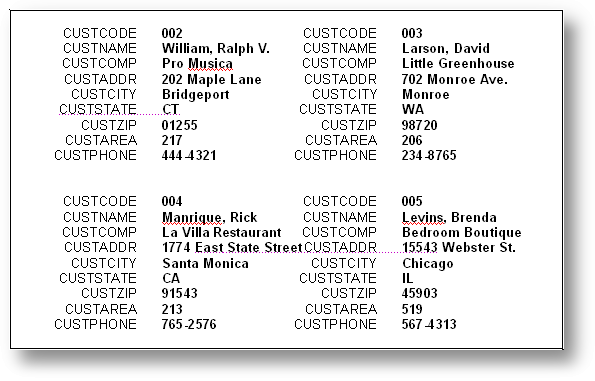
After you enter the first record the screen should look like the above. Enter the next four records using the data the following table. You may also choose your own data to enter if desired.
Finding Records in a File
Now that you have created a CUSTOMER database and saved some records in it, you can begin experimenting with some of the features of TAS Professional .
As mentioned earlier in this manual, TAS Professional can typically find any one record in one second or less. TAS Professional does this by searching for records according to key fields. Recall that when you designed the CUSTOMER database, you designated four fields to be keys. They were:
CUSTCODE
CUSTNAME
CUSTSTATE
CUSTZIP
This means you can search for records in the CUSTOMER database by customer code, by customer name, by state or by zip code. You could also start at the beginning or the end of the file and step through the records one by one. Of course that would take a lot more time than searching with a key. In this program the keys are listed in the drop down box to the right of the Close File button. Since the first key is the default, CUSTCODE is listed as the active key when the file is opened. To search for records in the file you must not be in Edit mode. This means the Allow Editing box is unchecked.
NOTE: You can switch back and forth from editing to search mode by either clicking on the Allow Editing check box or by pressing the ALT and E buttons at the same time (referred to in the future as ALT-E). This will have the same effect and will either put you in edit mode if you are currently in search mode or vice versa.
Once you have entered all the records turn off the edit mode by clicking on the Allow Editing box (if it is still checked) or pressing ALT-E. The FastSearch™ field box will be displayed on the left size of the screen at the top (see below the screen has been shortened so that certain features will display with just a few records).
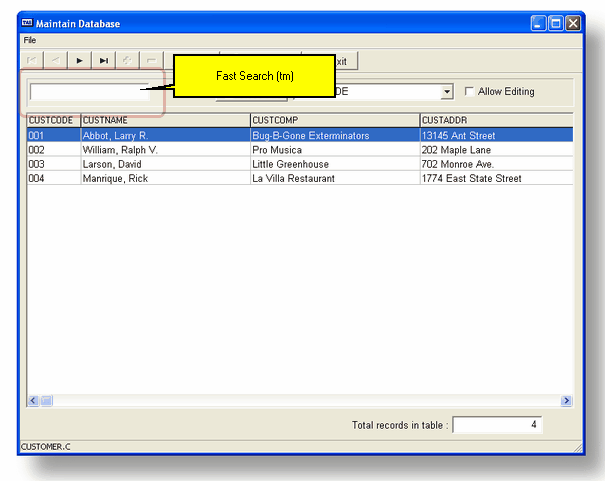
Click in the FastSearch™ field if the cursor is not there already. If you start typing 0, 0, 3 in the FastSearch™ field the select line (the highlighted line) will not move until you enter 3. This occurs since the first two characters enter (0 & 0) match the current record. Once you enter 3 the highlighted record will now be 003 Larson. You can get into edit mode automatically by double clicking on the highlighted line or clicking on the Allow Editing check box. This is much more effective if you have hundreds or thousands (or more!) records in the file. Search time, however, will be almost identical.
If you want to search on a different index all you have to do is click on the Key Name drop down box and choose one of the keys in the list. If the first field in the key is of a different type than you are currently searching the FastSearch™ field type will change, the first column will change to the new key field and you will start over at the beginning of the file using the new key.
You can also scroll through the file by clicking on the scroll bars. However, the scroll bars in the grid will not be effective until you click within the grid.
Another way to find records in the data file is to use the Home (move to the beginning of the file for the active index), End (move to the end of the file), PageUp or PageDown keys. The Down Arrow key will move down (toward the end of the file) one record and the Up Arrow key will move up (toward the beginning of the file). Note that you may not be in editing mode to use these keys. And, of course, you can also use the navigator keys.
Change (Edit) a Record
What happens when one of your customers moves? How do you change his (or her) address? It's really very easy. TAS Professional lets you change (edit) or add to data that already exists in your database. In this section we'll show you how.
Now let's say you want to update the address for Brenda Levins. If you are in edit mode, press the ESC key. Then press the UP or DOWN arrow until you get to the appropriate record (or click on the Next or Previous key on the navigator bar). If you are in Search Mode click on the Allow Editing check.
Position the cursor on the CUSTADDR field to change the record. If the entire field value is not already highlighted, double click anywhere in the field to do so. Enter 456 Bondman Ave. W. as the new address. Click on the Save button on the navigator bar (looks like a check mark) or move to a different row (record) on the grid. Both will save the current record to the disk.
NOTE: If you have made changes to a record but have yet to save it to the disk you can restore the original information by clicking on the Refresh button on the navigator bar (last button, looks like a semi-circular arrow).
Delete a Record from a File
Deleting a record from a file works much the same way as changing a record. That is, first you find the record (see options above), then you delete it by pressing the Delete key or clicking the Delete button on the navigator (minus sign).
Let's say you just learned that Brenda Levins sold her business and you want to delete her record from the database. Move to the appropriate row, if you aren't already there, using the procedures explained above.
Press the Delete key on your keyboard. A standard dialog message will appear asking you to confirm your delete request. If you are sure this is the correct record to delete just press the ENTER key to accept the default (Yes) or click on the No button. The record will be removed from the file and the row on the grid will also be removed.
When you are finished click on the Exit button. This will close the WTADATAM program and completes Part 2 of the tutorial.
Page url: http://www.cassoftware.com/tas/manual/part2_maintaindatabase.htm