|
Maintain Data Dictionary |

  
|
|
Maintain Data Dictionary |
|
Use this program to add, change or delete File Descriptors (FDs or Schemas). This program controls FILELOC.DBF, FILEDICT.DBF, FILEDBF.DBF, FILEKEY.DBF, FILEKNUM.DBF and FILEDES.DBF.
NOTE: There is an in-depth description of how to operate this program in the tutorial. Part 1 Creating a Database
MENU ACCESS
Program -> Maintain Data Dictionary
MAIN SCREEN

ENTER FD NAME HERE
Enter the name of the FD you want to edit. You can click on the drop down arrow to get a list of current FDs. You can also enter the first character or part of the FD name and the drop down list will start with the name that matches.
| Edit | Once you have entered a FD name, or chosen one from the list, you would click on this button to edit the FD. The fields will be displayed and you will be able to click on the Keys tab to edit/display the key information. You will also be able to print the FD by clicking on the Print button. |
| New | If you are creating a new FD click on this button. When you do the following dialog box will be displayed: |
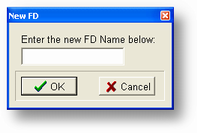
Enter a new FD name and click on the OK button. You will then be able to enter new fields and keys.
| Save | If you have entered a new FD or are editing a current FD you would click on this button to save the field/key information back to the data dictionary. After you click on the Save button the following dialog will be displayed. You must answer Yes or OK before the FD changes will be saved. |
NOTE: If you save an existing FD the key information in FILEKNUM.B is deleted and will not be restored until you run the Restructure menu item from the Options menu (see below).
| Close | If you are currently editing a FD and don't want to save any changes made, or just want to edit a different FD then you would click on this button to close the current FD. No changes made will be saved. |
| Delete | If you want to delete an existing FD from the data dictionary you would click on this button. You must be editing the FD before you can delete it. You will be asked to confirm that you want to delete after you click this button. |
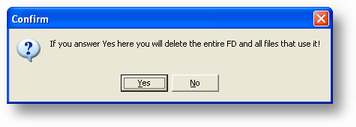
NOTE: When you delete a FD from the data dictionary all files that use that FD in FILELOC.B are also deleted.
| This will print the FD information. You must be editing a FD before you can print it. |
| Exit | If you click this button the program will exit. If you are currently editing a FD it will be closed before you exit. |
FIELDS AND KEYS TABS
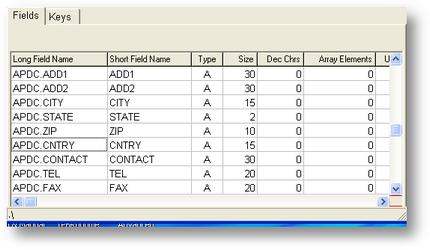
| Fields | On this tab all of the field information for that FD is displayed. To edit an existing field just move the cursor to the appropriate field and press ENTER. To add a new field press CTRL-END and ENTER twice (the first time puts you in edit mode, the second moves to the new line). |
Deleting fields
To delete a field name click onto the field row you want to delete press the ESC key the field will become un higlighted and a dotted box will now be on the screen. If this is the field you want to delete press the delete key. Once you are in this insert/delete mode you can move to any field you want by using the up and down arrow keys.
Inserting fields
To insert a field name click onto the field row position you want to insert at. Press the ESC key the field will become un highlighted and a dotted box will now be on the screen. If this is the field row you want to insert. Press the insert key. Once you are in this insert/delete mode you can move to any field row position you want by using the up and down arrow keys.
Navigating the grid
Example screen above. If you look at the screen above and look at the field name APDC.CNTRY you will see the insert/delete box. To turn this mode on click on the row and press the ESC key. At this point you can move the box up and down using the up and down arrow keys. if you press the inser key you can insert a field or press the delete key will delete the field row. To edit the information press the enter key and you can edit the field name press enter to go to the next colume till you finnish the row. This works the same when editing any of the TASPRO entry grids.
Programmers Note : We do not recomend that you insert fields in the middle of a database. If you are changing a file with existing data this could cause loss of data in the restruture of the live data. you can insert any field at the end of the file you want.
| Keys | The screen below will be displayed when you click on the Keys Tab. |
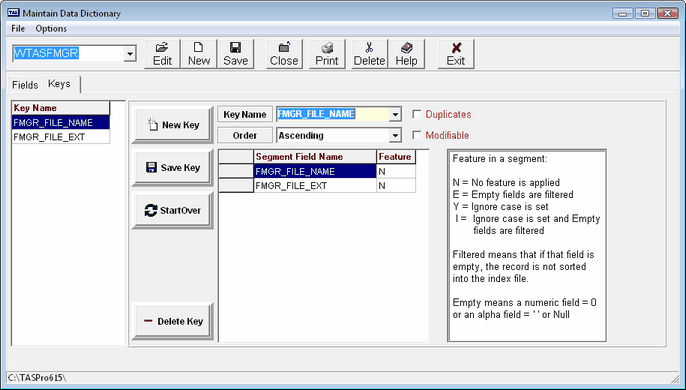
To edit a key click on the key name. The information about that key is displayed to the right of the key name list. To save the key after you've made changes or added a new key click on the Save Key button. To create a new key click on the New Key button. To delete an existing key, click on the key name and then, when the key information is displayed, click on the Delete Key button.
Deleting field segments
To delete a segment field name click onto the segment you want to delete press the ESC key the field will become un higlighted and a dotted box will now be on the screen. If this is the segment you want to delete press the delete key. Once you are in this insert/delete mode you can move to any field you want by using the up and down arrow keys.
Inserting field segments
To insert a segment field name click onto the segment position you want to insert at and press the ESC key the field will become un highlighted and a dotted box will now be on the screen. If this is the segment position you want to insert at press the insert key. Once you are in this insert/delete mode you can move to any field position you want by using the up and down arrow keys
Advanced Features
Ignore Case
This now works in both CodeBase and Btrieve version 6.15 or later. To set key segments Ignore Case, the Dictionary Maintenance Program has been extended to allow entry of a Y or I to each segment of a key, to set it part of Ignore Case. However, only alpha field segments are affected by this feature. You can also specify any combination of key segment features by selecting N for no feature, Y for Ignore Case, E for Empty or Null field and also I for both Ignore Case and Empty or Null field.
Null Key Segments
A Null Key Segment specifies if the key for a special record is to be included in the index file. For instance, some records include a project number. If you are interested in projects, you do not care about all the records that do not have any project number attached to them. This will result in a much shorter index file and faster processing. You do not want this to happen in a primary index that is supposed to show all entries in the data file. Typically there is a secondary index that consists of the project number, a date and an account number for the case just described.
Null Key Segments are sometimes refered to as Manual keys in Btrieve or Null keys in Pervasive or Filtered keys in CodeBase.
In this implementation the Btrieve concept is expanded compared to how it was used in TP5. It is possible to select which segments are to be considered for index entry exclusion. Also alpha fields can be tested to see if they are empty. The CodeBase concept is restricted to filter expressions evaluating to numerical 0 or empty alpha fields. Any expression can be rearranged to show that true or false.
Both Btrieve and CodeBase test the key for any segment Null. Thus compatibility is maintained among the two databases. For instance if you are interested in all people age 28 or above, you make the value in the index segment the result of the expression Age - 27 or 0 if less than 28. To avoid redesigning the key definition file, we use the same field for specifying Null Key Segment as is used for Ignore Case.
It can generally be done safely as Ignore Case operates on alpha fields only and also, if the alpha field is empty, it should be of no interest for Ignore Case lookup too, given it is a secondary index. To use Null Key Segments,
The dictionary maintenance program has been extended to allow entry of a E or I to each segment of a key, to set it part of a Null Key. However, you can specify any combination of key segment features by selecting N for no feature (default), Y for Ignore Case, E for Empty or Null field and also I for both Ignore Case and Empty or Null field.
Technically all keys are filtered in CodeBase using the expression NOT DELETED. What happens with Null Key Segments are that they are added to this expression with an AND operator.
Btrieve works in a little different way in that the record is skipped if there is any numerical segment in the key that has the value 0 or alpha fields that are empty. This is in fact the same as if the fields had an AND operator.
NOTE : to use UpCase or the advanced features in btrieve you must have your file format set in btrieve to 6.15 it will not work in 5.11 format.
OPTIONS MENU
The following items are the menu items on the Options Menu at the top of the screen.
Edit File Locations
This item will display the following screen:
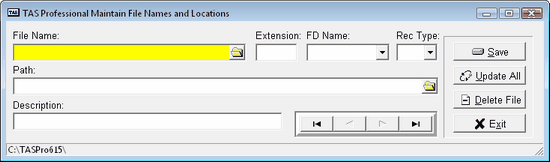
To display an existing file location record click on the ellipsis button in the File Name field. A list of files will be displayed. To create a new file location record enter the file name (maximum of 32 characters), the extension, the FD Name for this file (a list of existing FDs can be displayed by clicking on the drop down arrow), the Record Type (B - Btrieve, C - CodeBase or DBF, N - non-TAS), and the location of the file or path. You can also enter a 40 character description for your own use.
To save a new location record or changes to an existing one click on the Save button. To delete a location record and the file it refers to you need to find that record first by specifying the File Name and Extension, and then clicking the Delete File button.
If you want to change the location (path) of all files with the same extension then click on the Update All button. The following dialog box will be displayed:

Enter the appropriate three characters extension and the new path. You can display locations on your hard drive (or a network drive) by clicking on the ellipsis button in the Path field. Click on the Do Update button when you're ready to continue.
NOTE: A record must exist in the location file for each file you open in a TAS Professional program. A record must exist before you can initialize or create a file. If you delete the location record the file that's referred to will also be deleted.
Print File Locations
This menu item will print the information in the location file.
Create/Initialize File
You must initialize a file before you can save data to it. You would do so with this option. The following screen will be displayed when you choose this menu item:
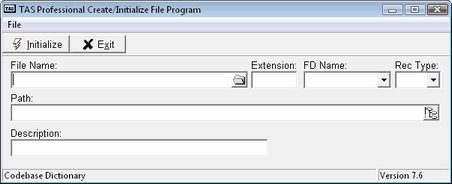
The options are the same as the Edit File Locations above. The Initialize button will start the actual initialize process.
Reindex Btrieve File
This option will display the following screen:
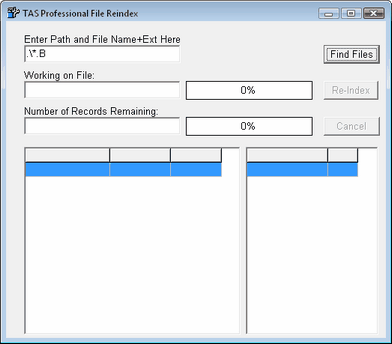
Enter a path and file name in the first field. You can use any standard wildcards. This defaults to your current data dictionary location. Then click the Find Files to search for all files that match. These files will be listed in the grid on the left. A sample follows:

The Status tells what Btrieve version the file has been setup for. The Num Recs is the number of records in the file. The second grid is a list of files that can't be reindexed. The Type value can be L, file is locked in some way, or N, this is not a Btrieve file.
Once the list of files is displayed click on the Re-Index button and the files will be reindexed one at a time.
NOTE: This works for Btrieve files only.
Reindex CodeBase File
This option is very similar to the Reindex Btrieve file above, except for a couple of changes:
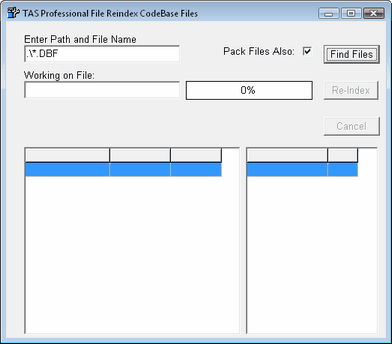
Notice the Pack Files Also option. In CodeBase files (DBF) when you delete a record is doesn't actually get removed from the .DBF file until the file is packed. By choosing this option all deleted records will be removed along with re-creating the indexes. NOTE: Until you pack the files using this process they will continue to grow regardless of the number of records that are deleted. Deleted records are not automatically reused.
The second difference is the Memo Fld column. If there is a (Memo) line in this column for the file then it has a memo file also (.DBT). When you pack the main file it will pack the memo file at the same time.
The 70 error in the Exceptions grid will tell you that the file is opened and cannot be re-opened in exclusive mode. This needs to happen for the reindex routine to work properly.
Restructure File
Use this option when you have made changes to an existing FD, including changes to the keys. When you first choose the option the following dialog is displayed:
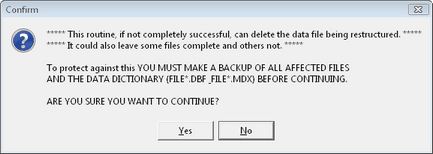
MAKE SURE YOU FOLLOWING THE WARNING. IF YOU DON'T MAKE A BACKUP BEFORE YOU RESTRUCTURE A FILE, AND SOMETHING GOES WRONG WITH THE PROCESS YOU WILL NOT BE ABLE TO RECOVER THE DATA.
When you click on the OK or Yes button the following screen will be displayed:

Enter the FD name directly or choose the FD from the drop down list. Once you have chosen the FD click the Restructure button to continue. The program will change each file that uses the FD chosen.
When the process is finished (Number of files remaining will be 0), click on the Exit button.
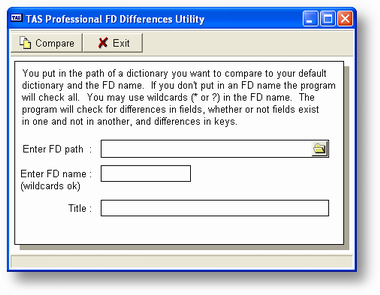
Fd Differernces
This program allows you to compare the current data dictionary to one in another sub-directory. You reach this option by placing the cursor on the option menu. Below is a sample of the screen.
.Program name: FD_DIFF.RWN (Source Included)
When you choose this option the program will ask you to enter the path of the dictionary to be compare and an optional title for your report. You will also be able to specify which FDs to check. You may use the wildcards ? and * here. If you wish to compare all then just leave this field blank. The program will run through the FDs in the current dictionary that match your entry and then will check for those same names in the remote dictionary. Differences in field sizes, types, decimal characters, even whether they exist or not will be printed. The program will also report whether the keys are different.
File Menu
Print DF
Use this option from the print button on the maitain data dictionary program or the file menu. NOTE : To use this option you have to be editing a file definition.
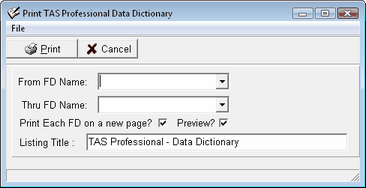
Print FD Range
Use this program to print a report for a range of data dictionary entry. When you run this program the following screen will be displayed.
Program name: PRINTTASDICT.RWN (Source Included)
COMMENTS
This is a TAS Professional program and, when you choose it from the menu, an instance of the runtime is started and runs WTASDMGR.RWN. Even if you exit TASPRO7.EXE this program will continue running until you exit Maintain Data Dictionary. You should see a button for this instance in your Start program bar.
Page url: http://www.cassoftware.com/tas/manual/maintaindatadictionary.htm