|
POS-J - POS Configuration Maintenance |

  
|
|
POS-J - POS Configuration Maintenance |
|
Purpose of Program
Use this program to set up the controls for POS. Also, Clerks, Registers and Payment Types are entered/changed/displayed using this program.
Main Configuration Screen
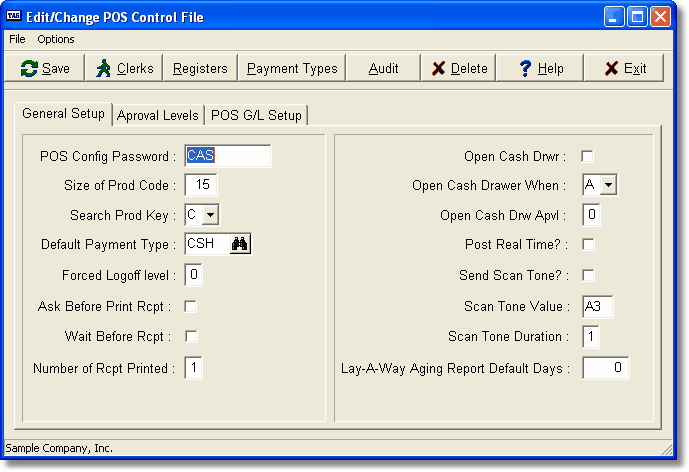
Field Explanations
Pswd for this Prg
If you want to require a password for this particular program then enter it here.
Size of Prod Code
This is the size of the product code that will be required in POS-A. If you are bar code scanning your products you would normally make this the size of the code that is returned by the scanner. Then, the program will automatically go to the next line and be ready for the next product to be scanned.
![]() This size value is the largest product code you may have in the file. If you specify 10 characters here you will not be able to find a product with a 25 character code entered through IC-A, Enter/Change Inventory.
This size value is the largest product code you may have in the file. If you specify 10 characters here you will not be able to find a product with a 25 character code entered through IC-A, Enter/Change Inventory.
Search Prod Key - When the user enters a product code during a sale, or scans the bar code for an item, the code/number is used to search for that item in the inventory master file. If you enter C here the program will use the Product Code as the index to search by. If you enter U here the program will use the UPC Code as the search index.
Dflt Payment Type - The initial Payment Type that will appear when the payment part of the sale is started. If the customer chosen is not the default customer, and that customer has a terms value that matches the value in one of the other payment types, the program will use that payment type instead of the default. For example, suppose the default payment type is CSH (this would generally be the case), and a customer is chosen whose normal terms are Net 30. When the time comes to enter the payment, the program will look for a payment type where the terms field is set to Net 30. For more information, see Enter/Change Payment Types below.
Forced Log-off Lvl - The approval level you will require for someone to be able to perform a forced log-off. This might occur if a computer reset itself for any reason or was turned off and on while the system was still in the POS-A, Run POS Register program or in POS-C, Settle (Balance) Register.
Ask b4 Prt Rcpt - Ask before printing a receipt. If you enter N here a receipt will always be printed for each sale. If you enter Y the program will display a message after the sale is complete asking whether or not a receipt should be printed. The default entry value for that question will be Y in all circumstances.
Wait b4 Rcpt - Wait before receipt. If you enter Y here the program will pause and allow you to press a key before continuing with the final processes after a sale has been completed. This gives you a chance to see the final figures on the screen, including any cash back amount, before the screen is cleared in preparation for the next sale. If you enter Y to the Ask b4 Prt Rcpt question above, you probably don't need this also.
Num Rcpts Prt - Number of receipts printed. Enter the number of receipts you'd like to print. For example, you might wish to print 2 receipts: one for your customer, and one for your own records, perhaps with a signature from the customer or the clerk's initials.
Chg Qty Sold - Change quantity sold - The entry you make here will affect where the cursor will start in a standard entry line and the options available in POS-A, Run POS Register. The options are:
a) S - Sometimes change quantity. If you choose this option you will be able to change the quantity for a sale line by pressing the <Left Arrow> key when the cursor is in the Product Code field. You return to the Product Code by pressing the <Enter> key after changing the quantity or by leaving it at 1.
b) A - Always change quantity. The cursor will start in the Quantity field instead of the Product Code. This option would be chosen when the quantity sold varies quite often.
c) N - Never change quantity. With this option, you can't change the quantity, and each item sold will have to be entered individually.
Open Cash Drwr - Enter Y if the program should open the cash drawer for the registers or N if not. The process the program uses is set up in each register.
Open Cash Drwr When - If you want the cash drawer to be normally opened only at the end of a sale then enter S here. If you enter A the Clerk will be able to enter the drawer anytime.
![]() The clerk will press the <^O> (ctrl+O) key to open the cash drawer at times other than the end of a sale.
The clerk will press the <^O> (ctrl+O) key to open the cash drawer at times other than the end of a sale.
Open Cash Drwr Apvl - If you entered S at the option above, there will still be times when someone needs to open the cash drawer other than at the end of a sale. So that you can control this, enter the approval level needed to be able to approve opening the cash drawer.
Post Real Time - If you answer Y here, the system will post each sale immediately after it occurs. There will be a slight delay while the system posts, but all your information will be completely up--to-date. If you answer N, you would use POS-E, Post POS Transactions to post your sales in batches or via a stand-alone processor. Please refer to POS-E for more details.
Special Approval Levels - For each of the actions listed below, you can determine whether or not the clerk must have approval to perform the action (Req App), what approval level the clerk must have in order to perform it (Clrk App Lvl), and whether or not a clerk with the correct approval level can okay his/her own action (App Own).
To Cancel a Sale Entirely (Voids) - This approval controls the use of the <^V> (ctrl+V) void option as well as the <^Q> (ctrl+Q) cancel option. NOTE: If you don't allow a clerk to make changes to lines (see Enter/Change Clerk records below) then the only options that clerk has to change a sale are to record it as Void or make balancing negative quantity entries.
To Change/Refund a Prev Sale - This approval covers the use of the <F7> key look-up and possible modification of old sales.
Allow Credits (Negative Vals) - This approval covers the ability to enter a credit or negative quantity. NOTE: As we mentioned in the previous note, if you don't allow changes to lines, the clerk's only options for changing a sale are to record a void or make balancing credit (negative) quantity entries.
Allow Cash Out to Vendors - This approval covers the use of the cash out program (the <F5> key on the initial sales entry screen) for paying vendors.
Allow Lay-a-way Trans Access - This approval covers access to lay-a-way transactions from the initial sales entry screen (<F6>).
Checking Account Number & Name - Here you specify the default checking account for your POS system. Please refer to the information in the Getting Started section of this manual and to SY-A-D, Enter/Change Checking Accounts.
Over/Short G/L Acct - This is the number for the G/L account where you want Over/Short's to be recorded. Typically this would be the Bad Debts expense account number.
Lay-a-way Inventory Asset Acct - This account number tracks inventory on lay-a-way.
Lay-a-way Pmts Recv Liab Acct - Indicate here the liability account for lay-a-way payments received toward completion of a lay-a-way sale.
Lay-a-way Refund Charge Acct - This is an income (type I) account number for holding money collected on cancelled lay-a-way's. If you charge a fee for a cancelled lay-a-way or do not refund payments made toward a cancelled lay-a-way, those funds would be recorded here as income.
Lay-a-way Aging Report Default Days - You can specify here the default lowest number of days before printing aging information on lay-a-way's. For example, if you're only interested in lay-a-way's over 30 days old, put in 30 here.
Send Scan Tone - If you would like to send a tone to indicate that a product code has been correctly entered or scanned, enter Y here. If you enter Y, you will also be able to specify a Tone Value and a Tone Duration. Press <F1> for Help.
You must press the <F10> key to save the information you have entered here; the program WILL NOT automatically save the entries made to the file.
To exit the program press the <Esc> key.
Initial Log On Operation
Enter Manager's Code and Password
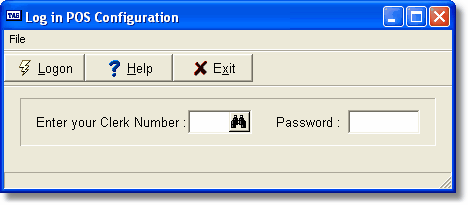
When this program is run the screen above is displayed first.
The manager, or clerk with appropriate approval level, should enter his/her code first. If there is a password associated with that code, it must be entered.
If there is a password set up for this particular program, enter it next. If the password is not entered properly, the program will return to the main menu.
A record is saved in the Audit Trail file for both the entry to and exit from this program using the clerk code entered here.
Enter/Change Clerks
General Program Operation
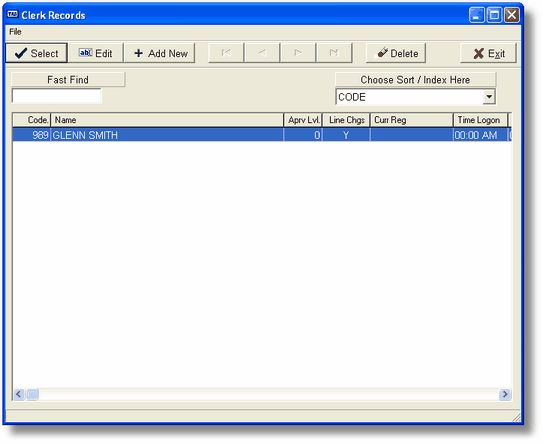
If you want to enter, change or just display information about the Clerks in the system press the clerk button while the cursor is in the main screen. The lookup screen above will be displayed.
The information that is displayed about each Clerk includes: Employee Number; Name; Approval Level; Allow Line Changes choice; and if the Clerk is currently logged on to a Register, the Register Code; and Time and Date of Log-on.
To change a Clerk record move the cursor bar to that line and press the <Enter> key. To delete a Clerk move the cursor bar to that line and press the <Del> key. To enter a new Clerk press the <^End> (ctrl+End) key. This will automatically take you to the end of the list and start the entry process.
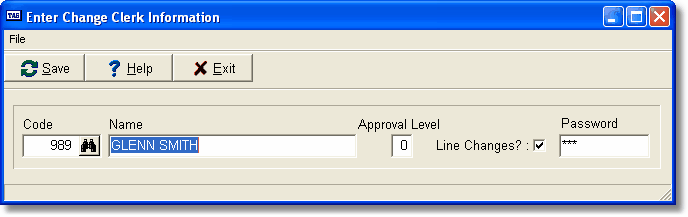
If you enter or change a Clerk record the entry window above will be displayed. You will be able to enter the Clerk's employee number (if this is a new record being added to the clerk file), change the name, if desired, the approval level, whether or not the Clerk can make changes to lines during POS-A, Run POS Register, and the password for that particular Clerk.
![]() Before a Clerk can be added they must have a record in the employee file. For more information please refer to PR-A, Enter/Change Employees.
Before a Clerk can be added they must have a record in the employee file. For more information please refer to PR-A, Enter/Change Employees.
After you enter the Password the program will confirm that all entries are correct, and if you enter Y, the program will save the record and return to the list. If you press the <F10> key the program will also save the record and return to the list. To return to the main screen press the <Esc> key.
Enter/Change Registers
General Program Operation
If you want to enter, change or just display information about the Registers in the system press the Register button while the cursor is in the main screen. The lookup screen above will be displayed.
To change a Register record, move the cursor bar to that line and press the <Enter> key. To delete a Register move the cursor bar to that line and press the <Del> key. To enter a new Register press the <^End> (ctrl+End) key. This will automatically take you to the end of the list and start the entry process.
Enter/Change Registers
Enter Box Field Explanations

If you enter or change a Register record the entry window above will be displayed. The fields are:
Register - The Register code. Once this is entered it cannot be changed using this program.
![]() To change this code please refer to SY-K, Change Related Record Vals for more information. The change type title is POS Reg Code.
To change this code please refer to SY-K, Change Related Record Vals for more information. The change type title is POS Reg Code.
Beg Cash - The default amount of cash in the cash drawer you're going to start with at this Register. Cur Cash, shown during register log-on, will be set to this value after each settling process (POS-C).
Next T# - The next ticket number for this Register. Each Register has its own ticket number that is sequentially incremented each time a sale is recorded. This gives you another security check for this Register by making sure there are no missing values. This should be a continuous range of numbers from first to last. You will probably not want to change this number once the Register has started recording sales so that you don't lose this continuity.
Dflt Cust - The default customer code displayed at the beginning of a sale. There must be a record in the Customer file with this code. Press the <F2> key for a list of existing customers.
Recpt Type - The receipt type. At the current time there are 4 options: They are 40 column plain paper ("40COL"), 80 column plain paper ("80COL"), 80 column pre-printed short invoice ("80INV") and TSP400 - Star 400 thermal 40 column printer.
Prt To - Where to print the receipt. The options are: Print to Default Printer (Prtr), Ask at Runtime (Ask) and Print to Screen (List).
End Lines - The number of lines to print at the end of the receipt
CC - Change Customer - If you enter Y here, the person logged on to the Register will be able to change the Customer Code for the particular sale. If you enter N the program will always use the default Customer Code.
ACOF - Add/Change Customer on Fly - If you enter Y in the Change Customer field you will also be able to choose whether (Y) or not (N) to allow adding or changing an existing customer at sale entry time. If you enter Y the clerk will be able to add new customer records or change an existing one either before the line items are entered or during entry.
Location - This is the inventory location for the product being sold.
Cash Drawer Setup
Port Type - If the cash drawer is connected to the parallel port then enter P here, if serial enter S. If the cash drawer is connected through a printer, enter the port type the printer is connected to.
Num - The port number, generally 1 or 2.
Characters to Send - The first number is the number of characters that need to be sent to open the cash drawer. The balance of the numbers entered are the numeric values of the ASCII characters to be sent. So, for example, 65 is the letter A.
Turn Pole Disp On - Check this option if you have a standard pole display attached to the computer that's used as a register. If you check this option the following fields can be entered also.
![]() All of the information needed about the pole display should be available from the manufacturer. They are all necessary to make the serial port work properly.
All of the information needed about the pole display should be available from the manufacturer. They are all necessary to make the serial port work properly.
Comm Port - The comm port number, generally 1 or 2.
Baud Rate - The menu above will be displayed, choose the appropriate value.
Hdwr Flow Ctrl - (Hardware Flow Control) - What protocol to use, if any. The menu above will be displayed, choose the appropriate value. Generally this will be none.
Data Bits - The number of data bits. The menu above will be displayed, choose the appropriate value.
Parity - The menu above will be displayed, choose the appropriate value.
Stop Bits - The number of stop bits, choose the appropriate value.
Sfwr Flow Ctrl - (Software Flow Control) - What software protocol to use, if any. The menu above will be displayed, choose the appropriate value. Generally this will be none.
Inactive Message - This is the message that will be displayed on the pole between sales. Up to two lines may be displayed, the width depends on the pole capability.
Pole Msg Width - The number of characters in one line the pole can display.
After you enter the last field, the program will confirm that all entries are correct, and if you enter Y, the program will save the record and return to the list. If you press the <F10> key, the program will also save the record and return to the list. To return to the main screen press the <Esc> key.
Enter/Change Payment Types
General Program Operation
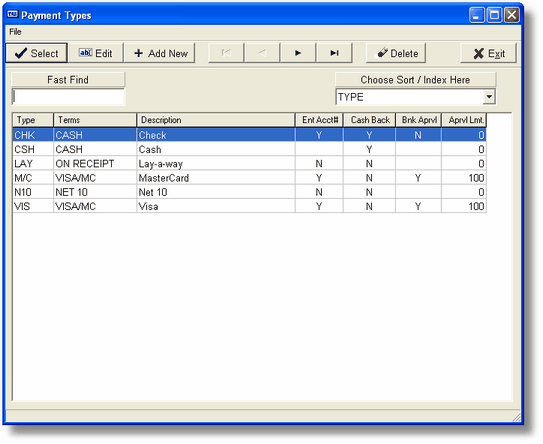
If you want to enter, change or just display information about the Payment Types in the system press the <F4> key while the cursor is in the main screen. The lookup screen will be displayed.
To change a Payment Type record move the cursor bar to that line and press the <Enter> key. To delete a Payment Type move the cursor bar to that line and press the <Del> key. To enter a new Payment Type press the <^End> (ctrl+End) key. This will automatically take you to the end of the list and start the entry process.
Enter/Change Payment Types
Enter Box Field Explanations
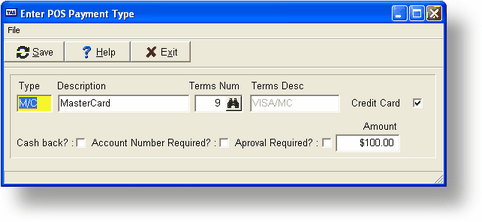
If you enter or change a Payment Type record the entry window above will be displayed. The fields are:
Type - The Payment Type code. Once this is entered it cannot be changed using this program.
![]() To change this code please refer to SY-K, Change Related Record Vals for more information. The change type title is POS Pmt Type.
To change this code please refer to SY-K, Change Related Record Vals for more information. The change type title is POS Pmt Type.
Desc - A 25 character description for this Payment Type. This is for your use and will be displayed on the POS Register screen and during reports.
Terms - The appropriate Terms type from the System Maintenance file (please see SY-B, Enter/Change Terms Info).
Credit Card - L type. If this option is checked it tells the POS system that this is a credit card type. If the X-Charge option in SY-A-E Supplemental is check. When the user chooses this type of payment. It will evoke the Credit card terminal process in POSA enter Point if sale.
Cash Bk - Does this Payment Type allow cash back (Y) or not (N).
Acct - If this value is Y, an account number must be entered for this Payment Type during POS register operations.
App Req - If this value is Y, an approval code must be entered for this Payment Type during POS Register operations. For example, this might be the code returned by a credit card verification.
Amt - If you entered Y for App Req then you may also specify the level of payment above which an approval is required. If you always want the clerk to get an approval code then enter 0 here.
After you make the final entry the program will confirm that all entries are correct, and if you press Y, the program will save the record and return to the list. If you press the <F10> key the program will also save the record and return to the list. To return to the main screen press the <Esc> key.
Audit Trail Listing
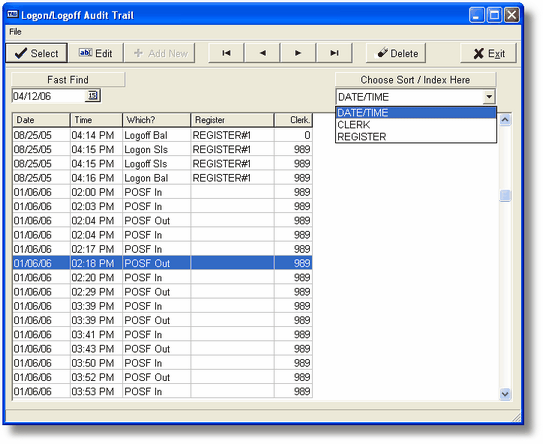
You may get a listing of the Audit Trail file by pressing Audit Button. This will allow you to quickly check a system event (e.g., a log-on) for date, time or even that it took place at all. To return to the main screen press the <Esc> key. No other actions are available here.
Delete Single Sale or Purge History Records
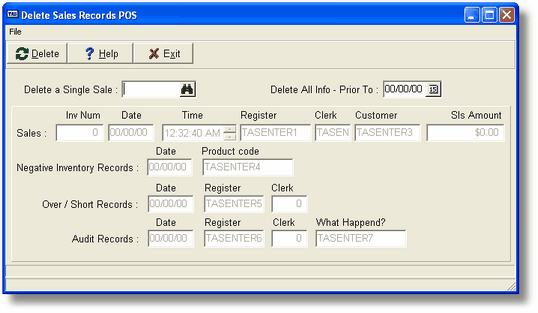
To delete a single sale prior to posting or purge history records (if your files are getting too large) press the Delete Button.
If you wish to delete a single sale that you don't want to post, enter the appropriate invoice number in the first field. You may press the <F2> key to get a listing of un-posted sales.
If you want to purge old information then press just the <Enter> key at the Delete a Single Sale field. At the Delete All Info - Prior To field, enter the date through which all POS information should be deleted. After asking for confirmation the program will delete all sales, line items, payments, negative inventory, over/short and audit records that occurred on dates up to but not including the date entered. The information being deleted will be displayed while in process.
There are no requirements for you to delete history data; you're simply limited to your own available disk space. We suggest you retain as much information as possible for as long as possible.
When this process is complete the program will automatically return to the main screen.
Page url: http://www.cassoftware.com.com/adv7docs/index.html?pos_j_posconfigurationmain.htm