|
POS-C - Settle (Balance) Register |

  
|
|
POS-C - Settle (Balance) Register |
|
Purpose of Program
This program helps you to balance out a cash drawer. When completed, this routine resets the sales data to 0 and sets Cur Cash for this register to the Beg Cash value set in POS-J.
Field Explanations
Register
This is the internal register code of the register to be balanced. This should have been previously attached to a physical register in POS-A, and sales should have been recorded.
You can enter a code in this field or use <F2> to select from a list.
Clrk
Enter the appropriate clerk code here. A list of clerks is available by pressing the <F2> key.
Password
The password assigned the clerk. Must be entered properly before any further entry is allowed.
Name
The name of the clerk as entered above. This is displayed as information only.
Balance Date
The date this process is occurring. Defaults to today's date.
Initial Log On Screen
General Program Operation
Log on to a Register
This is the initial process you will perform when preparing to balance the cash box for a register. Enter the same code for the register used during the sales process. You may press the <F2> key for a listing of available registers.
![]() The clerk and internal register must be logged off the physical register for this process to occur. While a clerk is logged on to an internal register, the system will not allow anyone else to log on to that register.
The clerk and internal register must be logged off the physical register for this process to occur. While a clerk is logged on to an internal register, the system will not allow anyone else to log on to that register.
Next enter the appropriate clerk code. As with the internal registers above, a clerk may be logged on to only a single register at a time. Press the <F2> key for a list of available clerks. After a record is chosen the clerk's name is displayed.
If there is a password in the clerk's record, it needs to be entered next. The system allows three attempts to enter the password correctly. If those attempts fail, the system returns to the main POS menu.
Next enter the date. Press the <Enter> key to accept today's date as the default. After entering the date the main balancing screen will be displayed as below.
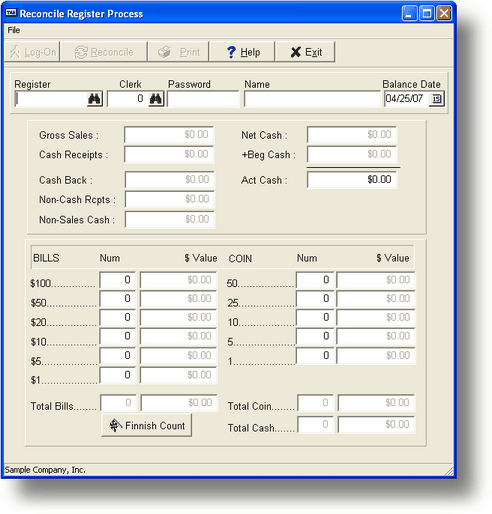
Register Balance Screen
Field Explanations
Register, Clerk and Date
The codes for the register being balanced, the clerk and the appropriate date.
Gross Sales
The total sales amount recorded for this register since the last time it was closed out. This amount should equal Cash Receipts + Non-Cash Rcpts - Cash Back.
Cash Receipts
The total amount of cash received for this register since the last time it was closed out.
Cash Back
The amount of cash returned to the customer.
Non-Cash Rcpts
All other payment types made (e.g., credit card sales).
Non Sales Cash
Any cash in's or other cash added to the drawer.
Net Cash
The net amount of actual cash that should be in the cash box for this register. This is Cash Receipts + Non Sales Cash - Cash Back. The total expected amount of cash will be Net Cash + Beg Cash (the amount of cash you started with before making sales).
Beg Cash
This is the beginning amount of cash that was in the cash box for this register.
Act Cash
The amount of cash the clerk counts in the cash box for the register. If this amount matches the sum of Beg Cash and Net Cash, the drawer is balanced. If not, there will be an Over/Short.
Register Balance
General Operations
Closing out a cash box proceeds very much as it normally would when using a 'dumb' register. The main difference is that, in this case, the system will help you perform the close out.
You can get a list of all non-cash payments made by pressing the Print button or <F3> key. This report will list all the different types in Payment Type order. The appropriate account number, amount, invoice number and customer code will also be printed. If you print the report to paper, a space is provided to check-off the item as being in hand.
You may enter the appropriate quantities for each bill and coin. As the amounts are entered, the program calculates the total dollar figure for each field and then gives a total amount. This process can help with accurately counting the actual cash for a register. The total amount entered here will be transferred to the Act Cash amount on the main screen.
You can edit as often as needed until the process is complete. The entries made previously will still be there for your use.
When you're finished counting, the program will calculate the over/short position and will display the appropriate message. You will be asked whether or not to record the results. And finally, you have the option to print the balance results. (See Appendix A for an example.) This can be used to create a paper record of the process. The record will include all the information on the main screen, the cash balance screen and a listing of all non-cash payments.
When you have completed your editing click the reconcile button ot press the F10 key.
A record is saved in the over/short file indicating the net result of this process and then the system returns to the main POS menu. The over/short amount is typically reflected in Petty Cash and Bad Debts; set up your account information using POS-J. Please note that after reconciliation is complete, the Cur Cash field in the initial register log-on screen will default to the amount stored in Beg Cash under POS-J for this register.
Page url: http://www.cassoftware.com.com/adv7docs/index.html?pos_c_settle(balance)regis.htm