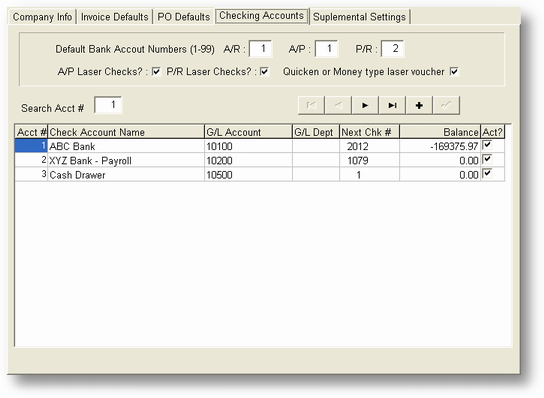
Purpose of Program
Use this option to set up the checking accounts you want to use. Up to 99 different checking accounts can be set up, but you will assign a particular account as your default banking account for A/R, A/P, and P/R.
Field Descriptions

A/R
If you are setting up this information for the first time, you should set up the names and numbers of your cash account(s) in the lower portion of the screen. You can then type in the line number (1-9) of the account that is to be used for handling deposits from Accounts Receivable.
![]() Set the Default A/R Checking Account to 0 if you want a choice of bank accounts to post cash sales to.
Set the Default A/R Checking Account to 0 if you want a choice of bank accounts to post cash sales to.
A/P
If you are setting up this information for the first time, you should set up the names and numbers of your cash account(s) in the lower portion of the screen. You can then type in the line number (1-9) of the account that is to be used for checks issued through Accounts Payable.
P/R
If you are setting up this information for the first time, you should set up the names and numbers of your cash account(s) in the lower portion of the screen. You can then type in the line number (1-9) of the account that is to be used for issuing payroll checks.
![]() All three designations above can be the same account.
All three designations above can be the same account.
Force to Laser Checks
The option under the A/P and P/R entries allow you to specify whether laser checks are being used when printing these checks. If this is not checked then the program will use the continuous feed format when printing.
Money or Quicken type laser type voucher
If this option is checked the check printing format will represent the popular windows electronic checkbook programs use. Microsoft Money(r) or Intuit Quicken(r). These checks can be purchased o the internet or from your local office supply store. NOTE: To use this option you have to have the Force to laser checks option checked.
Num
The account number, just to keep track of how many accounts are listed.
Account Name
Type in the name of the account. This can be any reference that is useful to you. It is not printed on any checks, but it is the way you will identify which account you want whenever you are in a program that requires selection of a bank account.
G/L Account-Dpt (Asset Account)
Cash G/L account code for cash on hand (checking account).
Next Check #
This can be set to a higher number than 1 during your initial setup; after that, the number is updated when checks are printed.
Balance
The period ending balance of each bank account. This figure is updated only after you use the GL-K, Reconcile Check Register program. This is not necessarily the same amount as maintained in the General Ledger cash account for this bank. You can change the amount here without affecting the General Ledger.
Active
Active - if the checking account is active then this should be Checked. If not, mark this unchecked and the account will not be displayed when the checking account lookup is displayed
MICR?
If this is checked then this will use the new plain paper check option for this checking account account. Printing with this option will require you to purchase the MICR font you can contact CAS or your dealer to purchase this font. With this feature you can purchase blank stock checks and never have to order checks from your printer again. One order of checks can print to all of your bank accounts.
MICR Routing Number
This is your bank routing #.
MICR Account Number
This is your bank account #.
Bank Name
The Name of your bank.
Bank Address 1
Your bank address.
Bank Address 2
Your bank address 2.
Bank CSZ
Your banks City, State, Zipcode.
Bank Phone
Your banks telephone number.
Bank Routing Number (NOT MICR)
This is your back routing number used for regular text on your check.
Logo File Name
If you would like to add your company logo place the location and filename to this file here.
Signature File Location
If you have a graphic file of your authorized signature you can even have the printer print your signature for you.
General Program Operation
When you first choose this option only the first part of the screen is displayed, that is the A/R, A/P and P/R choices. After you enter through the Laser Check choices the bottom part of the screen is displayed with all of the actual checking accounts.
To change an account move the selection bar to the appropriate line and press the ENTER key. To add a new record move to the end of the list (press the END key or DOWN ARROW to the end of the list) and press the ENTER key.
When you have finished making changes press the F10 or Save button or ESC key Exit button to quit without changes.
Page url: http://www.cassoftware.com.com/adv7docs/index.html?sy_a_d_enterchangechecking.htm