|
IC-A - Enter/Change Inventory |

  
|
|
IC-A - Enter/Change Inventory |
|
Purpose of Program
Use this program to add new inventory records or change certain information about current ones. The screen used to enter an inventory record is illustrated below, followed by a description of each field.
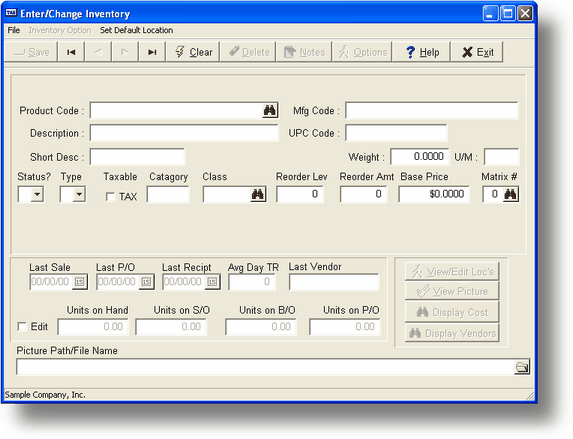
Field Explanations
Product Code
The Product Code field lets you assign a name/number that will identify this item for sales orders and purchase orders. This is a 15 character alphanumeric field and displays in upper case only.
Product Description (Desc Long)
The description of the product that will print on invoices and P/O's. This is a 30 character alphanumeric field. Both upper case and lower case characters can be displayed in this field.
Short
If you have the POS option checked in UT-D - Turn BOM/JC/POS On/Off, then this field will be displayed on the form. Otherwise it will not show up. This field gives you an opportunity to enter a short description that will print on receipts for sales entered in POS-A.
NOTES
If you have notes attached to this line item the word NOTES will be just above the Manufacturer's Code. These are standard TASNotes notes and can be edited at any time by pressing the Alt-F1 (ALT+F1) key any time there is an active inventory item on the screen.
Manufacturer's Code
This is the code assigned by the vendor/manufacturer for this product. This will be printed as the line item code on purchase orders.
UPC Code
The standard UPC for this product, or a numeric value that you have assigned. If you print bar code labels for this product (IC-N - Print Bar Code Labels) it will use this code when generating the label.
Status?
What is the current status for this product code:
A - Product is fully active
I - Product is inactive and non-selectable in Sales/PO programs.
P - Product may only be used in the PO programs.
R - Product may only be usedin the Sales programs.
Type
Two types of products are allowed in the inventory file:
R regular inventory keeps track of units on hand.
N non-inventory (non-stock) type keeps track of sales and price but disregards units on hand. You would use the N type for items such as labor, freight, disposable parts, etc.
Regular vs. Non-Inventory Items:
If you sell services, you have no need to track how many units are on hand and how many units are on reserve, your inventory would use type N. You would probably use type R when you sell physical items such as wrenches, cars, paper, etc.
Below is a list of the kind of information which is not tracked for non-inventory items. If you need to track any of the items below, then you should use regular inventory. Otherwise, non-inventory will suit your needs. See the field description for each of these items for more information.
Reorder Level Reorder Amount
GL COGS Units on PO
Units on Hand Average Cost
Total Inventory Value Units on Reserve
After you have worked with inventory control for a while and feel more comfortable with it, you may want to track units on hand for certain items. Simply change the type from N to R and add the additional information necessary to track a regular inventory item and save the record. You can add your inventory using the IC-G, Adjust Levels to Phys program or through purchase order creation and receiving (PO-A and PO-D).
UM
Unit of measure. This is a 3 character alphanumeric field. You might use 'ea' for each, 'doz' for dozen, or 'hr' for per hour.
Taxable
If the inventory item is normally taxable on an invoice, then enter Y here. Otherwise, enter N.
Cat - Category
You may use this field as a selection criterion since the printing programs allow you to limit reports by this value. This is a 4 digit alphanumeric field. For example, a company may find a HRDW (hardware) vs. SFTW (software) division as a helpful category for dividing inventory types. If you assign sequential categories such as A-F or 1-10, you can then request printouts based on these ranges.
Cls - Class
This is a second selection criterion for an inventory item. You can assign a class so that you can easily select a group for a particular report. For example, a class might be a particular brand of hardware. This is a 4 digit alphanumeric field. If you assign sequential classes such as A-F or 1-10, you can then request printouts based on these ranges.
R Lvl - Reorder Level
Reorder this item if the number of units on hand falls below this value. If you enter a number here, you will be able to use IC-D, Print Avail/Order Info to check on what items are below reorder level.
R Amt - Reorder Amount
The usual amount that is ordered when your reorder level is reached.
Price Base
The default sales price. Additional pricing structure information can be entered from the price matrix popup screen.
Matrix #
A 9-level discount/markup percentage can be set up and assigned a number from 1-999. This number can be used by multiple products for discount/markup percentage assignment. If the price matrix field is left blank (or has a 0), a nine-level fixed price structure unique to that product can be entered. The levels are cross-referenced to a customer's price level assignment. See the section Using a Price Matrix in this section.
If this is a non-inventory type item (Type=N) then three more fields will be displayed. They are:
G/L Expense
If you have this item on a P/O, when it is received it will automatically post to the proper expense account. The account should be an Expense account that you have created in SY-E, Create/Chg G/L Account. You can view your G/L accounts by pressing F2 when your cursor is in this field.
G/L Sales
When you post transactions, this is where the taxable sales amounts will be posted.
G/L Non-Tax Sales
This is where the sales amounts for non-taxable items will be posted.
Some of the fields below may be modified when you are initially entering the inventory item (See Adding a New Inventory Record below). Thereafter, the data in these fields is automatically maintained by other programs within Advanced Accounting 7. Rather than entering your units here, it is recommended that you use the procedure outlined in Getting Started, to initially enter your inventory units on hand.
Last Sale
The date of the most recent sale for this item.
Last P/O
The date of the most recent purchase order for this item.
Units on P/O
Displays the number of units on open purchase orders.
Last Recpt
The date of the most recent receipt of this item from a P/O.
ADTR
Average days to receive items on a purchase order.
Last Vend
The code for the vendor used when this item was last ordered.
Last Cost
The cost for one unit of this product as received on the last order.
Avg Cost
The average cost as calculated from purchase order amounts or as set using IC-G, Adjust Levels to Phys.
Units on Hand
The number of units on hand and available for sale. (See Getting Started to follow the recommended procedure for entering units on hand for a new inventory item.)
Units on S/O
Units on open sales orders. These are the units that are on existing sales orders but have not been invoiced/shipped yet. They are still in stock but not available for sale.
Units BO
The number of backordered units on sales orders. When a sales order is invoiced/shipped, backorders can be filled from units on hand if the inventory has the items available.
Total Inv Value
Total inventory value, calculated as
((Units on Hand + Units on Sales Order) X Avg Cost)
General Program Operation
Adding a New Inventory Record
The description below assumes that you are holding all your inventory in a single location. See the section Using Multiple Locations earlier in this section.
Enter the new code in the Product Code field and press ENTER. Because Advanced Accounting 7 uses this product code in a number of programs, remember to design your product codes so that you can take the greatest advantage of the product code ranges used for printouts and range-based searches. For example, all products of a specific manufacturer might use the same first three letters so that they can all be located as a group; you might also group items that have associated parts with the same prefix.
![]() If you are going to use UPC bar codes then this must be the actual bar code number (generally a 12 digit number).
If you are going to use UPC bar codes then this must be the actual bar code number (generally a 12 digit number).
![]() You can create a DEFAULT record to preset default values for a new inventory item. For more information please refer to Default Records.
You can create a DEFAULT record to preset default values for a new inventory item. For more information please refer to Default Records.
If the code has been previously used, that inventory record will be displayed. To start with a new code in this situation, you must first press F3 to clear the existing record from the screen.
After you enter the new product code, enter the rest of the appropriate fields. When you have entered the base price and indicate that you want to use a price matrix, you will have the opportunity to enter up to 9 fixed price levels (if you have 0 or blank in the price matrix field) or 9 discount/markup percentage levels (if you have a number from 1-999 in the price matrix field). You can use an existing price matrix; see IC-H, Enter Price Matrix.
If the product type is N, you must enter a G/L Sales account, a G/L Non-Tax Sales account, and a G/L Expense account. Use the F2 function key to see a list of the various G/L account codes. You must be in an account code field to be able to use F2 for this function.
Since this is a new record, you can enter some information below the double line reflecting the sales history (if this is a R type item): Last sale date, Last P/O date, Last Recpt date, Last Cost, Average Cost. You must enter at least one location record for each R type item and you will be able to enter the Units on Hand for that item in the Location record. This will be totaled in the main record also and, using the average cost, will calculate the total value on hand.
![]() In order to have a more complete and reliable history of your inventory, do not enter Units on Hand values for an inventory item when you are entering the inventory item. Instead, create a purchase order (using PO-A, Enter Purchase Orders) after you have created the inventory item or use the BKBEGINV.RUN program (please see Getting Started for more information).
In order to have a more complete and reliable history of your inventory, do not enter Units on Hand values for an inventory item when you are entering the inventory item. Instead, create a purchase order (using PO-A, Enter Purchase Orders) after you have created the inventory item or use the BKBEGINV.RUN program (please see Getting Started for more information).
To save the record, you may enter a value into each field or just press ENTER until the program asks whether you want to save the record. You may also press F10 to go directly to the Save prompt.
If this is a R type item the program will ask you to enter at least one location record. If you choose not to the main record will not be saved.
The program will not allow you to save a record that does not have a product code and the appropriate G/L Account Code(s).
Changing an Existing Inventory Record
To find an existing inventory record, enter the full product code or use the standard record search keys. You can use the F2 function key to view existing inventory items (if your cursor is positioned in the Product Code field) or available account codes (if your cursor is positioned in an account code field). You may change any of the fields in the upper portion of the inventory record.
To change the product code itself please refer to SY-M, Change Related Rec Vals.
![]() If you have designated a price matrix number used by other products, you cannot change the discount percentages other than adding new levels that were previously unassigned.
If you have designated a price matrix number used by other products, you cannot change the discount percentages other than adding new levels that were previously unassigned.
To save the changes you have just made, enter a value into each field or press ENTER until the program asks whether you want to save the record. You may also press F10 to go directly to the Save prompt.
Deleting an Existing Inventory Record
After you have selected the record you want to delete (by typing in the product code or using F2 to select from a list), press the F4 function key. You will be allowed to delete an existing inventory record only when the Units on Hand, and Units on P/O and Units on S/O amounts for the product are all 0. The program will ask you to verify the delete request. Once it is deleted, the record cannot be recovered. You must reenter the record if it is deleted by accident.
Inventory Locations
If you have inventory at more than one location, you can track the units on hand, etc., for this item at each location. Advanced Accounting 7 allows you to maintain inventory at up to 250 locations. See the section Using Multiple Locations earlier in this section for a discussion of how to set up and handle multiple-location inventories.
![]() When entering a new R type inventory item you are required to enter at least one location record. Locations do not apply to N type items.
When entering a new R type inventory item you are required to enter at least one location record. Locations do not apply to N type items.
To display the locations you must have an inventory item displayed on the screen. Press the view/edit Loc button and the following screen will be displayed:
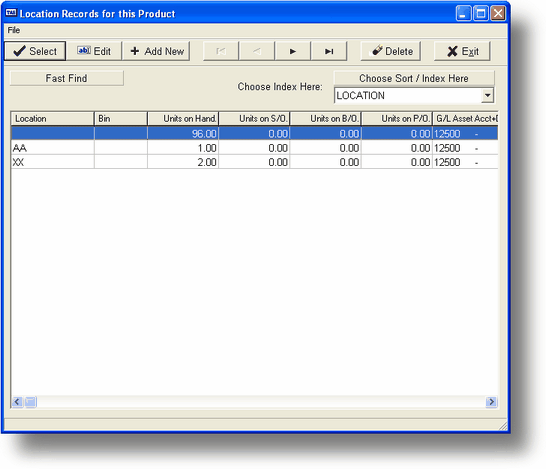
This list will have all the locations currently setup for this item. It will always have at least one. This is a sliding list and there is more information you can see by pressing the RIGHT ARROW key.
To change a location entry move the cursor bar to the appropriate line and press the ENTER key or click on the location you want to edit. (To add a new location, press INSERT key.) A screen similar to that below will be displayed:
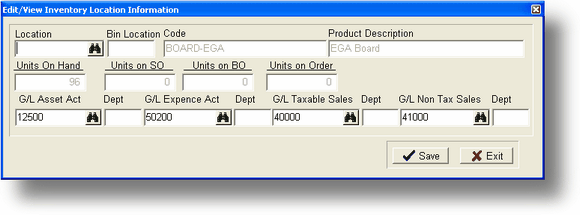
Locations
Field Explanations
Location
The name of the location you are editing. All products should have a default location which is blank.
Bin Location
The physical location (bin number) for this product at this location.
Average Cost
The average cost of all of the items for that location.
Last Cost
The last purchase price for a single unit of that item at that location.
G/L Assets
When posting transactions, the cost of units received or sold will be posted to the G/L Asset account. The account should be an Asset account that you have created in SY-E, Create/Chg G/L Account. You can view your Asset accounts by pressing F2 when your cursor is in this field. In the case of a purchase order received and invoiced, this asset account will be debited (increased) by the number of units received multiplied by the cost per unit on the P/O. In the case of a sales order invoiced and posted the asset account will be credited (decreased) by the number of units sold multiplied by the Average Cost of the inventory item. If you are posting a credit purchase order or invoice then the transactions above are reversed.
![]() You must enter an active G/L account code for each G/L field in the location record.
You must enter an active G/L account code for each G/L field in the location record.
G/L COGS
When posting transactions, the cost of goods sold amounts will be posted to this account. This must be an Expense account in order to reflect your inventory costs. When you post an invoice this COGS account will be debited by the number of units sold multiplied by the average cost of the inventory item.
G/L Sales
When you post transactions, this is where the taxable sales amounts will be posted.
G/L Non-Tax Sales
This is where the sales amounts for non-taxable items will be posted.
Locations
General Program Operation
To enter a new location from the list window press the INSERT key. The screen above will be displayed and you will be able to enter a new location record. To change an existing location enter the appropriate location code and press the ENTER key or press the F2 key to get a list of locations for this product.
You may change the Bin or G/L Accounts in any location record and in a new location record you can also enter the Units on Hand. If you wish to change the location code to one that already exists for this inventory time, you will first have to transfer all units on hand from this location to the new one using IC-K, Transfer Inventory. After all units on S/O, B/O, and P/O have cleared for this item at this (old) location (all 4 unit counts are now zero), you will be able to delete the old location record. If you wish to change the location code to one that does not yet exist for this inventory item, first add a location record for the new location (do not indicate any units on hand), then perform the inventory transfer from the old location to the new one as above. If you wish to change ALL location records from one code to a new code that you specify, for every inventory item that uses that location, you can do so by using SY-M, Change Related Record Vals. An example of this is changing all instances of location XYZ to ABC for every item in the inventory file. Use care in doing this; if the location you are changing to already exists for one or more inventory items, duplicate location records could result, and inventory tracking will be adversely affected.
You may delete a location by pressing the DEL key when in the list window. If there are units on hand, back order, sales order or purchase order for the location you will not be able to delete it.
Getting Other Information About this Product
Using this same program you may get other information about this item. If you press the ^PAGE DOWN (CTRL+PAGE DOWN) key the following menu will be displayed:
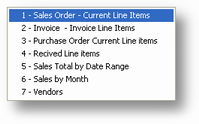
| 1. | Sales Order - Current Line Items - This option will show a list of all current (open) Sales Orders that include this product. This is a sliding list and you can see more of the record by pressing the RIGHT ARROW key. You can see the entire order by moving the cursor bar to the appropriate line and pressing the ENTER key. The program will chain to SO-A and the order will be displayed. You may not enter a new order from this list. |
| 2. | Invoice Line Items - This will show a listing similar to option 1 above, however, this uses the invoice history file. To see the entire invoice move the cursor bar to the appropriate line and press the ENTER key. The program will chain to SO-K. Only one invoice at a time can be displayed. To see more return to the list, choose the next item, and press the ENTER key again. |
| 3. | Purchase Order - Current Line Items - This option will show a list of all current Purchase Orders that include this product. This is a sliding list and you can see more of the record by pressing the RIGHT ARROW key. You can see the entire order by moving the cursor bar to the appropriate line and pressing the ENTER key. The program will chain to PO-A and the order will be displayed. You may not enter a new order from this list. |
| 4. | Received Line Items - This will show a listing similar to option 1 above, however, this uses the P/O receipt history file. To see the entire invoice move the cursor bar to the appropriate line and press the ENTER key. The program will chain to PO-E. Only one P/O at a time can be displayed. To see more return to the list, choose the next item, and press the ENTER key again. |
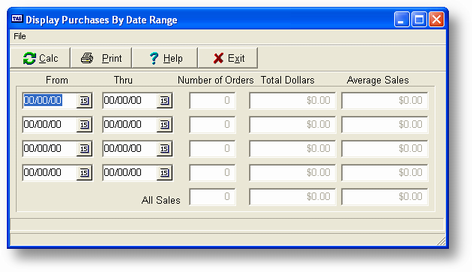
| 5. | Sales by Date Range - If you choose this option the screen above is displayed. You will be able to enter 4 different date ranges. The program will automatically calculate the total sales amount. The dates you enter are saved and will be used as the defaults the next time you choose this option for any product. This option uses data in the invoice history file and will only report on sales to customers whose Hist? indicator is set to Y. The results of this option may be printed if desired. |
| 6. | Sales by Month - This option will print the Gross, COGS, Net Sales and Net Margin Percentage by month for this product. Only those months in which sales were recorded will be displayed. The program will display up to 5 years of sales in descending order (current year first). As with option 5 above this information comes from the invoice history file. |
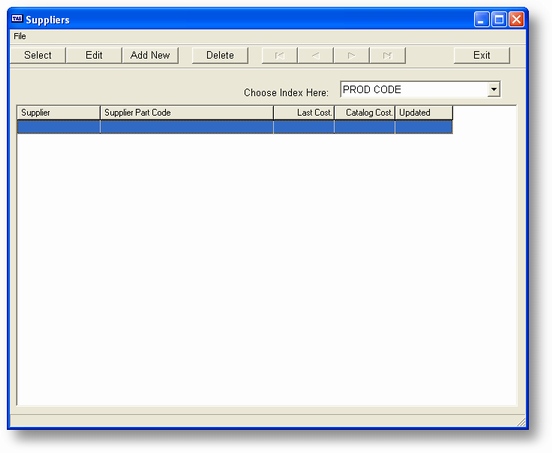
| 7. | Vendors - A list of vendors that supply this part will be displayed as below: |
To enter a new alternate address press the INSERT key and the following screen will be displayed:
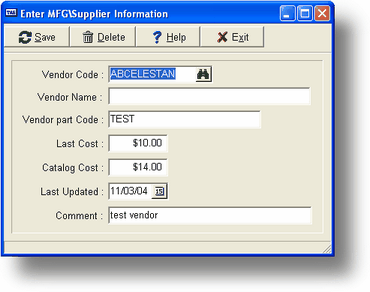
You will then be able to add a new supplier for this product. Press ENTER after the last field or F10 to save the new supplier.
To modify an existing supplier record move the cursor to the appropriate line and press the ENTER key. The entry window above will be displayed, this time with the current data. Click the Save button after the last field.
To delete an existing supplier record move the cursor to the appropriate line and press the DELETE key. The program will ask you to confirm your action. If you enter Y the record will be deleted from the list.
Page url: http://www.cassoftware.com.com/adv7docs/index.html?ic_a_enterchangeinventory.htm