|
POS-A - Run POS Register |

  
|
|
POS-A - Run POS Register |
|
Purpose of Program
Use this program to convert your PC to a cash register.
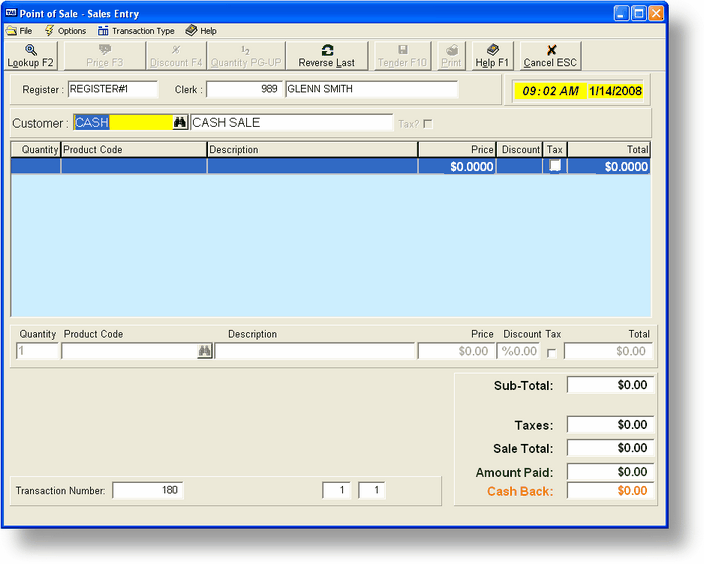
Initial Log On Screen

Field Explanations
Register
This is the internal register code you are going to use when running this physical register. Each physical register being run must be 'attached' to a different internal register.
You can enter a code in this field or use <F2> or click on the register button to select from a list.
Cur Cash
This is the current cash balance as recorded for that internal register. If there have been no sales since the last reconciliation, this amount will be equal to the amount set in Beg Cash for this register using POS-J, POS Configuration Maintenance.
Clrk
Enter the appropriate clerk code here. A list of clerks is available by pressing the <F2> key.
Password
The password assigned the clerk. Must be entered properly before any further entry is allowed.
Name
The name of the clerk associated with the clerk code entered above. This is displayed as information only.
Initial Log On Screen
General Program Operation
Log on to a Register
This is the initial process you (or a clerk) will perform when preparing to set up a computer as a cash register. This process attaches an internal register and clerk code to a physical register.
The first step is to choose an internal register code. An internal register can only be attached to a single physical register at a time, and the program will alert you if you try to attach a register that is already attached to a different machine. Press the <F2> key for a list of registers. After a register is chosen the current cash balance is displayed. We recommend that a clerk logging on to a register count the actual cash in the drawer or till to verify the accuracy of the current cash balance shown.
Next enter the appropriate clerk code. As with the internal registers above, a clerk may be logged on to only a single register at a time. Press the <F2> key for a list of available clerks. After a record is chosen the clerk's name is displayed.
If there is a password in the clerk's record it needs to be entered next. The system allows three attempts to enter the password correctly. If those attempts fail, the system returns to the main POS menu. After the password is entered correctly, the main sales screen will be displayed as below.
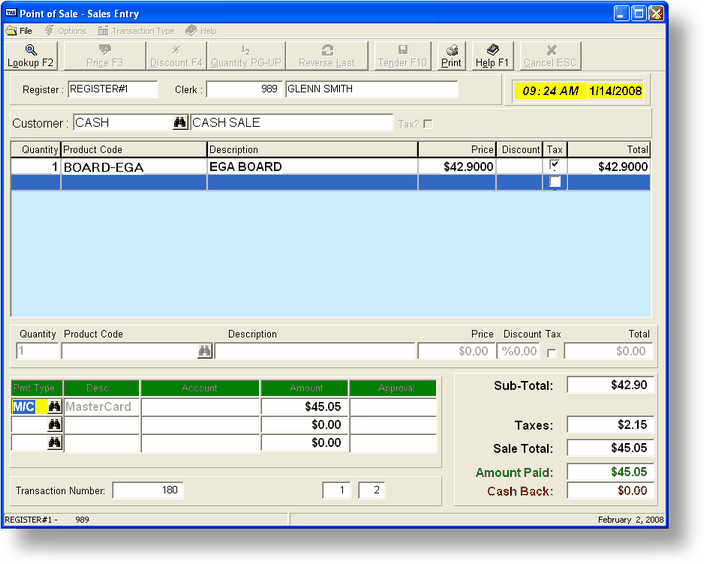
Sales Screen
Field Explanations
Cust Code and Cust Name
The code and name for the customer for the current sale. The name is displayed automatically after choosing a specific customer. Press the <F2> key or click on the button to get a list of customers. The default value in this field depends on the appropriate entry in the Register record.
Tax
Whether or not the line items in this sale are normally taxable or not. This entry will default to the value in the customer record.
Balance of top entry line
The register and clerk code as entered on the initial log on screen are displayed again here as well as the current date and time.
Bottom of sale screen
Certain information about the sale in process is displayed at the bottom of the screen. On the right side are the current totals for the sale, including the sub-total of all line items, discount rate and amount (if any) and the tax amount. The total of all these items is also displayed. The left side shows payment information. This includes the amount paid so far, the amount owed (which is equal to the total amount when amount paid is 0), and the cash back (or amount of change).
Main sale area
The center section of the screen is devoted to entering line items for the sale and is explained below.
Sales Screen
General Program Operation
Choose a Customer
The value entered for Change Customer Code in the Register record determines whether or not an entry can be made here. (Please refer to POS-J, POS Configuration Maintenance.) If this value is set to Y, the cursor will start in the Customer Code field at the beginning of the sale. The value displayed will be the default customer code for this register (see POS-J). To accept the default, press the <Enter> key; otherwise enter a different code or press the <F2> key or click on the lookup button to get a list of available customers. (You can type in all or part of the customer code to search as with all <F2> look-ups.) You may also be able to enter a new customer using the <CTL-F2> key, depending on the setting of the appropriate option for this register (see POS-J). You are now ready to enter the first line item.
![]() If you have the proper permission you may also change the current customer as chosen. By pressing the <CTL-F2> key the program will chain to the Maintain Customer program (AR-A) and will automatically use the customer code from the POS program. This will allow you to make changes to that customer's address, telephone number, etc., while they're still in the store.
If you have the proper permission you may also change the current customer as chosen. By pressing the <CTL-F2> key the program will chain to the Maintain Customer program (AR-A) and will automatically use the customer code from the POS program. This will allow you to make changes to that customer's address, telephone number, etc., while they're still in the store.
Normal Sale Line Entry
If the Change Quantity Sold option in the Configuration record is set to A (always) then the first entry will be the quantity for this line. If the option is set to S or N, the first entry is the Prod Code (product code). The S (sometimes) option allows you to change the quantity by pressing the <Left Arrow> key. The cursor will move to the quantity field. Make the appropriate entry and press the <Enter> key to return to the product code. If the Change Quantity Sold option is set to N (never), you won't be able to change the quantity value.
With the cursor in the product field you can enter the appropriate code, or search using the <F2> look-up or click on the search button. Within the look-up, you can switch keys using choose index sort dropdown for example, you might want to search using the Short Description field.
![]() POS is compatible with any bar code scanner or similar device that attaches directly to the keyboard, or between the keyboard and the computer. When an item is scanned the device sends the appropriate characters just as though you had entered them at the keyboard. Don't forget: if you use this type of entry, the Product Code for the inventory item (specified in the inventory control module) must be the appropriate bar code number for that item.
POS is compatible with any bar code scanner or similar device that attaches directly to the keyboard, or between the keyboard and the computer. When an item is scanned the device sends the appropriate characters just as though you had entered them at the keyboard. Don't forget: if you use this type of entry, the Product Code for the inventory item (specified in the inventory control module) must be the appropriate bar code number for that item.
If the Product Code field size (see POS-J) is set to the same number of characters entered, the system will automatically move to the next line as though you had pressed the <Enter> key. (A scan tone will sound when this happens, if you have set the Send Scan Tone field to Y in POS-J, to alert you that the item has been scanned or entered correctly.) The price for the item will be displayed and added to the Total fields at the bottom of the screen. The Tax field for this line will be set to the same value as the Tax field for the entire sale, the Short Description field entered for the product will be displayed or if it is blank, the program will use the first 15 characters of the regular description field (see IC-A, Enter/Chg Inventory). The price displayed is the normal retail price for the item. If this customer has a special price matrix then that pricing structure is used. (See AR-A, IC-A and IC-H for more information about the pricing matrix. Please note that if you change customers after entering line items, and the new customer has a different price matrix, the line item prices will NOT reflect the change.) Items on promotion are marked with an asterisk (*). The program then moves the cursor to the next line and you are ready to either enter the appropriate quantity or product again without any further keyboard entry.
![]() Advanced Accounting 7.0 allows for negative (or below zero) inventory on-hand amounts. If an item is sold for which there is no inventory on-hand, no warning messages will be displayed. In most cases, the item is there; the customer has brought the item to the register! However, the system makes a record of this occurrence, and a listing of all the transactions that resulted in negative on-hand amounts can be printed using the Neg Inventory option in POS-B, Print POS Reports.
Advanced Accounting 7.0 allows for negative (or below zero) inventory on-hand amounts. If an item is sold for which there is no inventory on-hand, no warning messages will be displayed. In most cases, the item is there; the customer has brought the item to the register! However, the system makes a record of this occurrence, and a listing of all the transactions that resulted in negative on-hand amounts can be printed using the Neg Inventory option in POS-B, Print POS Reports.
If you need to enter more items you may do so now. You can enter up to a total of 1000 line items if necessary. When you are finished entering items, press just the <F10> key at the blank product code field. The program will automatically move to the payment routine.
Payment Entry
The first payment type listed will be either the default type as set up in the Configuration file or the appropriate type for that customer.
![]() When a customer other than the default customer is chosen the program attempts to find a match in the payment types file with the terms set up for that customer. If there is a match it is displayed as the initial payment type. If a match is not found the program uses the default payment type as the initial choice. In either case you can override the choice displayed.
When a customer other than the default customer is chosen the program attempts to find a match in the payment types file with the terms set up for that customer. If there is a match it is displayed as the initial payment type. If a match is not found the program uses the default payment type as the initial choice. In either case you can override the choice displayed.
You can then accept that type by pressing the <Enter> key or enter the appropriate type. You can press the <F2> key click on the payment button to get the list of payment types.
If the payment type requires that an account number be entered, the program will wait at that field until you enter the appropriate value. The same applies to any approval code that may be required. For example, the approval code might be the code returned from a credit card verification. If you are using the X-Change system to process credit cards the system will automatically update the approval code with the Credit card verification from the x-charge system.
Finally you need to enter the amount of the payment for this type. If the customer is paying for all or the balance of the sale using this type then press just the <Enter> key at the 0.00 amount field and the system will automatically apply the amount remaining. If you don't record all (or more than the amount owing in the case of cash), the program will go to the next line and allow you to enter another payment type and amount. This will continue until you have recorded enough payments to cover the entire sale.
![]() You may split a single sale over 3 different payment types. The same payment type may be used as many times as required (e.g., for multiple VISA cards).
You may split a single sale over 3 different payment types. The same payment type may be used as many times as required (e.g., for multiple VISA cards).
![]() To return to the line entry mode from payment entry just press the <Esc> key when the cursor is in the payment type field. The system will go back to the first line in the sale, and you'll be able to edit lines or add new ones.
To return to the line entry mode from payment entry just press the <Esc> key when the cursor is in the payment type field. The system will go back to the first line in the sale, and you'll be able to edit lines or add new ones.
You may change a payment line by moving to that line with the <SHIFT-TAB> or <TAB> keys. You can also if you have a mouse click on the fields you want to edit. Enter the correct payment type or change the amount entered previously. You can also delete the line by moving the cursor to that line, pressing the <Esc> key and then pressing the <Del> key. The program will not ask you to confirm your action but will automatically delete the line. To enter more payments, move the cursor to the end of the list (first blank line) and press the <Enter> key.
After all payments have been entered.
Credit Card Processing
If you would like to use this powerful feature to process credit cards Please contact us here at Computer Accounting Solutions at (928)257-1236 Email: or Contact Ramon Corona our CAS Software / X-Charge Representative at Phone: 800.637.8268 ext. 115 Fax: 702.446.0473 or Email:
If one or all of the payments are set for credit card the program will run the Advanced Accounting Credit card terminal program using the X-Charge Credit card server. Here is a sample of the credit card terminal program screen.
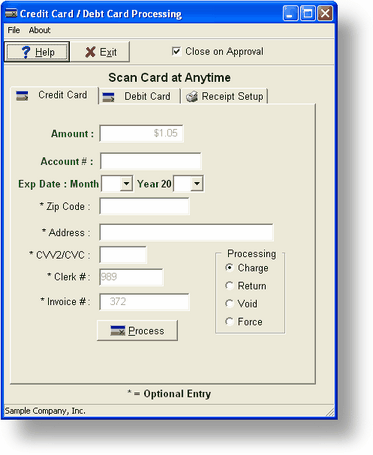
On this screen the clerk will swipe the customers credit card or Debit Card and click the process button. Or the clerk can enter this information manually from the keyboard. If this is a keyed entry the clerk will also have to enter the CVV2/CVC code from the back of the credit card. then they simply click the process button. The program will contact the X-Charge server and process the payment thru X-Charge Credit card processing.
If X-Charge for some reason declines the entry. The program will return to the payment processing screen so the clerk can try and resolve the payment issue and try again. When the Credit card process is successfully the program will print a Credit card Slip for the customer to sign. If the Customer users more them one credit card this process will repeat till all Credit card type payments are resolved.
After Credit card processing is done the program will record the sale and print a receipt. Depending on the options chosen in the Receipt setup tab in the ADV Credit card terminal, the program may ask before printing a receipt and may also wait before a receipt is printed. Otherwise, the program will automatically print the Credit card receipt and return to the beginning of the next sale.
Please note that if you have set the Post Real Time field to Y, there will be a very brief delay while the just-completed sale is posted. If you have set this field to N, the program will be ready for the next sale instantaneously. If the Change Customer Code option is set to Y, the program will return to the Customer Code field. Otherwise, it will start with the first line of the next sale.
NOTE: to see more information on the Adv Credit card program press the F1 key or click the help button for detailed information on this programs operation and setup.
Changing/Deleting Lines
To make changes to a sales line entered previously you need to have the correct option set in the appropriate clerk record (Allow Line Changes). If this option is set to Y, you will be able to move the cursor back to a previous line by pressing the <Up Arrow> key. Once you are on that line you can change the quantity, product code, price, discount, or tax flag using the function keys displayed at the top of the screen. For more information refer to the Other Operations section below.
If you wish to delete the line entirely then press the <Up Arrow> key and the line cursor (a single bar across the list) will be displayed. Press the <CTRL -D> keys this will delete the line. The clerk will be ten returned to product entry mode.
Voiding a Sale
If you cannot make changes to lines (due to settings in Configuration file), or you just want to remove an entire sale and start over, you may void it. You must be in the line item list, not the payments, to do this. Press the <^V> key (ctrl+V). If you do not have the approval to perform a void, the program will ask you to enter the appropriate clerk code and password. (The clerk chosen would have to have the necessary approval.) If you do have the approval necessary, the program will ask if you are sure you want to void the sale. If you enter Y, it will be voided and you will be returned to the beginning of the next sale.
A voided sale is kept in the same sales list as a normal sale. However, the sale is marked as voided, and the code for the clerk who approved the void is saved with the record.
Please note that you can also cancel a sale in progress by pressing ^Q (ctrl+Q). No record of the canceled sale will be saved. In general, we recommend that your clerks use the void procedure described above so that you'll have an audit trail of voided sales. We have intentionally not included a listing of this option at the bottom of the sales screen, so that clerks will only be aware of the option if you tell them about it.
Refunding a Sale
If a customer returns merchandise and would like a refund or exchange, there are two ways to proceed. You can enter negative quantity values for the items returned, and then add any new items if this is an exchange. (Note that you or the clerk must have the proper approval to enter negative quantities as set up in POS-J.) To avoid confusion, use the same customer and payment types as the original sale if possible.
If the customer has the original receipt or you can find the ticket/invoice number, you can do the refund another way. Use the old sale look-up facility menu item options>Recall or(use the <Ctrl-F10> key from the initial sales entry screen) and choose to reverse the sale. For more details, see the instructions given under the section Other Options Available from POS-A, Run POS Register later in this section.
Please note that if you attempt to refund more cash than currently exists in the cash drawer, the system will complete the sale and then "chain" to the Cash In program described below. The POS system assumes that you or a clerk will have to replenish the cash drawer to do the full refund, and therefore gives you the opportunity to record the cash in immediately.
Other Operations
There are several other operations you may perform while in the normal line item entry. These include:
a) Change Sale Price - <F3> - If you wish to use a price different from the value in the inventory record use this option. The price may be changed after the item is found (if you have the approval to 'backup' and change a record) or before (if you don't have approval).
b) Discount Line - <F4> - By choosing this option you can enter a discount for just the current line, as opposed to the entire sale (see Discount Sale below). Enter the amount as a percentage (e.g., a discount of 10% would be entered as 10, a discount of 2.5% would be entered 2.5, etc.). The program will automatically calculate the extension for the price and give the discount.
c) Tax Toggle - <F5> - This will allow you to switch the line from taxable to non-taxable and back again. Each time you press this key the tax value will change to its opposite.
d) Suspend the Sale - <F6> - If for some reason you want to suspend the current sale and enter a new one, press this key. It will put the current sale on hold and allow you to complete another transaction. After you have completed the next sale, the suspended one will ask if you wish to continue with it. If you answer N you can enter another sale, and again, at the end, the program will ask if you wish to continue with the suspended sale. This will happen until you finally finish with the suspended sale. Only one sale at a time may be in this suspended state.
e) Enter Message Line - <F7> - This will let you enter a 30 character message instead of a normal item line.
f) Discount Sale - <F8> - If you wish to discount the entire sale, instead of just a single line, press this key. As with the Discount Line option you should enter the amount as a percentage.
g) Change Customer - <ESC> to get back to Customer Code entry. At any time during the sale you may change the customer entered for this sale by pressing this key. This only applies if you have the proper approval to do so. The cursor will move to the Cust Code field and you will be able to choose or perhaps, add a new customer if desired. All the options that apply to this entry when creating a new sale apply here also.
Exiting the Program
To exit the program and return to the menu, press the <Esc> key while the cursor is in the Customer Code field. If you don't have the approval to enter/change customers then press the <Esc> key while the cursor is in the product code field in a new sale. You will be asked if you wish to exit the program; enter Y. Please note that when you (or a clerk) exit from POS-A, you will be logged off the register. To run the register again you must log back on. If you just want to change clerks or registers, you can speed up the transition as outlined in section below.
Other Options Available from POS-A, Run POS Register
The preceding sections covered most aspects of a "normal" sale. POS-A also offers a number of other options directly from the sales entry screen. Please note that to run these options, the cursor must be in the Cust Code field (that is, before you have selected and accepted a customer). The additional options are listed at the bottom of the sales entry screen. The facilities for displaying customers, adding new customers, and changing the data for existing customers has already been discussed. The sections below will provide details on how to record cash out's for deliveries and cash-in's for replenishing a cash drawer; set up lay-a-way's; retrieve old sales for doing refunds or edits; reprint receipts; and quickly change sales clerks or registers without returning to the main POS menu.
Performing a Cash Out
If you ever have vendors deliver goods to your place of business and ask for payment on delivery, the cash out facilities in Point of Sale will be very helpful. From the initial sales screen, with the cursor located in the Cust Code field, press <Ctrl+F5>. If you have set the approval codes in POS-J to require approval for doing a cash out, the box below will pop up, asking for a clerk code and password.
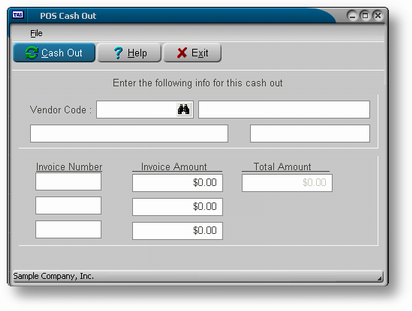
After the correct information has been entered, a cash out entry screen like the one shown below will appear. Here you enter the vendor code (use the <F2> lookup if needed) and then put in invoice numbers and amounts. Up to three invoice lines can be entered. When you have finished entering cash out amounts, press <Enter> from a blank line.
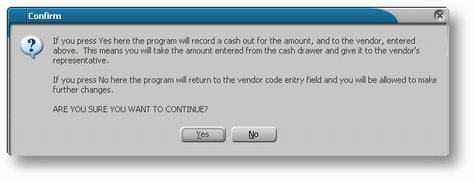
Answer Y to continue with the cash out, and the amounts you entered will be recorded. (You can get a listing of all unposted cash out's using POS-H, Cash Out Report. To post cash out's, run POS-G, Post Cash Out Transactions). At this point you or your clerk can take money from the cash drawer, pay the vendor, and then close the drawer. You are also given the option of printing a receipt for the cash out. When you've finished the cash out, the program returns to the initial sales screen.
Please note that a cash out is posted as a credit to the cash account and a debit to the clearing account. When you run POS-G and distribute to the appropriate expense/asset account(s), the clearing account will be credited for the proper amount.
Performing a Cash In
Occasionally you will have to replenish a cash drawer if you've run out of cash or change. To keep a record of a cash in while running a register, press <Ctrl>+<F6> (press the CTRL key plus the <F6> key). The screen shown below will be displayed, and you'll have the opportunity to enter the amount of the cash in. The new register balance will be reflected when a clerk settles (balances) the register or when a new clerk logs in.
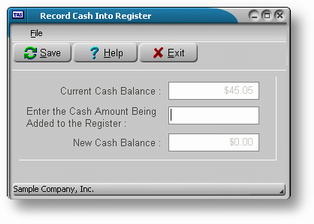
You will be offered the opportunity to print a receipt showing the cash in. After you've finished, the program will return to the initial sales entry screen. Please note that no G/L transaction is generated by the cash-in.
Lay-a-way Sales
POS offers the ability to do lay-a-way sales, where a customer selects an item and makes payments toward the price of that item over a period of weeks or months until the entire price has been paid. At that point, the customer may take the item home. With the POS system you can perform a number of activities to record sales, payments, look at inventory on lay-a-way, cancel lay-a-way's, and complete a lay-a-way sale. These options are discussed below.
a) Enter a Lay-a-way Sale - To put in a lay-a-way sale, proceed as you normally would to enter a sale and choose LAY as your payment type. (This payment type must be set up in advance using POS-J.) Please note that you may not split a lay-a-way sale with other payment types. If you need to record a deposit at the time the lay-a-way sale is entered, put in the lay-a-way first, and then record a payment against that lay-a-way as outlined below. Once you select LAY as the payment type, the entire amount of the sale will be recorded (with an option to print a receipt) and the program will return to the initial sales entry screen.
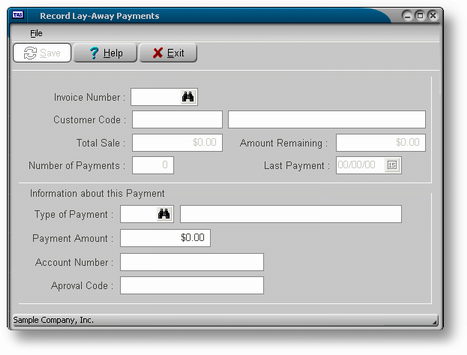
From the sales entry screen, press the <Ctrl>+<F7> key to perform lay-a-way activities. Once you press <Ctrl>+<F7>, you can choose whether to record a payment (Yes) or perform other lay-a-way transactions (No).
b) Record a Lay-a-way Payment - Enter Y to record payments against a lay-a-way, and you'll see the screen above. Select the lay-a-way you'd like to record payment against using the <F2> look-up. Press <Enter> and then choose the payment type and payment amount. Answer Y to record the payment, and then print a receipt if you'd like a hard-copy summary of the payment. The payment amount will be recorded in the G/L account you specified in POS-J under Lay-a-way Pmts Recv Liab Acct.
If you enter N for Other Lay-a-way Transactions, you'll see the menu below. These options are discussed next.

c) Look Up a Lay-a-way - If you choose the first option, select the lay-a-way you want to view by placing the highlight bar on the correct line, press <Enter> and you'll see the screen shown below.
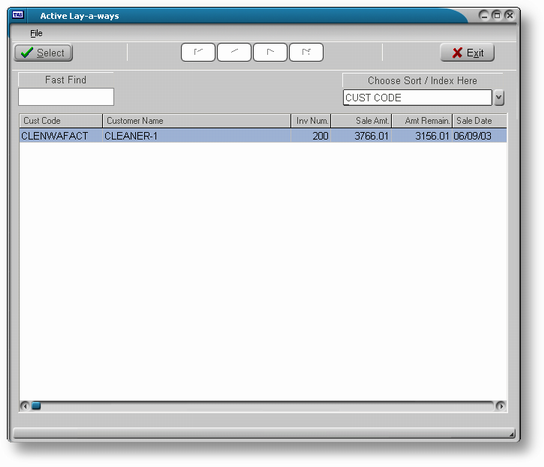
You can get a print-out of the information shown here by pressing <^P> (ctrl+P). You can also press <F2> to see all the line items in the lay-a-way, as shown below.
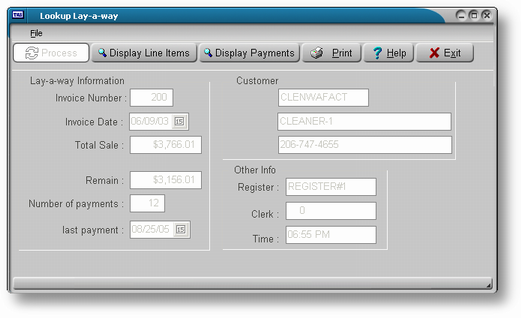
Pressing <F3> will display payments data for this lay-a-way. The report shows the date of each payment, the amount, the invoice number, and the payment type.
d) Complete a Lay-a-way Sale - Before you can complete a lay-a-way sale, you must have recorded payments that in total equal the original sale price, so that Amount Remaining is 0. If you need to record a final payment, use the process described in a) above. If that payment results in Amount Remaining being set to 0, the POS system will ask if you want to complete the sale and automatically "chain" to this program if you want. If you are entering this program from the Other Lay-a-way Trans actions menu, simply select the lay-a-way to process, answer Y to continue, and the system will post the sale.
e) Cancel a Lay-a-way - If you are cancelling a lay-a-way where payments have been made, and you want to refund all or part of the payments to the customer, you must first record a final negative payment that reflects the amount to be refunded. If no money is refunded or you only return part of the payments, the excess will be added to the Lay-a-way Refund Charge G/L account (an I type account) you specified in POS-J. After recording refund payment, if necessary, select the Cancel Lay-a-way option, choose the lay-a-way to cancel, and enter the clerk code. Confirm that you want to cancel the lay-a-way, and the system will perform the cancellation and return you to the Other Lay-a-way Transactions menu.
f) Change a Lay-a-way at the Time of Completion - If the line items or prices on a lay-a-way change when the lay-a-way is being completed, you need to cancel the original lay-a-way and "refund" the payments, typically in cash. (Note that this may not be a real refund, since the payments may be applied towards the "new" sale.) Record the new sale as a cash sale, settling the difference in cash you refunded versus the new sale amount as the sale is completed. You could also add items to this "new" sale at that time.
If the entire contents of the lay-a-way are likely to change, or you find yourself changing lay-a-way's often at the time of completion, we suggest you create a special N (non-inventory) type inventory item that serves as a place-holder for an entire set of lay-a-way items. The amount charged for this item would be equal to the amount of the particular lay-a-way (less any taxes). Putting this item on lay-a-way provides something to record payments against without having any impact on the system's inventory levels. When the payments were completed, you would cancel the lay-a-way as described above and then put in the real items as a regular sale.
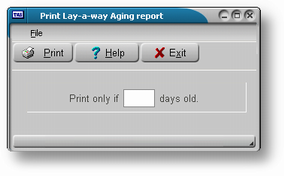
g) Print Information on Aging of Lay-a-way's - Choose the Lay-a-way Aging Report option, select the number of days to use in restricting the print-out, and press <Enter>. An example of the report is shown below.
h) Show Products on Lay-a-way - To get an idea of which products are on lay-a-way and in what quantities, choose this option, and then restrict the output by Product Code, if desired. For each product, the report shows quantity on hand and on lay-a-way, days since last payment, the original date of the invoice, and the percentage remaining (100*(1- amount paid/total amount)). An example of the report is shown in Appendix A.
Changing or Reversing a Previous Sale
If a customer returns merchandise to you for a refund or exchange, and you have a receipt or other means for identifying the sale, you can use the old sales lookup facility available from the initial sales entry screen. (If no receipt is available, for example where an item was received as a gift, you can record negative quantities to reverse the effect of the sale. See the section entitled "Refunding a Sale" earlier in this section for details.)
Press Recall <Ctrl>+<F10> from the initial sales entry screen to reverse or change a previous sale. The security system will ask for a clerk code and password if this action requires approval. Enter the information necessary, and then select the sale you'd like to reverse or edit by placing the highlight bar on the appropriate line and then pressing <Enter>. Press <End> to move to the end of the list (the most recent sales).
If the sale you've selected has not been posted, the system will issue a message saying that if you continue, the original sale will be voided, and the original line items will be used as the basis for a new sale. You may then delete or change the existing line items, and add new entries just as in a regular sale. The original sale will be voided; you can see that sale using POS-B, Print POS Reports and selecting the Sales Report option.
If the sale you've selected has been posted, the system will give negative quantities to all existing line items in anticipation of your reversing the sale (see the example below). Should you decide not to continue by answering N, the system will return you to the initial sales entry screen. If you continue and would like to do a straight refund of all items, simply move to the first blank line, press <Enter>, and the system will ask if you wish to use the original payment types and amounts for the refund. Answer Y to accept the original payment types; answer N to change.
PLEASE BE CAREFUL if you are doing a complete refund about how you mix cash and non-cash payment types. You could end up refunding cash to a customer who paid with a bad check that hasn't cleared yet. This is especially important where the customer has been given terms and may or may not have made any payments before asking for a refund. At the very least, you should cover such possibilities in training your clerks and setting company or store policies. In the case of a straight refund, we recommend that you accept and use the original payment types and amounts for the least risk.
In a straight refund, the Amount Owed will be negative, indicating that you owe the customer money back. Where the customer has paid on terms, the refund will be reflected as an outstanding credit in the customer record. Use AR-C, Record Payments to apply the outstanding credit and update the customer information.
Exchanges are handled in much the same way. Select a previous sale, and then move to a blank line in the sales entry screen (past the negative quantity line items) to add the new items. (See the example below.) The Amount Owed will track the net amount for additional payment or for refund.
Take the additional money required from the customer or refund any money due, and the sale will be recorded by the system. Inventory levels on hand will be updated to reflect the items returned and sold.
Reprinting a Receipt
POS provides a quick and easy way to reprint a receipt. If you'd like an additional copy of a receipt for your internal use or if your printer jammed in the middle of printing, simply press <Ctrl>+<F8>, select the appropriate sale by placing the highlight bar, and press <Enter>. (You can press <End> to move to the end of the list.) A copy of the sale receipt will be sent to your printer.
Changing a Salesperson
If you'd like to quickly change the clerk logged onto a register, press <Ctrl>+<F9>. After you enter a new clerk code and password (if any), the new clerk will be logged onto the register.
Changing a Register (and Salesperson)
If you'd like to change the internal register (and possibly log on a new clerk) without going out to the menu and then coming back in, press <Ctrl>+<F9>. The program will put you into the Initial Register Logon screen, where you can log onto a new register and change clerks if you like. The clerk code will default to the clerk currently logged on.
Credit Card Terminal
You may find that you have to do Force or a Void transaction or make changes to the recipe setup to use the adv Crecit card terminal you can press the <Ctrl>+<C> keys.
Open Cash Drawer
Of you have permission to open cash drawer Press the <Ctrl>+O keys.
An Overview of the Process
A sale can be as simple as:
a) Press <Enter> for the default customer.
b) Enter/scan item(s).
c) Press F10 key to tender sale.
d) Press <Enter> at default payment type field.
e) Press <Enter> at payment amount (pay all).
e1) If this is a credit card sales swipe card and press enter Credit card will be processed.
f) Take the customer's money or have them sign credit card slip.
g) Put it in the cash box or credit card slip.
h) Give the customer a receipt.
i) You're ready for the next sale!
It can also become much more complicated. This depends entirely on the decisions that have been made about which actions to allow and which to restrict. The basic idea of the POS system is to offer the speed of a 'dumb' cash register, while also providing all the information needed to run a successful business.
Page url: http://www.cassoftware.com.com/adv7docs/index.html?pos_a_runposregister.htm