|
Screen Painter Overview |

  
|
|
Screen Painter Overview |
|
MENU ACCESS
Program -> Screen Editor or Tool bar Button -> Screen
From the Main Menu click on the Screen icon. A blank screen will be displayed under the menu bar. However, if you look at the status bar at the bottom of the screen you will see Screen Painter in the first section. You can always refer to this section to make sure you're at the right place.
Now click on the New icon (it's the first one in the menu bar). Something similar to the screen below will be displayed. The actual layout will depend on your screen size settings. Part of the image below has been cropped to fit on the page.
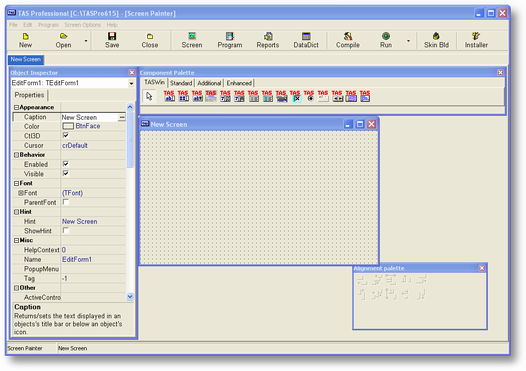
NOTE: You can run the screen editor in as little as 800 x 600, however, we don't recommend it. Your minimum resolution should be at least 1024 x 768. The higher the resolution the more you'll see without having to move things around.
The screen displayed above is basically a blank canvas. You can put anything you want on it. Above the screen is what is called an object pallet.
Object Inspector
On the left side of the screen editor is the Object Inspector. Each object has properties. These properties can generally be set either at design time (what you're doing now) or runtime (when the user is running the program). To set them at design time you enter or change the value in the field next to the property name. Each property has been defined in the help file (documentation) for this object. To display that information click on the Help menu option at the top of the screen, click again on TAS Pro Help. A standard Windows help box will be displayed. By entering the name above, the appropriate help screen will appear.
The Object Inspector will always display the information for the current object. The name of the active object, and its type, will be displayed at the top of the Object Inspector (or OI for short).
The properties in the OI are logically divided into sections. So, for example, in the Position section are items like Top, Left, Height and Width. In the TAS Pro section are properties that involve connection to the program (FieldName, Events, etc).
Adding/Moving Objects on the Form
To place an object on the screen form you click on the icon and then click at the appropriate location on the form. A default version of the object will be displayed. You can then change the size by clicking on one of the sizer (or grabber) blocks that surround the object and, while holding the left mouse button down, move the mouse as appropriate.
You can also move the object anywhere on the form by clicking anywhere inside the object and, while holding the left mouse button down, move the object where you want it. As you're moving the object an outline shape of the object will move with the mouse. When you release the mouse button the object will 'move' to the new location.
Another way to move or resize the object is to change the property values that apply. These are Top, Left, Height and Width. All values are in pixels with the top left of the screen form position Top=0 and Left=0.
Multiple Screen Forms
You can have more than one form open at a time. Each form that is opened, or created when you click on the New button, will be on their own tab. The name of the form is on the appropriate tab. To move between forms all you have to do is click on the appropriate tab.
You can also copy and paste object from one screen format to the other.
Saving/Closing Screen Forms
To save an open screen form click the Save button. If this is a new screen a standard save file dialog will be displayed and you will be able to specify a form name and path. You can also save an existing form to a new name by clicking on the File->Save As menu option. Again, the save file dialog will be displayed and you can enter a different name, and possibly a new path, for the form. This allows you to easily reuse current screen forms and create new ones with minor or major differences.
You can also close the screen form without saving it by clicking on the Close button. If the form has been changed you will be given the chance to save the screen form before it is closed. The same applies if you exit TAS Professional completely and there are forms open that have been modified.
Object Pallet
There are five different tabs that make up this Tas Professional object pallet. They are: TASWin all of the objects that are unique to TAS Professional ; Standard objects that might be typically part of a standard screen; Additional these are objects that you would use occasionally. More Objects in the Enhanced and Enhanced2 tabs. Each of these is described below:
TASWin Page
| TASEnter - Use this object to enter any type A (alpha - string) field. There are other objects to enter numbers, dates and times. However, you can use this object to enter any value in your program. |
| TASNumEnter - Use this object to enter any numeric (N, B, I or R) type field. There are other objects to enter strings, dates and times. |
| TASDataGrid - This may be the most important object available. This will display a list of records or array field values on the form in a certain order in columns. You can allow the user to delete rows (records or array elements), insert rows (array elements only), add new rows to the end of the grid, and, through the use of the DATA_GRID command, add columns, remove columns, shift them around, etc. |
| TASComboBox - This object is similar to the TASEnter with a few extra options. You can create a list of values that the user can choose from if the click on the drop down button or as they are typing. |
| TASCheckBox - Use this object to replace a standard Y/N question. If the user checks the box the value returned to the field attached to the object will be Y; if unchecked, it will return N. You can also make the attached field a type L (logical). In that case the object will return .True. (clicked) or .False. (unclicked) as would be expected. |
| TASRadioButton - Use this object to replace a standard Y/N question. If the user checks the box the value returned to the field attached to the object will be Y; if unchecked, it will return N. You can also make the attached field a type L (logical). In that case the object will return .True. (clicked) or .False. (unclicked). The major difference between this object and the TASCheckBox is in usage. Generally, you would put two or more TASRadioButton objects on a TGroupBox. The group box allows only one radio button to be chosen at a time. Using this, you can give the user multiple choices with the knowledge that they can only choose one. |
| TASPageControl - This can be used to create a standard multi-page notebook on your form. You can place objects (including another TASPageControl) in the panel below the tabs and the objects will be seen only when the user chooses the appropriate tab. |
| TASTimeEdit - Use this object to enter/edit time values. You can also include a check box as part of this object. NOTE: The TASTimeEnter object is recommended for usage instead of this. The TASTimeEdit was retained strictly for compatibility with early versions. |
| TASComboEnter - This is a special version of the standard TASEnter object. Using this object you can allow the user to enter a value 'normally', and/or by chaining to a program routine when the user clicks on the button. |
| TASDGColTemplate - This is a duplicate of the TASDGItem (Columns) in a TASDataGrid object. Through the use of this object you can add to or update an existing grid through the use of the DATA_GRID command. This is a non-visible object. |
| TASNavigator - This is a special object that provides the user with a group of buttons that can be accessed by the user to scroll through the records in a file, delete a record, save a changed record or refresh a record from the file even after changes have been made. Use the NAVIGATOR command to link this object to a file and key. This is required before this command will have any effect. |
| TASStrList - This object can be used specifically to create a string list. To manipulate the list you can either use the appropriate property editor or the STRINGS() function. This is a non-visible object. |
![]() TASDateEdit - Use this object to enter any type D (date) field. There are other objects to enter numbers, strings and times.
TASDateEdit - Use this object to enter any type D (date) field. There are other objects to enter numbers, strings and times.
| TASTimeEnter A newer version of the TASTimeEdit object. It allows for more flexibility in entering time and hours and is the recommended object to use. |
| TASMemo This object is used in CodeBase files where you have included a Memo field as part of the FD. It acts as a small word processor and allows you to add and change memos directly to a file. |
Standard Page
| MainMenu - This object creates the menu that appears at the top of the form. The items that make up the menu are actually MenuItem objects. You create those by using the MenuItemEditor. |
| PopUpMenu - This object creates a menu that appears when the user right clicks on an object (you must specify the Popupmenu object name as the PopupMenu property). The items that make up the menu are actually MenuItem objects. You create those by using the MenuItemEditor. |
| Label - This object will allow you to put a fixed string on the form. It is the simplest of all objects that you will use and, along with TASEnter, probably one of the most used. |
| Memo - Use this object to put a mini-word processor on your form. If you want to allow your user to enter messages or notes, etc. you would use this object in connection with the STRINGS() function. This is different from the TASMemo above in that it cannot be connected to a field. |
| Button - This will display the standard Windows button on the form. The user will be able to 'click' on this button (press the left mouse button while the arrow is over the object) and have this execute an Event that will call a routine in your program. This is a common object and will probably be used often on your forms. |
| GroupBox - This object is used in connection with TASRadioButtons. When multiple radio buttons are placed on a single group box the user will be able to set only one of the options active at a time. |
| Panel - This object is similar to the Bevel in that it can put a border around other objects but it has other uses also. The types of styles available are greater than with a bevel and it 'owns' the objects placed on it. This means that if you set the Visible property of the panel to .False. all object that are on the panel, automatically become invisible also. The same applies to the Enabled property. This can be very useful when you know you want to effect a group of objects all the same way at the same time. |
NOTE: The Panel object can also be used as a button since it has a CLICK event just like a button. This is very helpful when creating forms where you want to use buttons that have a different background color than a standard button. You can also place both an image and text (Label) on the panel object.
| GlyphBtn - This will display a slightly different Windows button on the form. In this case the button can have a glyph (.bmp graphic) that is part of the button along with the caption. If you don't include the graphic this is identical to the standard Button object. The user will be able to 'click' on this button (press the left mouse button while the arrow is over the object) and have this execute an Event that will call a routine in your program. |
Additional Page
![]() Image - Use this object to display an image on the form.
Image - Use this object to display an image on the form.
| Shape - This object will allow you to draw a simple shape on the form. It can be used in the same manner as the Bevel, to put a box around an object or group of objects. Other than that, it has no other purpose. |
| Bevel - Use this object to put a bevel around entry objects or other screen objects. Even though this is a visible object there is no interface with the user other than beautifying your form. |
| StatusBar - This object is generally used to display information to the user at the bottom of the form. You can split up the bar into panels, each of which can be individually modified. The panels that make up the menu are actually StatusPanel objects. You create those by using the Status Bar Panel Editor. |
| ToolBar - This object creates a tool button bar that appears at the top of the form. The items that make up the bar are actually ToolButton objects. |
| DualListDialog - This is a non-visual object at design time that can display a very useful dialog at runtime. To execute this dialog you will use the DUAL_LIST_EXEC() function. Refer to this for an image of what the dialog will look like to the user. You will also use the STRINGS() function to determine what options the user has chosen, and perhaps, to set the options (strings) the user has to choose from. |
| AlarmClock - This object will place a clock on your form. It can be either digital or analog in shape and can be used to set an alarm that will call a routine in your program. If you want to execute an event at a regular interval you should use the RtnTimer instead of this object. |
| RtnTimer - It won't appear on your form at runtime, however, it can call a routine in your program at a semi-regular interval. If you want to execute an event only once a day at a specific time your should use the AlarmClock instead of this object. This is a non-visual object. |
Enhanced page
Enhanced 2 page
NOTE: All objects start with the letter T, it has been removed in the examples above for clarity. However, the TASEnter object is really TTASEnter, Label is TLabel, etc. This is how they are referred to in the documentation.
See Also : Tutorial Part 3 - Creating a TAS Professonal sales program
Page url: http://www.cassoftware.com/tas/manual/screenpainteroverview.htm