|
Phase 3: Updating Your System With Recent Information |

  
|
|
Phase 3: Updating Your System With Recent Information |
|
You have now finished the second phase of setting up Advanced Accounting 7 - all your initial company information has been entered. You are now ready to update your financial data with any transactions since your system startup date and finalize your inventory information.
| 19. | Enter Inventory Information |
This step is necessary only if you did not enter units on hand information in step 15 in phase 2. If you entered all inventory information in step 15, you can bypass this step.
a) Freeze your inventory at the same point you captured your summary information for General Ledger entries (e.g., end of quarter). Use the printout you created in step 17 (IC-E, Print Physical Check) to record physical counts. Remember that beginning inventory quantities and average costs are not needed for N (non-inventory) items. Check your figures and make corrections on paper until you are satisfied that you have an accurate count. Any receipts, purchase orders, or invoices, that occur after this cutoff must be held for entry until after you have entered your beginning inventory quantities.
b) You can now run a TAS program to update your on-hand information. Choose UT-A, Run TAS Program. Type:
WBKBEGINV.RUN
You can enter a product number, on-hand quantity, and average cost. If you have set up locations, you will also be able to set up on-hand quantity for each location. The calculation of (quantity) x (cost) will be displayed for each product.
This program is a temporary utility to assist you in entering beginning quantities. Because it does not post this information to the General Ledger, this utility should NOT be used for any purpose other than loading your initial inventory amounts.
When you have completed your initial entries, return to IC-D, Print Avail/Order Info, to verify your balance with your physical counts. If there are any errors in quantities or costs, return to the BEGINV program to adjust the quantity/cost information for those products.
c) When you are satisfied that you have a correct count for your inventory, use IC-D again to confirm that the total inventory dollar value listed at the end of the report matches the beginning balance you placed in the inventory asset account(s) in step 5 above. If the figures do not match, return to the detail you carried over from your previous accounting system and/or look at your inventory information in Advanced Accounting 7 to establish the product(s) whose costs or quantities do not match.
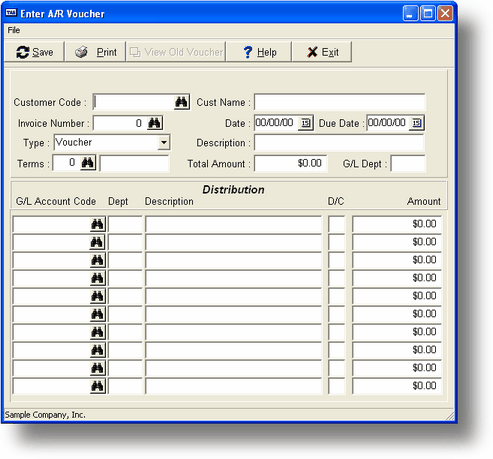
You can now enter invoice and credit amounts representing transactions up to your cut-off date, broken into individual invoices, in Accounts Receivable. You should only enter open (unpaid) invoices and credits.
Because you have already entered a beginning balance for Accounts Receivable in step 5 (phase 2), you must distribute the entire amount of each invoice to your main A/R account. The system debits and credits the main A/R account for a net change of $0, but the customer account will now show the outstanding invoice and the invoice will appear on A/R agings.
For example, create Voucher 10000 (using AR-B) for $1000 for your customer. Advanced Accounting automatically debits the Accounts Receivable default account you set up in SY-A-A, Enter/Chg Company/Interface. (In the case of the sample data in Advanced Accounting, the Accounts Receivable G/L account is 12000.)
In order to create a transaction record for your customer without changing the balances, enter $1000 as a credit to the same account you are going to debit, i.e., the G/L Accounts Receivable default account:
Do not enter any transactions that have occurred since the cut-off date; you can enter them at the end of this procedure.
This method of distributing to your main A/R account should only be used as a setup procedure. After you have completed this checklist, your normal procedure for a voucher will be to distribute to a sales account, not the A/R account.
| 21. | AR-F Print Aging |
At this point, you can confirm that the Accounts Receivable beginning balance matches the total of customer balances entered as vouchers in the previous step. Use this to verify that the A/R beginning balance you entered in step 5 matches the total of your customers' outstanding balances that you entered in step 20. You only need to print the totals at this time.
If these two figures don't match, check your customer balances. If necessary, use AR-B, Enter/Chg Vouchers, to back out and re-enter information so that these figures will be brought into balance.
If you did not enter all your vendors in step 10 and only entered those that were necessary to proceed with payroll, you must complete the process of entering all your vendors.
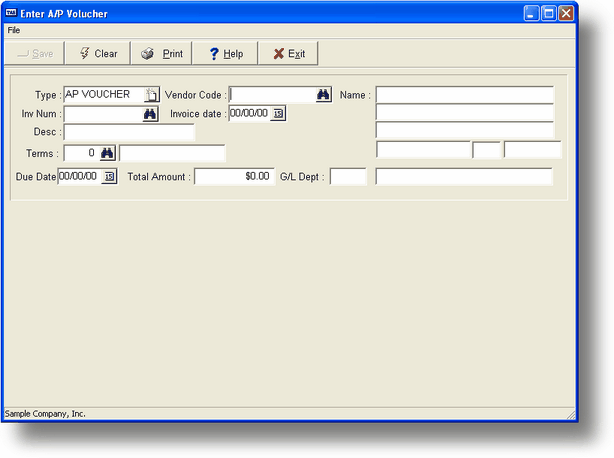
23. AP-B Enter/Change Vouchers
You can now enter invoice and credit amounts representing transactions up to the cut-off date in Accounts Payable. You should only enter open (unpaid) invoices and credits.
Because you have already entered a beginning balance for Accounts Payable in step 5 (phase 1), you must distribute the entire amount to your main A/P account. The system debits and credits the main A/P account for a net change of $0, but the vendor information and vendor aging information will now show your outstanding payables.
In the same manner described for the Accounts Receivable voucher in step 20, your voucher here will automatically use the A/P default account you set up in SY-A-A, Enter/Change Company/Interface. (In the case of the Advanced Accounting 7 sample data, this account is 20000.) You should offset the amount by debiting the same account, as illustrated below.
Do not enter any transactions that have occurred since the cut-off date; you can enter these after you have completed this checklist.
This method of distributing to your main A/P account should only be used as a setup procedure. After you have completed this checklist, you will normally be distributing your vouchers to an expense account, not to your main A/P account.
24. AP-G Print Aging
At this point, you can confirm that the Accounts Payable beginning balance that you entered in step 5 matches the total of vendor balances entered in step 23.
If these two figures don't match, validate the vendor balances. If necessary, use AP-B, Enter/Chg Vouchers, to back out and re-enter information so that these figures will be brought into balance.
You will now be able to rely on the audit trail generated by the Advanced Accounting 7 as you enter transactions because you have confirmed that all your setup information is correct and all the programs within Advanced Accounting 7 have a consistent starting point for your financial data.
The transactions that you have held for entry that occurred since your cut-off date can now be entered as invoices, purchase orders, or vouchers.
After you have used Advanced Accounting for a while, you will find other time-saving options not mentioned in this checklist; for example, you can set up recurring A/P vouchers, A/R invoices, and G/L transactions for operations that you repeat periodically.
Page url: http://www.cassoftware.com.com/adv7docs/index.html?phase3updatingyoursystem.htm