|
AP-A - Enter/Change Vendors |

  
|
|
AP-A - Enter/Change Vendors |
|
Purpose of Program
Use this program when you begin purchasing from a new vendor, or if there is a change in the vendor name, address, telephone number, or your company contact. This program is also used to add vendors for payment of sales tax, federal tax, and payroll withholding liabilities. Be sure any necessary purchase terms information has already been entered in SY-B, Enter/Change Terms Info. This vendor information is accessible when you create purchase orders in PO-A, Enter Purchase Orders.
Field Explanations
Standard Vendor Information
Vendor Code (Required)
The code you assign to identify this vendor record in other parts of Advanced Accounting.
Name (Required)
The actual vendor name.
Add 1
The first of 2 address lines.
Add 2
The second of 2 address lines. This can be a second address or simply a suite number.
CSZ
City, State and Zip (Postal Code).
Ctry
Country
Contact
The person with whom you normally speak at your vendor's location.
Phone and Fax
The telephone and telefax machine (if applicable) numbers for this vendor.
Your Acct
This is your account code from this vendor (assigned by them for you). This will print on all checks you print for this vendor.
Prch YTD and LYR
Purchases Year to Date and Last Year. These are the gross dollar purchases you have made from this vendor both this and last year (calendar year).
Rmks
These two lines will be displayed during purchase order entry (PO-A) after the vendor is chosen but before any other information is entered. You can use these lines as a reminder of important information that you want everyone to see before entering a P/O for this vendor.
Class
This is a 2 character alphanumeric field used as an additional means of grouping vendors for reports. For example, you might want to group all of your out of state vendors, or all of your vendors who are wholesalers, into a single report. Use this field to designate such a group.
Start
The date you started to do business with the vendor. This can be the date of the first purchase order.
1099 Type
If this vendor should receive a 1099 this is the type to be specified on the form.
Tax ID Number
This is the vendor's federal tax ID number.
Terms (Required)
Payment terms for this vendor. The terms entered here are later offered as a default when you record a Purchase Order for this vendor in PO-A, Enter Purchase Orders and PO-D, Receive P/Os.
Dflt G/L Acct
This is the default G/L account and department that will appear as the first account in the distribution lines of a voucher you enter in AP-B, Enter/Change Vouchers. If you don't enter a value here the first time you enter a voucher the first distribution account code and department will be saved here.
Crdts - Credits
The amount (in dollars) of credits that have not been applied toward vendor invoices. If you receive a credit from a vendor, this is where the amount is displayed.
Inv - Outstanding Invoice Amounts
The amount (in dollars) that you owe in outstanding invoices to a vendor. There could still be an amount in this field even if you have a credit from the vendor.
Lst Prch - Last Purchase
The date of the last P/O received from this vendor.
Lst Pmt - Last Payment
The date of the last payment made to this vendor.
General Program Operation
When you choose this program from the menu you may be presented with the dialog box below this program has two operating modes if you choose the "Yes" option the program will be in a read only mode allowing you to view records with out modifying this is importance because the records will be opened with no record locks. However if you intend to modify the vendor recors choose the "No" option in this dialog box.
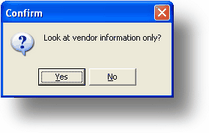
After making your choose the following screen will be displayed.
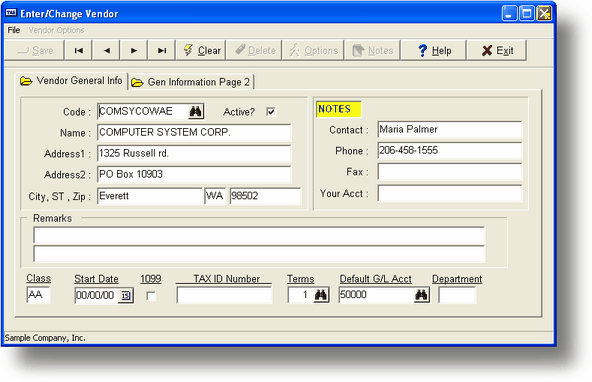
Creating a New Vendor Record
When you run Enter/Change Vendors, the cursor is initially placed in the Vendor Code field. Type in a new Vendor Code and press ENTER. If that Code is currently in use, the corresponding record is displayed. If you want to clear the screen so that you can use different code, press F3.
![]() This program will automatically create a Vendor Code depending on a choice you make in System Maintenance (SY-A-C). The program will either use the Telephone number (takes all characters other than the numeric ones out first), use a sequential number, or uses a combination of the first 6 characters of the Vendor Name, then the State and the first two characters of the City (this is the default and what we use at CAS). To have the system create a code for you just press the ENTER key when you're at the Vendor Code (leave it blank). Before you are asked if you wish to save the record the new code will be displayed. If for some reason the code would conflict with one already on file you will be notified and you must change it so that it doesn't.
This program will automatically create a Vendor Code depending on a choice you make in System Maintenance (SY-A-C). The program will either use the Telephone number (takes all characters other than the numeric ones out first), use a sequential number, or uses a combination of the first 6 characters of the Vendor Name, then the State and the first two characters of the City (this is the default and what we use at CAS). To have the system create a code for you just press the ENTER key when you're at the Vendor Code (leave it blank). Before you are asked if you wish to save the record the new code will be displayed. If for some reason the code would conflict with one already on file you will be notified and you must change it so that it doesn't.
After you enter the new Vendor Code, fill in the rest of the appropriate fields (see Field Explanations above). You can save a record in either of two ways:
| 1. | After you fill in the last field and press ENTER, the program asks whether you want to save the record: |
If you answer N, you will return to the Vendor Name field to edit the record. If you use the Up arrow to enter the Vendor Code field at this point, any data entered and not saved will be lost.
If you answer Y, the record will be saved and the screen cleared.
| 2. | At any time while entering data, you can press F10 and the program asks whether you want to save the record. Your options are the same as in choice 1. |
You must enter Y when asked if you wish to save, or the record will not be permanently recorded in the file. The program will not allow you to save a record that does not have a Vendor Code. The record is saved into the Vendor file, and can then be accessed for P/O or voucher operations, for aging, and for printing vendor information.
When saving a new record in the vendor file the program will ask if you wish to enter an order for that vendor. If you enter Y the program will chain to the PO-A program. When it is finished you will be returned to this program.
Changing an Existing Vendor Record
If you need to change your vendor address or telephone number, or if some other important information has changed, find the existing vendor record by performing one of the following operations:
| 1. | Enter the full Vendor Code at the Vendor Code field and press ENTER. |
| 2. | Use the standard record search keys to search for the code. For a list of these keys and their functions see the explanation in the Standard Key Functions. |
| 3. | Use the list display option to choose from a list of vendors. Press F2 to display the list, then proceed as explained in Getting Around in Advanced Accounting. |
Once the vendor record is displayed you may change any of the fields above the single line. You will not be able to change Crdts, Inv, Lst Prch,Lst Pmt or Purch YTD and LYR. Save the changes as described in Creating a New Vendor Record above.
![]() To change a Vendor Code please refer to SY-K, Change Related Rec Vals.
To change a Vendor Code please refer to SY-K, Change Related Rec Vals.
Deleting an Existing Vendor Record
When you delete a vendor record in Advanced Accounting, the Inv and the Crdts fields must both show a $0.00 balance. You can apply payments to your outstanding invoices in AP-D, Pick Vouch/Inv To Pay. Find the vendor as in the change process above. Press the F4 key. The program will ask you to verify the delete request.
![]() Once a record is deleted it cannot be recovered. You will have to reenter the vendor record if it is deleted in error.
Once a record is deleted it cannot be recovered. You will have to reenter the vendor record if it is deleted in error.
Other Vendor Options
Using this same program you may get other information about this vendor and enter additional addresses and contacts that can be used during purchase order entry. If you click the other vendor button the following menu will be displayed:
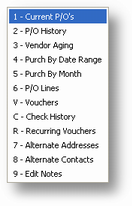
| 1. | Current P/O's - This option will show a list of all current (open) Purchase Orders. This is a sliding list and you can see more of the record by pressing the RIGHT ARROW key. You can see the entire order by moving the cursor bar to the appropriate line and pressing the ENTER key. The program will chain to PO-A and the order will be displayed. If you wish to enter a new order from this list then press INSERT key. |
| 2. | P/O History - This will show a listing similar to option 1 above, however, this displays received and invoiced P/Os only. To see the entire P/O move the cursor bar to the appropriate line and press the ENTER key. The program will chain to PO-E. You may continue displaying P/Os for that vendor until you reach the end of their P/O history. |
| 3. | Aging - This option will chain to AP-G and will display the current aging for this vendor. |
| 4. | Purch by Date Range - If you choose this option the screen above is displayed. You will be able to enter 4 different date ranges. The program will automatically calculate the total purchase amount. The dates you enter are saved and will be used as the defaults the next time you choose this option for any vendor. This option uses data in the P/O history file and will only be effective if you have Hist? set to Y for this vendor. The results of this option may be printed if desired. |
| 5. | Purch by Month - This option will print the total purchases by month for this vendor. Only those months in which purchases were recorded will be displayed. The program will display up to 5 years of sales in descending order (current year first). |
| 6. | P/O Lines - This option will display only the line items from past received and invoiced P/Os. This will let you quickly and easily see the actual items from those P/Os without having to scan through each individual P/O as in option 2 above. However, if you choose a specific line item the P/O for that line item will be displayed as in option 2 above. You will be able to limit the display to only the current year and only actual line items will be displayed, no message lines. |
| V. | Vouchers - Lists open vouchers (entered through AP-B) for this vendor. |
| C. | Check History - Lists checks paid to this vendor. |
| R. | Recurring Vouchers - Lists the vouchers entered in AP-M for this vendor. If you choose one of the line items displayed the AP-M program will be run with the appropriate data. |
| 7. | Alt Addresses - If this vendor has alternate address for mailings, returns, etc., use this option. You can use these during purchase order entry for the vendor information. See Alternate Address Maintenance below for more information. |
| 8. | Alt Contacts - If this vendor has alternate contacts use this option. See SC-A - Enter/Change Contacts. |
![]() You can easily enter a default contact record for this vendor by choosing this option. When the program chains to SC-A, you will be asked if you wish to create a default record. If you enter Yes, the code, name, address and telephone/fax numbers will be transfered from the vendor record to the contact record. It is a good idea to have a contact record for each vendor if you are going to use the email or fax options in the printing routines since the address/number comes from this record.
You can easily enter a default contact record for this vendor by choosing this option. When the program chains to SC-A, you will be asked if you wish to create a default record. If you enter Yes, the code, name, address and telephone/fax numbers will be transfered from the vendor record to the contact record. It is a good idea to have a contact record for each vendor if you are going to use the email or fax options in the printing routines since the address/number comes from this record.
Alternate Address Maintenance
Use this to keep additional addresses for this vendor. These addresses can be used in purchase order entry for the vendor address information. When you choose this option the following list box is displayed (if you have not entered any alternate addresses previously then the list is empty):
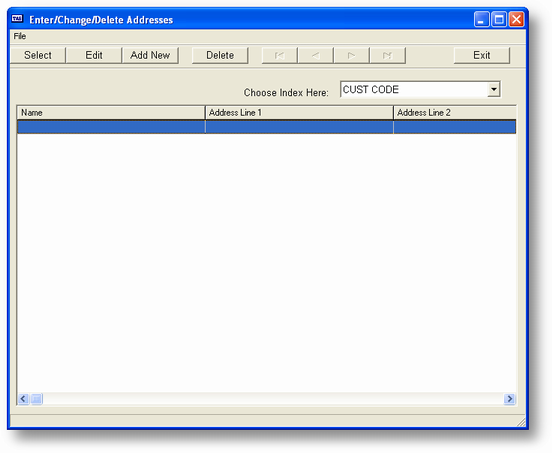
To enter a new alternate address press the INSERT key and the following screen will be displayed:
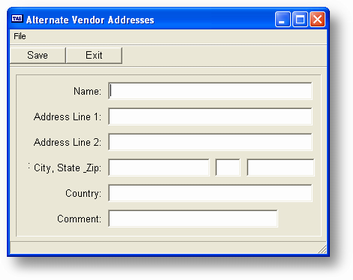
You will then be able to add a new address for this vendor. All field sizes are the same as for the original company name and address lines. You can also indicate how and when this address is to be used. Press ENTER after the last field or F10 to save the new address.
To modify an Alternate Address move the cursor to the appropriate line and press the ENTER key. The entry window above will be displayed, this time with the current data. Press ENTER after the last field or F10 to save any changes.
To delete an Alternate Address move the cursor to the appropriate line and press the DELETE key. The program will ask you to confirm your action. If you enter Y the address will be deleted from the list.
Page url: http://www.cassoftware.com.com/adv7docs/index.html?a_enterchangevendors.htm