|
AP-B - Enter/Change Vouchers |

  
|
|
AP-B - Enter/Change Vouchers |
|
Purpose of Program
When you have to enter vendor vouchers that do not affect your inventory, enter those vouchers in this program. You can also record vendor credits or enter reversing vouchers with Credit Memos, and you can enter Manual Checks, which update the check register in addition to the A/P accounts. The items you might enter through this program include but are not limited to the following charges: Rent; Lease Payments; Phone Bills; Repair Bills.
Normally, inventory items are processed through PO-A, Enter Purchase Orders.
Field Explanations
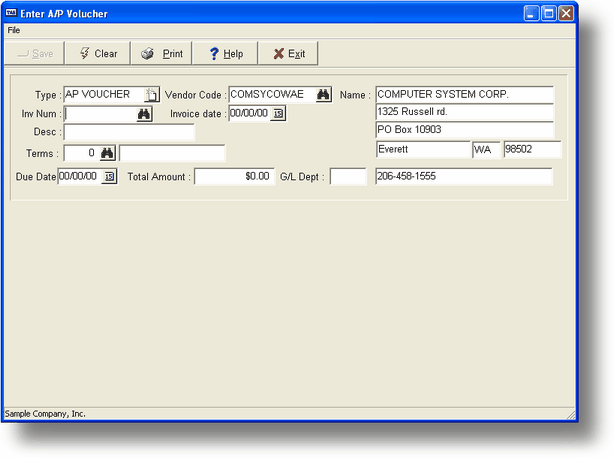
Voucher Entry Fields
Type (Required)
The invoice/voucher type: A/P Voucher, Credit Memo, Manual Check or Pre Payment (see General Program Operation below).
Vend Code
The vendor code.
Name
The vendor name and address, filled in automatically from the vendor file.
Inv Num (Required)
The invoice/voucher number on the bill you received from the vendor. This is a 10 character alphanumeric field.
Inv Date
The voucher date. The default entry is the current date.
Desc
An identifying description of the bill. This will print on posting reports and on the vendor's check.
Trms (Required)
The payment terms allowed by the vendor. You select here from a menu, with the highlighted selection being the default terms type for this vendor from AP-A, Enter/Change Vendors.
Tot Amt (Required)
The total amount of the transaction.
Due Date
The calculated due date for this voucher. Can be modified at entry time.
G/L Dept
If you are using G/L Departments, enter the G/L department for posting the Tot Amt in this field; this field also functions as a default for the distribution accounts.
Distribution Fields
In order to enter a balanced transaction, you will need to distribute the amount of the voucher to one or more G/L accounts. You will specify the accounts you want the balancing amounts to post to using the fields below.
G/L Account-Dept
The General Ledger Account(s) and Department(s) you are using to balance the voucher. You can distribute the amount of the voucher any way you wish.
![]() If there is a value in the vendor's default G/L account field it will be placed automatically in the first distribution line G/L account. You can change this as necessary. Also, if there is no value in the vendor record for this field what ever you enter as the first G/L account will be saved in the vendor record.
If there is a value in the vendor's default G/L account field it will be placed automatically in the first distribution line G/L account. You can change this as necessary. Also, if there is no value in the vendor record for this field what ever you enter as the first G/L account will be saved in the vendor record.
Description
The description of each G/L Account is filled in automatically by Advanced Accounting.
D/C
The Debit/Credit field defaults to what is necessary to balance the transaction, and you can change the entry if you want.
Amount
The distribution amount. These amounts added to the voucher amount must total zero. The program offers as a default the amount needed to balance the transaction.
General Program Operation
Adding a New Voucher
The first step in entering an voucher is to choose the voucher type. A menu of options is displayed and you will choose one of those options. If you choose A/P Voucher or Credit Memo, a record will be added to the Accounts Payable file updating your Outstanding Invoice Amounts or Outstanding Credits. Payment on vouchers or application of credits to vouchers is performed in AP-D, Pick Vouch/Inv To Pay.
Then enter the vendor code. You may either enter the entire vendor code and press ENTER, or use the vendor list display. To use this option, press F2 while the cursor is in the Vend Code field. For more information see Lookup Lists.
The vendor code you choose is placed in the Vend Code field. To display the vendor name, press ENTER.
If you type in a code which is not assigned to a vendor, you will be asked if you want to add the vendor to the file. If you answer Y, the Vendor Information screen from AP-A is displayed. You can add a new vendor at this point.
After you have selected a vendor, type in the number of the invoice or bill you received from the vendor.
Fill in the voucher date and an identifying description.
Next the dialog box above will be displayed. If you enter No, and you have the appropriate security rating, you will be able to change the address for this voucher.
Advanced Accounting displays the available terms as a menu when you reach the Terms field. The terms type entered in the vendor record in AP-A is the highlighted choice, but you can choose another type if you wish. You can add terms information to the list in SY-B, Enter/Change Terms Info. The Due Date is calculated and you can change it now, if necessary.
Next, enter the amount of the invoice or bill from the vendor.
If you want the voucher to be posted to a particular G/L Department, type the Department Code into the G/L Dept field. The Tot Amt will be posted to the proper A/P account with the same Department code, if it exists. Also, the department code for the distribution accounts will default to the same value. Otherwise, leave this field blank.
This completes the first half of the transaction. The cursor is placed in the G/L Account field for the balancing accounts to be entered.
In the case of a standard voucher, the Tot Amount entry will be posted as a credit to your default A/P account. This means that the balancing transaction must be a debit or combination of debit amounts.
If you have chosen to enter a Credit Memo, then the Tot Amount entry will be posted as a debit to your default A/P account and the balancing transaction must be a credit or combination of credit amounts.
Distribution
![]() There are two states in the distribution section. The first is the selection state where a solid block is display to allow you to select a line. The second is the edit mode where the individual values can be entered. When you first move to the distribution section you are automatically in selection mode. To start editing an existing line or a new line just press the ENTER key. You will be placed in the G/L Account field in edit mode. After you have entered a new distribution line, or have edited an existing one, the program returns you to selection mode.
There are two states in the distribution section. The first is the selection state where a solid block is display to allow you to select a line. The second is the edit mode where the individual values can be entered. When you first move to the distribution section you are automatically in selection mode. To start editing an existing line or a new line just press the ENTER key. You will be placed in the G/L Account field in edit mode. After you have entered a new distribution line, or have edited an existing one, the program returns you to selection mode.
The second half of the transaction is to enter the distribution amounts. The sum of the balancing account amounts must equal the amount in the Tot Amt field before you can save the item. In other words, the debits must equal the credits.
You can distribute the item over a maximum of 200 different G/L Accounts and Departments.
To enter the distribution amounts you must do the following:
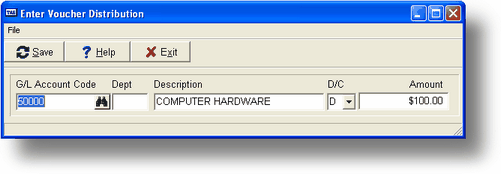
| 1. | Click on the grid item line the screen above will be displayed then Select a G/L Account code. To display a list of G/L Account codes, press F2 while the cursor is in the G/L Account-Dept field. After you make your selection, the appropriate account description is displayed. |
| 2. | Next enter whether the balancing account amount should be posted as a debit or credit. The default value displayed is the value required to balance the accounts. |
| 3. | In the Amount field, type in the amount from this account you want to use to balance the voucher amount. Enter/Change Vouchers displays a default value, which is the amount needed to balance the voucher amount. Press ENTER if you want to use the displayed value; if you are distributing over other accounts you can change each default amount to the value you want. Click the Save button and continue this process till your have a balanced entry. |
When you have your accounts and amounts balanced, click the save button. The program checks to make sure that the amounts are in balance. When the amounts are in balance, answer Y when asked if the entries are correct, and the program will post the voucher. Posting a voucher adds the transaction to the A/P transaction file, adds the voucher to the voucher records, updates the outstanding credit or invoice balance in the Vendor file, posts the transaction to the General Ledger and the Credit Purchases Journal.
If you have chosen the Manual Check option the program will ask for the check number and will add it to the check register instead of the A/P account.
If this is a regular A/P voucher the program will also ask if you wish to mark the item as ready to pay. If you enter Y this is the equivalent of choosing the voucher in AP-D, Pick Vouch/Inv to Pay.
When the program is finished, the screen clears and you are returned to the choice menu. You may then enter another item or return to the main menu by pressing X for Exit.
Changing an Existing Voucher
To change an existing voucher choose the A/P Voucher from the choice menu, then enter the Vendor Code, or choose from the vendor list. Press F2 while in the Vend Code field to display the list, then proceed as described in Lookup Lists.
The Vendor Code, name and address are then displayed. Enter the voucher number of the transaction you want to change. Press F2 to display a list of vouchers for this vendor. The voucher you choose is displayed.
If a payment has been made on this voucher, you are not allowed to edit it (see Reversing a Paid Voucher below). If no payments have been made on this voucher, the program asks if you want to back out the voucher:
If you answer Y, the transaction is reversed and the item deleted.
If you answer N, the original transaction is reversed and you can enter a new transaction in its place. You may display the old transaction for reference during editing by pressing F3. Once the old voucher is displayed, the entry routine is the same as in Adding a New Voucher.
Backing out a voucher reverses the operations described above for saving a voucher.
Reversing a Paid Voucher
A voucher that has been paid can be reversed with a "reversing voucher." Enter a new voucher using the procedures from Adding a New Voucher, being sure to debit the accounts that were credited on the original, and vice versa.
A/P voucher: If the original voucher type was A/P Voucher, enter a Credit Memo. Next, choose AP-D, Pick Vouch/Inv to Pay and pick sufficient A/P Vouchers for payment to balance the Credit Memo amount, and then pick the Credit Memo to apply the credit. When you print checks and the vendors are updated, the new transaction will offset the previous transaction and the net result is zero. Even though a check will not be printed the transaction will be recorded and the next time you run SY-N, Purge Old A/R & A/P Records, the voucher and credit memo will be deleted.
Credit Memo: If the original was a Credit Memo, enter an A/P Voucher. Next, go to AP-D, Pick Vouch/Inv to Pay, pick the voucher for payment, then pick the Credit Memo to apply the credit. When you print checks and the vendors are updated, the new transaction will offset the previous transaction and the net result is zero.
InstantCheck Processing
If one or more InstantChecks have been entered through ICHK-A - Enter InstantChecks, a special dialog box will be displayed
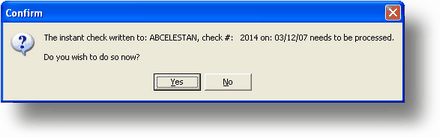
If you enter Y or click on the Yes button the following dialog box will be displayed:
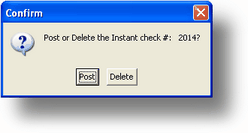
![]() The only way to delete an InstantCheck is at this time.
The only way to delete an InstantCheck is at this time.
If you enter P or click on the Post button the appropriate information in the AP-B screen will be filled out and you'll be put directly to the Dept entry. Enter the distribution accounts just like you would for a normal voucher. If you enter everything correctly and save the voucher the record in the InstantCheck file will be deleted.
![]() If you have multiple InstantCheck records waiting to be processed they will follow in order
If you have multiple InstantCheck records waiting to be processed they will follow in order
Page url: http://www.cassoftware.com.com/adv7docs/index.html?b_enterchangevouchers.htm