|
SO-R - Enter Estimate |

  
|
|
SO-R - Enter Estimate |
|
Purpose of Program
Use this program to enter and modify Estimates for your customers. An Estimate can include both regular and non-inventory (non-stock) items.
This program will also print out sales orders. Pre-printed sales order forms are available from Now Impressions, the authorized CAS forms supplier. For more information call: 1-800-358-4222 or 1-928-257-1236. Also, more information about forms is in Appendix E.
Field Explanations
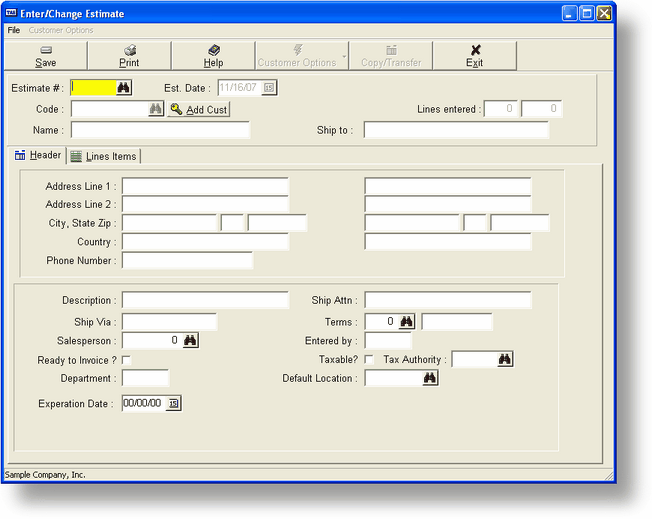
Estimate # (Required)
The estimate number. Usually you should allow the program to assign a defaultthe next estimate numberfor you. If the number the program tries to assign corresponds to an existing Estimate, the next available number is used. To specify a number other than 1 for your first Estimate number at system startup, use SY-A-F, SO Quote Defaults.
You can enter a number in this field or use F2 to select from a list to call up an existing Estimate for alterations, deletions or additions.
Est. Date
The date the Estimate is entered (defaults to the current date).
NOTES
If the word NOTES appears to the right of the Customer Code when a record is active (displayed on the screen) then you have notes recorded for this customer. To display them press the Alt-F1 key. For more information please see TASNotes.
Lines entered
The number of line items for this Estimate.
Estimate Information
Code (Required)
The code for the customer making the purchase.
Name
Add1
Add2
CSZ (City State Zip)
Cntry
Default entries from the customer record (created in AR-A, Enter/Chg Customers). You can use an alternate Sold To address by accessing the Alternate Address file created in AR-A. To get a list of addresses available press the ^C (CTRL+C) key and choose option 1 (Alt Sold To Addresses) from the menu. This will give you the standard Alternate Address list and you can choose the appropriate one. For more information please refer to Customer Options below.
Desc
The general description for this Estimate (optional). This will be printed on all reports and on the customer's statement.
Invoice Ship To
In case the delivery address for this customer is different than the billing address, enter the appropriate Ship To information for this customer here. You may enter all of this information yourself or, by pressing ENTER, the program will copy the customer information displayed on the left.
You can use an alternate Sold To address by accessing the Alternate Address file created in AR-A. To get a list of addresses available press the ^C (CTRL+C) key and choose option 2 (Alt Ship To Addresses) from the menu. This will give you the standard Alternate Address list and you can choose the appropriate one. For more information please refer to Customer Options below.
Attn
The person to whose attention this order should be addressed, with a default defined from the Contact field in the customer record. If you print shipping labels, this information will automatically be printed on the label. You can use an alternate Attn by accessing the Alternate Contact file created in AR-A. To get a list of contacts available press the ^C (CTRL+C) key and choose option 3 (Alt Attention Of) from the menu. This will give you the standard Alternate Contact list and you can choose the appropriate one. For more information please refer to Customer Options below.
Ship Date
The expected ship date for the sale.
Ship Via
The method of shipment. This is a 15 character alphanumeric field. This field will default to a value set up in SY-A-B, Enter/Change Invoicing Defaults.
Terms (Required)
Chosen from a pop-up menu, with the default entry from the customer record highlighted.
Slsp
An employee code for the salesperson on this Estimate. This is a 3 digit numeric field. This field will default to the salesperson number associated with this customer in AR-A, Enter/Change Customers.
Ent by
The person who entered the order. This is a 5 character alphanumeric field. This field will default to a value set up in SY-A-B, Enter/Change Invoicing Defaults.
Cust Ord Num
If the customer has given you a P/O number, enter that number here. If you print shipping labels, this number will be printed on the label.
Tax (Required)
Enter Y if any item on this order is taxable. Enter N if none are taxable. This defaults to the value in the customer's record.
Auth
This is the taxing authority for this customer and can be specified whether or not this sale is taxable. If this has already been set in the customer's record then you won't be asked for a value. If it hasn't you will be able to choose the appropriate authority from a list.
![]() Even though you enter a value here it will NOT be saved in the customer record.
Even though you enter a value here it will NOT be saved in the customer record.
Dept
If you are using G/L departments, this field allows optional entry of a G/L Department Code to post the sales to a specific department set up in your Chart of Accounts.
![]() **VERY IMPORTANT** If you specify a department value here you must be careful that all transactions, including sales tax liability, etc., all have the same department code. If you don't you will not be able to get a balanced departmentalized trial balance. This also applies to the G/L accounts in the actual inventory records
**VERY IMPORTANT** If you specify a department value here you must be careful that all transactions, including sales tax liability, etc., all have the same department code. If you don't you will not be able to get a balanced departmentalized trial balance. This also applies to the G/L accounts in the actual inventory records
Rdy?
If you want all line items on this Estimate to be invoiced and shipped from units on hand, enter Y here. N sets the default ready-to-ship flag for all line items on the Estimate to N, reserves inventory items from units on hand, and will not release them to be invoiced or shipped until you make a request to release in SO-E, Release Estimates or return to this screen and change the N to Y.
![]() If you have marked some individual line items Y and some N (see below), and you invoice the line items marked Y, when you next look at the Estimate (with the items marked N remaining), this Rdy? field will be set to R. This will alert you to the fact that some items originally on the Estimate have already been shipped.
If you have marked some individual line items Y and some N (see below), and you invoice the line items marked Y, when you next look at the Estimate (with the items marked N remaining), this Rdy? field will be set to R. This will alert you to the fact that some items originally on the Estimate have already been shipped.
The Display Window and the Line Item Entry Window
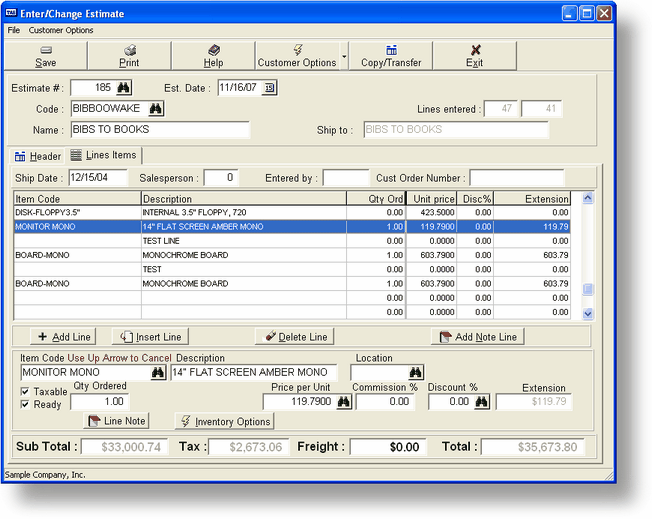
Once you enter the sales and shipping information the screen changes to that above.
![]() You can return to the sales/shipping screen at any time by pressing ^F (CTRL+F) when entering line items. To return to the line item screen just press the ESC key.
You can return to the sales/shipping screen at any time by pressing ^F (CTRL+F) when entering line items. To return to the line item screen just press the ESC key.
The middle-portion of the Estimate entry screen includes a display area which shows information for up to seven items on the Estimate. After entering a line item using the entry window, the item is moved to the scrolling display area. You can use the Up and Down arrow keys to choose a line item if you need to modify any information. You can see different information on a line item in the entry window than what you see about it in the scrolling area; be sure to view a line item in both modes for full information about the item.
Line Item Entry Window - Inventory Item

Product Code
This is the first entry field. Inventory product codes are set up in IC-A, Enter/Chg Inventory. You can select from a list of inventory items or you can type in a product code. As you press ENTER after you have selected a product code, the inventory product description is displayed next to the code. You can change the product code description for this particular line item. If the product is not yet in the inventory file the program will allow you to add it.
Once you have entered a product code and the item is displayed you can access the full inventory record for that item by pressing ^I (CTRL+I) and choosing option 5 from the menu. This option menu will also let you add a free form note to this line item, choose a note already saved for the inventory item or delete a note attached previously. For more information about these options please refer to Inventory Options below.
To enter a message instead of an inventory item press just the ENTER key here (leave the product code blank).
Loc
This is a particular location code for this item. If this is a N type item (non-stock) or if the item only has one location you will automatically skip this option. If the product has multiple locations you will be able to choose a specific one. You can get a list by pressing F2.
![]() One of the reasons we recommend you have the default location be blank is so you don't have to enter a specific value here. If you usually sell from the default location then just by pressing ENTER here with a blank field value you will be choosing the right one.
One of the reasons we recommend you have the default location be blank is so you don't have to enter a specific value here. If you usually sell from the default location then just by pressing ENTER here with a blank field value you will be choosing the right one.
NOTE
If the word NOTE appears next to the Location value then you have a note attached to this line item.
ESD
The Estimated Ship Date. The default value in this field is the current date.
Tax
If you entered Y in the Tax field above, you can also choose whether individual line items are taxable. You are offered a default from the inventory file. If you entered N in the Tax field above, this field will always be N.
Rdy
Like the Rdy? field described above, this is a ready-to-ship flag, but one that is applicable to individual line items. If any of these are set to N, the items will be reserved from inventory on hand, and the flags must be changed here or in SO-E, Release Estimates, before the line item can be invoiced, posted, or shipped.
Qty Ship (Required)
The number of units ordered. This is a seven digit numeric field with two decimal characters. The default display in this field is 1.00.
Price (Required)
The unit price for this customer. You are offered a default from the inventory file, using the price matrix level associated with the price level in the customer record. This is a nine digit numeric field with four decimal characters.
If there is a price matrix for this item you can display the other prices by pressing the F2 key. You can choose a price from this list if desired.
Disc%
The percentage discount used to create the unit price for this line item (if you have set up a percentage-based price matrix for this inventory item). If there is no price matrix set up or the price matrix is based on a flat rate, 0% will be displayed. This is a 4 digit numeric field with 2 decimal characters. You can also enter or change a discount for a line item here. Ten percent is represented as '10.00.'
Extension
The Qty ordered+Units on B/O multiplied by the net price per unit.
Line Item Entry Window - Message

To enter a message instead of an inventory item press just the ENTER key at the Product Code field.
Enter Message:
You may enter a free form message here. This will appear on the Estimate and invoice.
You can also set the message line to a credit card number on file for this customer by pressing the F2 key. This will give you a list of credit cards available. You can add new credit cards or delete existing ones directly at this point. To choose an existing credit card move the cursor to the appropriate line and press the ENTER key. To add a new card press the INSERT key. To delete an existing one move the cursor to the appropriate line and press the DELETE key. The screen that appears for creating a new card is the same as in AR-A (Credit Card Maintenance).
You can also use the same note entry process for a message as for inventory line items. When the cursor is in the actual message field press the ^N (CTRL+N) key. For more information on message line Estimate notes please refer to Message Line Notes, below. If you save a note the first line is displayed in the normal message line area.
Ready To Print?
Same as Rdy flag above.
Totals

Sub Tot
The sub-total amount for the Estimate for all items (calculated automatically and displayed as a running sub-total).
Tax
The amount of tax for this Estimate (calculated automatically when you save the Estimate).
Freight
The freight charge for this Estimate. You are asked to fill in this field before saving the Estimate.
Total
The total amount of the Estimate. This is the Sub-total + Tax + Freight.
General Program Operation
Adding a New Estimate
Press ENTER when you are in the Estimate # field, and the program will automatically assign a number when the Estimate is saved.
Enter a complete customer code, or use the F2 list display option to select a customer.
Press ENTER again, and the customer information will be displayed. You may change any field associated with this customer for this particular Estimate; however, the new information will not be saved in the customer record. If you want to change information in the customer file, use AR-A, Enter/Change Customers. You can also chain to AR-A by pressing ^C (CTRL+C) and choosing option 5 from the menu. For more information on this please refer to Customer Options below.
If you enter a customer code that isn't in the customer file, you will be able to enter a new customer at this point and then return to the Estimate process. (For more information on adding a customer record, see AR-A, Enter/Change Customers).
After choosing the customer the cursor moves to the Desc field. If you need to change the shipping address information for this Estimate you can do so in two ways. Change the information directly in the appropriate Ship To fields. You can reach those fields by pressing the UP ARROW key. You can also press ^C (CTRL+C) and choose option 2 from the Customer Options menu. This will display the Customer Alternate Address list and you can choose a different address there. If you do the new address will be displayed in the Ship To information block.
You can also enter or change the Attn name. This will print on the shipping labels, if you choose to print them, and will also appear on the printed Estimate and any printed invoices. You can also choose a name in the Customer Alternate Contact file by pressing the ^C (CTRL+C) key and then choosing option 3 from the menu. Choose the appropriate name and it will be inserted in the Attn field.
You can enter a general description for the Estimate in the Desc field. This description will appear on posting reports and the customer statements.
The Ship Via information offers a default entry from SY-A-B, Enter/Change Invoicing Defaults.
The Terms field will display the choices available to you. The terms menu will highlight the default set in the customer record. Cash terms (types A or C in SY-B) post directly to a cash accountno Accounts Receivable line items are created.
![]() Set the Default A/R Checking Account to 0 in SY-A-D if you want a choice of bank accounts to post cash sales to.
Set the Default A/R Checking Account to 0 in SY-A-D if you want a choice of bank accounts to post cash sales to.
The final entries in the Estimate header are as follows:
| · Slsp - Type in the employee number of the salesperson for this customer. A default entry is offered from the customer file, if one has been entered. Press F2 to get a list of available salespeople. |
| · Ent by - You can enter the initials or another identifying memo for the person who entered the Estimate. This field is not required. |
| · Cust Ord Num - In this field you can enter your customer's order number, if you have one; this is not a required field. This number will also print on the shipping label. |
| · Tax - Enter Y if any item on the Estimate is taxable. |
| · Dept - If you are using G/L departments, enter the G/L department to which transactions are to be posted. |
· Rdy? - The ready-to-ship flag setting. If you want all line items on this Estimate to be invoiced and shipped from units on hand, enter Y here. N sets the default ready-to-ship flag for all line items to N, reserves inventory items from units on hand until you change this flag within the Estimate itself or use SO-E, Release Estimates.
Estimate Line Items
You can enter up to 250 line items on a single Estimate. To add a new line move the cursor to a blank line and press the ENTER key. Enter items from the inventory file by typing in a complete product code or using the list display (F2) option to select an item. The program will place the product code in the appropriate field. To display the balance of the information for that item, press ENTER. The description from the inventory file will appear along with the price as listed in the product record. Quantity defaults to 1.00. You must enter a quantity other than 0.
You can also enter messages. To do this, press ENTER in the blank Product Code field. The message line window is displayed and you can enter up to 75 characters.
Both regular (physical) and non-inventory (non-stock) type items can be entered on the same Estimate. You can use the ready-to-ship status for non-inventory line items as well as regular inventory, but backorder or units on hand features do not apply.
For regular type items you will be able to choose a location. If there is only one location for this product then it will be used automatically and the cursor will not stop in the Location field. You can get a list of locations available, along with the number of units on hand at each, by pressing the F2 key when the cursor is in the Location field.
Enter the estimated ship date (defaults to today's date), taxable (Y or N, defaults to Y if the taxable flag for this order is Y and the taxable flag for the item in the inventory file is Y), and whether this line is ready to ship (defaults to what you set for the order). The quantity ordered must be more than 0 and defaults to 1. If you have chosen a regular inventory item the program will check the order amount against the number of units on hand at that location. If there aren't enough for the order you will be asked whether to go into negative inventory or back order the balance. You can also return to the Location field (press the UP ARROW key until you get back there), and choose a different location. You can enter a B/O quantity whether or not there are enough units to ship and also change the price. If there is a price matrix for this item you can display it by pressing F2 when the cursor is in the Price field. Once the price has been entered the program will automatically calculate the extension, add the item to the order and return to the list, ready for the next item. Saving the line item updates the units on hand, units on Estimate and units on back order fields in the inventory record.
If you were adding a new line the cursor will automatically go to the next blank line and you can enter another line item by pressing the ENTER key. To change a line move the cursor to the appropriate line and press the ENTER key (notice how the entry window below changes as you move the cursor). To insert a line move the cursor to the line above which the new line will be inserted and press the INSERT key.
Deleting a Line Item
Move the cursor to the appropriate line and press the DELETE key. You will be asked to confirm the deletion. Or you can highlint the line and click the delete line button.
Saving the Estimate
After you have entered all the line items for the Estimate, press F10 while in the list window. If you press the F10 key while in the entry window the program will give you instructions on how to properly save the line item. Enter the Freight at the prompt.
To finish saving the Estimate, follow the prompts for any options that may apply:
| | Printing/not printing the default ending lines from SY-A-B, Enter/Chg Invoicing Defaults on the invoice. |
| | The program will give you the option of printing the Estimate on plain paper. If you choose to do so you will also be able to enter the number of copies to print. This defaults to the value entered in SY-A-B, Enter/Chg Invoicing Defaults. |
| | If the Rdy? flag for the entire Estimate is Y you will also be given a chance to invoice the S/O. |
Saving a new Estimate creates a new Estimate header and line item information, and increments the Next Estimate Number in SY-A-A, Enter/Change Company/Interface.
Changing an Existing Estimate
A previously entered Estimate may be changed any number of times as long as there are unposted items remaining on the Estimate. Once the shipment of goods on an Estimate has been invoiced and the invoice posted, however, the line items included on that invoice cannot be changed or deleted and no new line items can be added. To make any modification after posting, you must enter a reversing Estimate (see Reversing a Estimate below).
To find an existing Estimate, use one of the following two options:
| · Enter the Estimate number in the S/O # field. |
· Use the list display option (press F2 while the cursor is in the S/O # field).
To display the rest of the information for that Estimate, press ENTER to view the balance of the information for that Estimate. The customer and/or product line item information can be changed by moving the cursor to the appropriate fields and typing in the new information. Press the PAGE DOWN key to get to the line item screen. The Estimate number itself cannot be changed without deleting and re-entering the Estimate.
Reversing a Estimate
If you need to reverse the effect of a posted invoice, (for example in the case of a customer return) enter a new Estimate with line items identical to those on the invoice, except that you must enter negative Quantity amounts. When the invoice is posted, the second Estimate adds offsetting detail line items to the General Ledger, inventory record, and customer record, balancing and reversing the first invoice. This is sometimes known as a "credit Estimate."
![]() You may enter both negative and positive Quantity amounts on the same Estimate.
You may enter both negative and positive Quantity amounts on the same Estimate.
Deleting an Existing Estimate
Find the existing Estimate using the methods above in the Changing an Existing Estimate. With the cursor in the Order Date field press the F4 key. The program will ask if you want to delete the entire Estimate. If you answer Y, the Estimatewill be deleted from the file, and any unposted invoices are also deleted. If you answer N the program will return you to the S/O # field.
Deleting a Estimate reverses the operations described above for saving a Estimate.
Customer Information Options
If you press the customer options button when the cursor is on the first page screen or when in the item list (not during item entry) the following screen will be displayed:

1 - Alt Sold To Addresses - Choose this option to get a list of the alternate addresses for the customer so that you can choose one for the Sold To name and address. This option can be chosen any time the customer option menu is available. If you choose an address from the list it will automatically update the current sold to information. If you press the ESC key while in the list nothing will change.
You can also add new alternate addresses here by pressing the INSERT key. The entry process is the same as in AR-A, Enter/Change Customers. Once a new alternate address is saved you can then move the cursor to that line and choose it by pressing the ENTER key.
You can delete an existing alternate address by moving the cursor to that line and pressing the DELETE key. The program will ask you to confirm the deletion. If you enter Y the address line will be deleted from the list.
2 - Alt Ship To Addresses - Choose this option to get a list of the alternate addresses for the customer so that you can choose one for the Ship To name and address. This option can be chosen any time the customer option menu is available. The same options apply here as for the Alt Sold To Addresses above. You can add or delete alternate addresses from this option. The address list is the same for both options. The only difference is where the address goes.
3 - Alt Attention Of - Choose this option to get a list of alternate contacts for the customer so that you can choose one for the Attn field. This option can be chosen any time the customer option menu is available. If you choose a contact from the list it will automatically update the current Attn value. If you press the ESC key while in the list nothing will change.
You can also add new contacts here by pressing the INSERT key. The entry process is the same as in SC-A, Enter/Change Contacts. Once a new contact is saved you can then move the cursor to that line and choose it by pressing the ENTER key.
You can delete an existing contact by moving the cursor to that line and pressing the DELETE key. The program will ask you to confirm the deletion. If you enter Y the contact line will be deleted from the list.
4 - Cust Aging - There are often times you will want to get a quick aging for this customer to see what their current receivable situation is. By choosing this option you will be able to do this quickly and easily. The program will chain to AR-F, Print Aging and will automatically display the aging information for this customer only. When you exit the aging report the program will automatically return to where you were in the Estimate.
5 - Cust Record - There are occasions when you need to change information directly in the customer record (tax authority, salesperson code, etc). If you didn't start this process from the customer record, or, if you want to get a list of other invoices, etc., choosing this option will return you to the main customer record in AR-A, Enter/Change Customers. You will not be able to start another Estimate for this customer or delete their record, but just about anything else can be changed or displayed. It's important to note, however, that any changes made to the main customer record will NOT be automatically copied to the current Estimate. So, if you change the salesperson code you will still have to change this information again for this Estimate if you have already entered it previously. When you exit from AR-A you will return to where you were in the Estimate.
Inventory Information Options
If you press the ^I (CTRL+I) key when the cursor is in the line item entry screen, after the inventory item has been found, the following screen will be displayed:
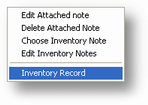
1 - Edit Attached Note - Free form (multi-line, automatic word wrap during entry and display) notes may be attached to any line item. These notes can be printed on the Estimate, invoice and/or packing slips. You can use these notes to better explain the line item, give instructions on how to use it, or just print it on the Estimate with special instructions on how to prepare the item.
We recommend you use this method of attaching notes instead of entering individual message lines for two reasons. First, making changes to the note are quick and easy. Just choose this option from the Inventory Options menu and any existing note will be displayed. You can then modify it in any way; add or delete characters, words or lines easily and quickly. If you use the message line approach and you need to change something major in the middle of the message it can take you a long time to restructure the note, line-by-line, so that it looks right again. Second, this note is bound to the line item. If you delete the line item the note is deleted also. Even more importantly, if you mark the item and the message lines as not ready to ship you might end up marking the item as ready and not the message lines. Besides not including them on the invoice, they would also keep the Estimate active until you noticed that all that remained on that s/o was message lines and deleted them so that you could get rid of the order. If all you need is a quick one line message and the entire order is marked ready then still use the message line option. That way the message is on the screen all the time and you know it will be printed on the invoice as appropriate. You can also attach a free form line item note to a message line. For more information please refer to Message Line Notes below.
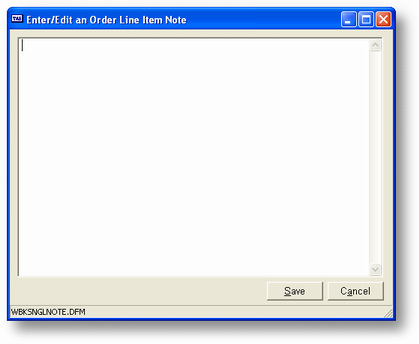
If you choose this option, and there is not a note already attached to this line item, the screen above is displayed. Enter your note just as you would normally. The lines automatically wrap. The same key options that are available for TASNotes notes are also available here. When you are finished entering the note press the F10 key to save it. If you do not wish to save the note press the ESC key. If you have made changes to the note and press the ESC key the program will ask you if you're sure you want to discard the changes made.
If you save a note for this line item the word NOTE will appear to the right of the location field. That note will remain attached to the line item even after it is invoiced. You will still be able to refer to it in the invoice history.
2 - Delete Attached Note - Choose this option to delete a note that is already attached to the line item. You will be asked to confirm the deletion.
3 - Choose Inventory Note - By choosing this option you can attach a TASNote previously entered for this inventory item to this Estimate line item. A list of notes available will be displayed. Move the cursor line to the appropriate note and press the enter key. The note will be automatically attached to the line item. If you want to make further changes to the note then choose option 1. The note you chose here will be displayed and you will be able to make changes to it.
4 - Edit Inventory Notes - This is the standard TASNotes procedure and it will allow you to add new notes or change existing ones that are attached to this inventory item. After entering a new note here you can then choose option 3 to attach it to the line item, and then option 1 to make further changes, if desired.
5 - Inventory Record - There are occasions when you need to change information directly in the inventory record (taxable, price, etc.) or if you want to get other information not available on the screen, choosing this option will return you to the main inventory record in IC-A, Enter/Change Inventory. You will not be able to delete the record, but just about anything else can be changed or displayed. When you exit from IC-A you will return to the line item entry.
Message Line Notes
You can also use this option when entering message lines. When the cursor is in the message line field press the ^N (CTRL+N) key. If this is a new message line (or there is no Estimate note attached to the line) the same note screen will be displayed as for a regular inventory item. You can then enter your free form note and when you save it the first line will be displayed in the message line on the screen. If you need to edit it again later just move the cursor to that line, press the ENTER key and the program will automatically display the note editing screen with the current note displayed. To delete a message line note (when attached to a message line only), move the cursor line to the appropriate message line on the list and press the DELETE key. You will be asked to confirm the deletion.
Printing an Existing Estimate or all Estimates
This program provides the opportunity to either print all or selected Estimates from the file or just the one currently on the screen. A sample report is provided in Appendix F.
To print all or selected Estimates, click print button while the cursor is on the S/O # field. The program will display the screen shown above.
To limit the printout, enter a range of Estimate numbers or customer codes. If you don't enter any limits, the program will print all applicable Estimates.
Copy Features
at the top of the estimate screen there is a button named Copy/Transfer. When this button is clicked the following menu will be displayed.
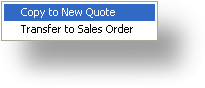
Copy to new Quote
When this menu option is chosen it will copy the currently displayed estimate to a new estimate. then you change the customer or change add or delete line items then save this as a NEW ESTIMATEOR QUOTE.
Transfer to Sales Order
When this menu option is chosen it will copy the currently displayed estimate to a new Sales Order. when the estimate is copied all item in the sales order are placed on backorder. then a dialog box will display see below.
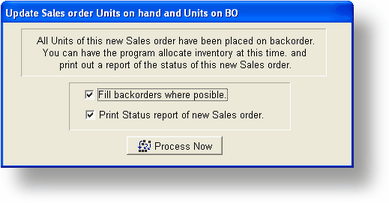
Make your choice to fill backorder where possible and if you want to print out a status report if this new sales order.
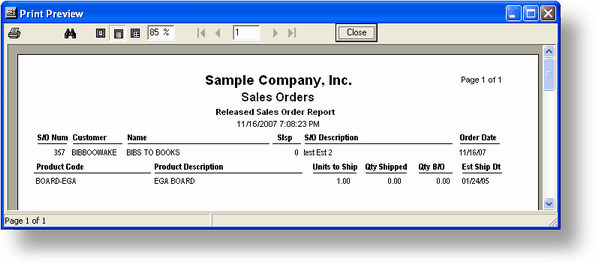
Sample of Sales order status report.
Page url: http://www.cassoftware.com.com/adv7docs/index.html?so_r___enter_estimate.htm