|
AR-C - Record Payments |

  
|
|
AR-C - Record Payments |
|
Purpose of Program
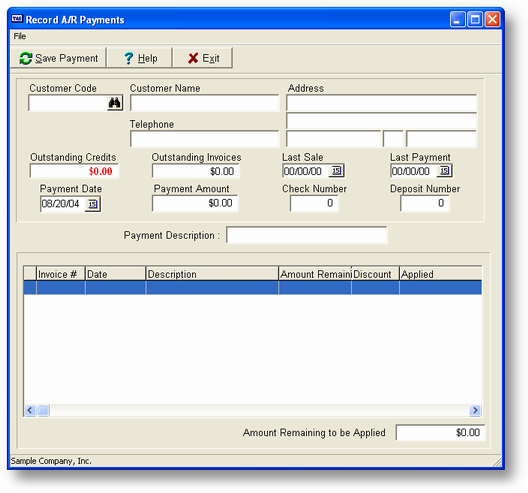
Use this program to record payments made by customers, to apply outstanding credits, or to record NSF checks. You can enter prepayments, deduct discounts on invoices paid, or apply outstanding credits toward invoices. You can also enter partial payments on your invoices or spread a payment over several invoices in any way you choose. The screen used to record payments is illustrated below.
Field Explanations
Customer Code
The code of the customer making the payment.
The fields below are filled in automatically from the Customer file.
Customer Name
The customer's name, from the customer file.
Address
The customer's address, from the customer file.
Telephone
The customer's telephone number.
Outstanding Credits
The total dollar amount in outstanding credits for this customer, if any.
Outstanding Invoices
The total dollar amount in outstanding invoices toward which payment may be applied.
Last Sale
The date of the last sale to this customer.
Last Payment
The date of the last payment made by this customer.
You can enter the actual payment information in the following fields.
Payment Date
Defaults to today's date.
Check Amount
Enter the amount of the check here. If this is an NSF check, enter this as a negative amount.
Check Num
The check number. This is a six digit numeric field.
Dep Num
The deposit number. This is a six digit numeric field.
Desc
The payment description. Will default to an appropriate value depending on the payment type.
General Program Operation
The first step in recording payments is to enter the code of the customer making the payment. This can be accomplished in three ways:
| · | Type the correct customer code into the Customer Code field and press ENTER. The corresponding name will be displayed. |
| · | Use the standard record search keys until the correct customer is found and then proceed (press F1 (Help) for a reminder). |
| · | Use the list display option. To use this option press F2 while the cursor is in the Customer Code field. |
The customer code you choose is then placed in the Customer Code field. Press ENTER and the customer name, telephone number, and any outstanding credits or invoices are displayed. Enter the check amount, the check number (optional) and the deposit number (required). This information will be used during check reconciliation (GL-K, Reconcile Check Register) to identify that the check has cleared the bank.
If the customer has prepaid the invoice and you now want to apply customer credits, then enter 0 for the payment amount. The program allows this only if there is an outstanding credit amount.
![]() If this program is used to record an NSF check returned from the bank or you need to reverse a payment made in error, enter the amount as a negative number, i.e., -100.00, etc. Enter the deposit number under which it was originally deposited. You will also be able to enter a description that will be saved to the customer's account and will be displayed in any statements printed. This defaults to NSF Check. However, you could enter Pmt Recorded in Error, for example, if you applied a payment to the customer's account that should've been applied to a different customer. If you are recording a negative payment for any reason, the program will go directly to the "Are all the entries correct?" message immediately after the description has been entered.
If this program is used to record an NSF check returned from the bank or you need to reverse a payment made in error, enter the amount as a negative number, i.e., -100.00, etc. Enter the deposit number under which it was originally deposited. You will also be able to enter a description that will be saved to the customer's account and will be displayed in any statements printed. This defaults to NSF Check. However, you could enter Pmt Recorded in Error, for example, if you applied a payment to the customer's account that should've been applied to a different customer. If you are recording a negative payment for any reason, the program will go directly to the "Are all the entries correct?" message immediately after the description has been entered.
After you enter the deposit number:
1. You are asked if you want to use all unapplied credits:
Answering Y automatically selects all existing credits for use in payment of invoices.
If you answer N, you must select which credits you want to use.
| 2. | Next you must choose which invoices to pay. You are asked if you want apply payment to all outstanding invoices, oldest first: |
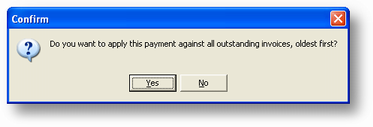
If you answer Y, the program will automatically allow any discounts if paid within the early payment discount time frame. As many invoices as possible will be paid until the payment amount is exhausted. You will also be able to change previously recorded payments if you use this option.
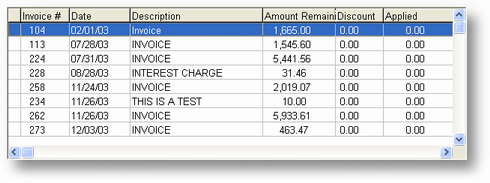
Choosing an Individual Invoice for Payment
When all the outstanding invoices are displayed you may choose which one to pay. You can do this by moving the selection bar to the invoice number or moving the cursor to the proper line. All standard list control keys apply. When the cursor is on the proper line press the ENTER key to tell the program you want to pay this item.
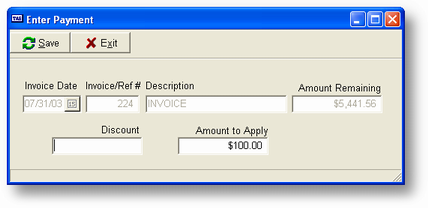
The screen above will be displayed. focus will be on the the to the DISC field. If a discount applies for this invoice the amount will be automatically calculated. If you wish to accept this you may by pressing just the ENTER key. If you want to change the amount you may do that also. Next enter the amount of the invoice to be paid. If the funds remaining are less than the amount of the invoice, that amount will be used as a default, otherwise the entire amount of the invoice (less any discount) will be used as the default value. Again, you can accept that amount or change it as you desire.
If you choose to record payment for all or part of the invoice it will be marked (check mark before invoice number). You can 'unchoose' an invoice by going through the process above and changing both the Disc and Applied fields to 0.
As you record invoices paid the Amount Remaining field at the bottom of the screen will be updated to reflect the appropriate balance.
To save your entries click the Save button. To exit from the process press the ESC key and answer YES to the exit question.
![]() You can control the maximum number of invoices it's possible to display for one customer by setting the appropriate value in SY-A-B, Enter/Change Invoicing Defaults for the field Max # Inv per pmt session. The default value is 500.
You can control the maximum number of invoices it's possible to display for one customer by setting the appropriate value in SY-A-B, Enter/Change Invoicing Defaults for the field Max # Inv per pmt session. The default value is 500.
Page url: http://www.cassoftware.com.com/adv7docs/index.html?ar_c_recordpayments.htm