|
Bill of Materials |

  
|
|
Bill of Materials |
|
Overview
The Bill of Materials provides a simple and efficient method to record manufacturing or building of products. By setting up the actual bill or list of materials that make up a specific product you can always know whether you have enough inventory to build more units, the current cost for each part, and a quick way of converting components into complete products. Each bill can be 9 levels deep and the build routine will automatically create sub-level products as well as the full product.
Below is a list of the available programs in the BOM module with a brief summary of each.
A - Enter Bill of Materials
B - Print Bill of Materials
C - Print Where Used Inquiry
D - Print BOM Availability
E - Print To-Build Orders
F - Build/Un-Build Process
G - Print Build History
H - Purge Build History
I - Enter BOM Configuration
This is the program to use to actually enter the bill or list of components for a specific product.
Will print the information entered in BM-A.
This report will give all the BOMs that require a certain product.
Print a list of BOMs and the number of units that are available or could be made, given product on hand.
This will print the BOM for a specific product and give the number of units of each component that are required. Any instructions that are a part of the bill are also printed.
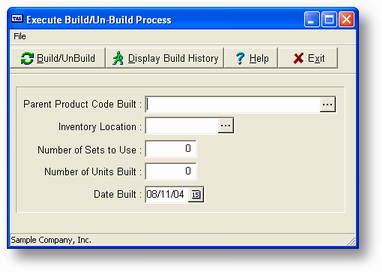
This program will do the actual work of moving component parts to a finished product, or allow you to record a finished product going back to component parts (un-build).
Print the history of products that have been built or un-built.
Delete records from the build history file.
Initial setup information.
Before You Setup Bill of Materials
![]() This section assumes that you have read and followed the instructions in Getting Started. Please read through all the information below before starting to use Bill of Materials.
This section assumes that you have read and followed the instructions in Getting Started. Please read through all the information below before starting to use Bill of Materials.
This section provides a step-by-step procedure for setting up your system to run Bill of Materials. Before proceeding, let's explore some of the programs in your new software.
If you have installed the sample data choose the Bill of Materials option (B) from the main Choose menu (in Windows click on the BOM button). Try out the programs and various entry screens. Look at the way the sample data has been set up. The sample data includes several bill of materials already entered. Another option is to look at the report samples provided in Appendix F.
Try the following exercises to see how some of the Bill of Materials features work.
1. Select the Bill of Materials option from the main menu. Press ENTER to choose the first item, Enter Bill of Materials. Press the F2 key to display a list of Assembly and Finished Goods items. Because the top item is already highlighted, simply press ENTER twice and this bill of materials is displayed. The UP and DOWN ARROW keys allow you to move between the BOM lines. Try the other keys listed at the bottom of the screen. When you have finished, press the ESC key to exit back to the menu.
2. Now press the F key to choose Build/Un-Build Process. Press the F2 key to again show a list of the assemblies and finished good inventory items. Press the ENTER key to choose the first one. Press the ENTER key only for the balance of the options. The program will automatically build 1 unit of the item chosen if there are enough component parts. That's all there is to record the building of an item. To record the un-building just use -1 for the Number to Build: it's that easy.
Setting up Bill of Materials for Your Company
The section below outlines the steps to follow in setting up your system and entering your initial information.
1. BM-I Enter BOM Configuration
Use this program to enter your system default choices for the Bill of Materials and Sales Order (SO-A) programs.
2. IC-A Enter/Change Inventory
Continue by entering your inventory items. You will need to categorize your inventory into the following four types:
N - Non-Stock Inventory - Use this type for services you sell, labor, and for anything else which you sell or purchase that is not tracked as a tangible product but may be included on a Sales Order or a BOM.
R - Regular Inventory - This type is used for raw materials, and for tangible goods which are not finished goods or assemblies.
A - Assemblies - These are the items you build. They are always part of other finished good items.
F - Finished Goods - These are the final results of what you build, the products you actually sell.
Refer to your Advanced Accounting manual regarding entering inventory using IC-A, Enter/Change Inventory.
3. BM-A - Create your Bills of Materials using Enter/Change BOM.
Enter a bill of materials for each Assembly and Finished Good item you created in the previous step. Simply define what parts make up the Assembly or Finished Good by entering a line for each part and instruction.
![]() You will not be able to add an Assembly to a Finished Good bill of materials until a BOM has been set up for that Assembly item first. So, create your BOMs from the lowest level up.
You will not be able to add an Assembly to a Finished Good bill of materials until a BOM has been set up for that Assembly item first. So, create your BOMs from the lowest level up.
4. Actual Operation
Once you have completed the steps above, and the others required in setting up Advanced Accounting 7, you are ready to run Bill of Materials. You will find that it fits seamlessly with the rest of the Advanced Accounting programs and gives you a quick and easy way to create finished products out of component parts.
Changes to Other Programs
If you have activated Bill of Materials (see UT-D - Turn BOM/JC/POS On/Off) some programs within the base system are automatically modified. Only the changes are documented here. For more information about these programs please refer to the base program documentation.

In this program you can now enter 4 types of products in the Type field.
| R - | Regular items - These may be parts of Finished Goods or Assemblies or sold as individual items. They will never have a BOM. |
| N - | Non-inventory items - As with regular items these may be a part of a Finished Good or Assembly but will never have a BOM. |
| A - | Assemblies - These are sub-components within a Finished Good that have their own BOM. You may sell these but they would normally be just a part of other products. |
| F - | Finished Good - This is something you build that is also a product you would normally sell. |
You can now enter or change Average Cost for Non-inventory type items. Since the Average Cost is used when calculating the final cost of a Finished Good or Assembly this allows you to add Non-inventory type items to your BOM and still have them be part of the final cost.
Even though you can set a cost or change it for a Non-inventory item it will not affect your General Ledger.
SO-A, Enter/Change Sales Orders
Changes to program operation
The screen above is displayed if you enter a Finished Good or Assembly product that does not have enough units on hand to cover the order.
If you choose option B the program will check to see if enough units can be built for the order. If they can and you have the Auto-build flag set to Y (see BM-I), you will also be asked if you wish to build the product now. If you answer Y the program will print the to build orders and record the build process.
If the Auto-build flag is set to N or you answer N the units will be placed in back-order.
The balance of the sales order process is the same.
Page url: http://www.cassoftware.com.com/adv7docs/index.html?billofmaterials.htm