|
Phase 1: Before You Set Up Advanced Accounting 7 |

  
|
|
Phase 1: Before You Set Up Advanced Accounting 7 |
|
Before you set up your new accounting system, the following are several steps we recommend in order to make your implementation of Advanced Accounting 7 as smooth as possible.
A. Look at Advanced Accounting 7 using the sample company data.
Go into Advanced Accounting 7 and familiarize yourself with the menus and various entry screens. In particular, you should look at the way the sample data has been set up. Look at the section Getting Around in Advanced Accounting 7, to learn how to make use of the function keys to view sample data. The sample company includes customers, vendors, employees, bank accounts, inventory, and several open transactions. Use this sample as a basis for comparison to help you decide how to set up your own system.
The sample data represents a company with transactions dated in 1995. In order to see a complete set of month-to-date figures in the various modules of Advanced Accounting, you should set your computer date back to no later than Dec 31, 1995. Remember to reset the computer date to the current date after you have finished looking at the sample data.
B. Close the accounting records in your previous system.
Whether you have been using a manual system or another computer system, you must have an up-to-date summary of your financial records before you set up Advanced Accounting 7. We recommend end of quarter as an ideal time to make this change; much of this summary data can be easily created at this time. However, if an end of quarter is not close at hand, use an end of month summary.
You will need to have the following items ready at various stages of this checklist:
| 1. | A copy of your current Chart of Accounts. |
| 2. | Year to Date balances for all General Ledger Accounts. |
| 3. | Outstanding invoices and credits for all Accounts Receivable customers and Accounts Payable vendors. |
| 4. | Your checking account balance(s) as of your end of quarter (or whatever date you are using for system startup). |
| 5. | Your inventory on hand quantities for each of your products. |
You should bring forward summary data only from your previous system. Do not expect Advanced Accounting 7 to manage extended financial histories created and reconciled under another method.
Remember - any recent transactions that are not reflected in the summary data will be entered as "live" data as the final phase of this setup procedure.
| C. | Go over the financial statements and chart of accounts provided by Advanced Accounting 7 with your accountant. |
We suggest that you read through the entire setup procedure and familiarize yourself with the system before making a decision on how you will use it. The following items, found in Appendix E, will help you explain your options within the system to your accountant to determine what best meets your needs.
The chart of accounts provided by Advanced Accounting 7.
Does this chart of accounts only require minor modifications in order to work for your business? If so, you might be able to simply mark the accounts you will use on the printout.
If you are using your own chart of accounts, be sure to go over the SY-A-A screen and identify which account you will use for each account type required by Advanced Accounting 7.
If you decide to create your own chart of accounts, it is very important to put some thought into its structure. Each of the different account types should be in its own number group. For example, asset accounts might all be from 10000 to 19999. In fact, you might even want to follow the code with the letter 'A' to indicate its category (i.e., 1000A to 1999A, liabilities might be 2000L to 2999L, etc). By putting an organizational scheme in place now, you will save yourself a great deal of difficulty later.
Financial Statements
The range of accounts that are already set up to create a Balance Sheet and Income Statement are based on the sample chart of accounts. For example, the accounts in the sample data that have '1' as the initial number are all asset accounts, those with '2' as the initial number are liability accounts, etc. Are the ranges and titles appropriate for the financial statements you will be producing? If you are creating a custom chart of accounts, be sure to make note of the account ranges you will be changing when you set up your financial statements.
The copy of the Enter/Chg Company Info screen (SY-A-A)
Identify the accounts you will use as your main account for each account type required by Advanced Accounting 7.
| D. | Prepare your inventory, employee, vendor, and customer data. |
You may find it easiest to enter all of this start-up information as part of your setup, but Advanced Accounting 7 also allows you to add customers and vendors as you enter transactions later on.
You may want to enter an inventory item of your own in the system and then try out the invoicing functions in Accounts Receivable to familiarize yourself with the procedures you will be using. At this point you should not type in any of your company information in the system other than as a test; you will be clearing all sample/test data in the next step.
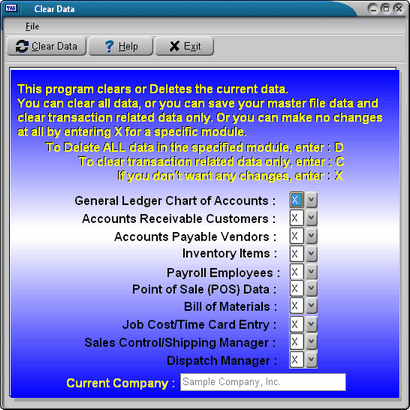
E. Run WBKCLRDAT.RWN to remove sample data.
The previous steps should have helped you decide if a modification of the chart of accounts provided by Advanced Accounting 7 will be satisfactory or if you prefer to enter an entirely different chart of accounts.
The WBKCLRDAT.RWN program will allow you to replace all or part of the information provided in the sample data.
We suggest that you copy the sample data to a new company code so that it will continue to be available for your reference after you have run the WBKCLRDAT.RWN program. To do this refer to SY-H, Multi Company Maintenance. You will want to Add a new company, use 99 as the new company code, leave the from company field blank (just press the ENTER key), and for company name enter Sample Data. When adding new companies you should put the data files in separate sub-directories. For this one you should enter DEMO. This will put the data into \ADV50\DEMO if you installed ADV 7 in the \ADV50 sub-directory.
This will create a company code "99" that contains the original sample data. You may want to delete this sample data after you have become more comfortable with Advanced Accounting 7. See UT-C - Change Company Code to learn how to switch between your actual company data and the sample data that you have copied using this procedure.
To clear the sample data in preparation for entering your own company information, select UT-A - Run TAS Program. When you are prompted for the program name, type:
WBKCLRDAT.RWN
You will be able to select a partial or complete deletion of the sample data at each choice. Before you make your selection, press F1 (help) for additional information on each choice.
If you have decided to use the existing chart of accounts as a model for your own company, you will probably want to clear only the transaction-related data from the chart of accounts and keep everything else. If you do not clear the sample chart of accounts, you will also retain the sample company's name, address, terms, and bank accounts. You can modify these in the appropriate step in the checklist below by clearing the field (CTRL+U) and typing in your own data.
After the WBKCLRDAT.RWN program is finished, you will be ready to set up your system using the checklist provided in the next section.
Page url: http://www.cassoftware.com.com/adv7docs/index.html?phase1beforeyousetupad.htm