|
GL-B - Enter/Chg/Print G/J Entries |

  
|
|
GL-B - Enter/Chg/Print G/J Entries |
|
Purpose of Program
This menu option allows entry of miscellaneous transactions to the General Journal. The type of transactions to enter here are ones which you don't want to affect your Accounts Receivable, Accounts Payable, or Payroll subsidiary accounts. This program is also used to make adjusting entries at the end of the month or year (such as depreciation) and to post the checking account expenses from your bank.
However, do not use this program to adjust Accounts Receivable or Accounts Payable accounts. These adjustments are made in their respective modules. Enter/Chg/Print General Journal lets you adjust the cash account and automatically updates the check register.
Each transaction may have up to 250 individual line items in it. Each line item posts to a single G/L account. The net balance of all line items must be 0.00 before the system posts the transaction (all debits and credits must balance). You may, however, save an out of balance transaction and change it later.
![]() CAUTION: Adjusting entries made in this program will only affect the General Ledger Accounts, not the subsidiary Accounts Receivable or Accounts Payable Ledgers (detail invoice files). DO NOT make adjusting entries for those G/L Accounts here; use an A/R or A/P voucher instead.
CAUTION: Adjusting entries made in this program will only affect the General Ledger Accounts, not the subsidiary Accounts Receivable or Accounts Payable Ledgers (detail invoice files). DO NOT make adjusting entries for those G/L Accounts here; use an A/R or A/P voucher instead.
The screen below is an example of a journal entry created in GL-B, followed by an explanation of the screen fields.
Field Explanations
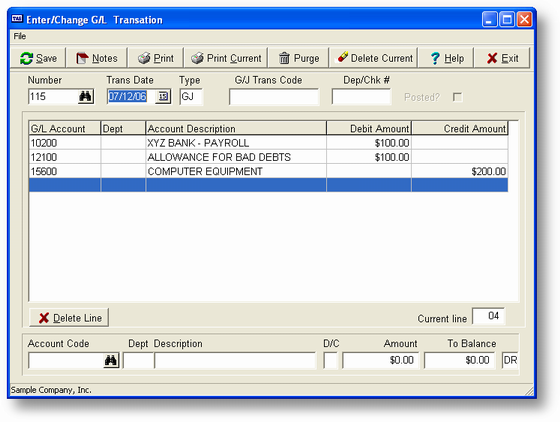
Upper Entry Fields
These fields are used either to create a transaction or to recall a previous transaction for adjustment.
Trans Date
The posting date for this transaction. This program allows you to enter transactions that affect previous periods or years by entering the appropriate date. For example, if today's date is March 1, 1993, then this program will default to that date. However, if you want to adjust the previous month, you could change the date to 02/01/93. The posting will then be made to the February Current Amounts rather than March.
The same can be done for a previous year. This is very useful at the beginning of the new year when you're trying to keep up with the current work and still make adjusting entries to the previous year.
The day is not important to the posting program, just the month and year. However, the journals are sorted by the complete date, so the location of a transaction in a printout is determined by the date used. Enter a standard date in this field.
Num
The transaction number automatically assigned by the system is displayed in the Num field. You may set the beginning number in SY-A-A, Enter/Change Company/Interface. You can use this number later to retrieve a specific transaction for any adjustments to the entry (until it is posted). This is a six digit numeric field.
Type
The transaction type. Your options are as follows:
GJ General Journal (and Beginning Balance)
CR Cash Receipts
CD Cash Disbursements
CR and CD allow you to select from the cash accounts set up in SY-A-D, Enter/Change Checking Accounts. The transactions entered here are recorded in the General Journal, Cash Receipts Journal, and Cash Disbursements Journal. Transactions affecting the Credit Sales Journal, the Credit Purchases Journal and Other Journal must be entered elsewhere. For more information on the sources of the various journal records, see GL-D, Print Journals.
G/J Trans Code
This is generally the customer, vendor, employee, or product code, or the journal entry number. Enter a code that will help you correctly identify this transaction. This is a 10 character alphanumeric field.
Dep/Chk Num
In the case of a Cash Receipts or Cash Disbursements transaction, this is the deposit or check number. In the case of a General Journal transaction, this can be used as another identifying number. This is a six digit numeric field.
Post
This field reflects posting status and is filled in automatically. If the transaction is not yet posted, then this field will be blank. If you saved the transaction and it is out of balance, a B is displayed. Once the transaction is posted, a Y is displayed, and you can no longer edit the transaction.
Line
This is the current line number within the transaction that you are entering or changing. G/J transactions are entered or changed in the entry window, with completed entries moving up into the display columns. The line number helps you keep track of where you are while adjusting entries. This value is automatically assigned by the program, and ranges from 1 to 250 (the maximum number of line items in a single transaction).
Entry Window
The entry window is the set of fields at the bottom of the GL-B screen used to enter line items. Enter the line items you want to include in the transaction into these fields. For instructions on creating transactions, see General Program Operation below.
Acct Code
This is the G/L Account Code. When you post your transactions (see GL-C, Post G/J Transactions), the program will post each line item to the account entered here.
Dept
The G/L Department Code specifies the department where the line item is to be posted, if applicable.
Description
The G/L account description. This is automatically displayed when the correct account code is found. When the journals are printed, both the standard G/L account description and whatever you have entered into this field are printed. You can change the description provided by the program to whatever is more meaningful to you. For example, if you enter the account code 100, the program will display the description Cash In Bank. You could change that to Bank Charges 3/1/95.. When the General Journal (GL-D) or the Detailed Trial Balance (GL-E) is printed, the standard account description will print correctly but you will also get the description you entered with the transaction. If you do not change the Description field, then the program will print the standard account description twice.
D/C
D - debit this amount or C - credit this amount. This field will default to whatever the normal status is for the G/L Account, but you can change the entry.
Amount
The amount you want to debit or credit in this transaction. This amount will always be >0. Use D or C above to control its effect.
To Balance
To assist you in entering long lists of line items, the program calculates the amount needed to balance the transaction. The program displays the net amount and whether it is a debit (DR) or credit (CR). This is a running total and is updated each time a new entry is made or changed. To balance the transaction at any time, enter the appropriate account code and make the transaction specified. For example, if you were entering petty cash transactions and the final To Balance amount was 395.23 CR, then your last transaction would be to enter your Petty Cash Account code, a C at the D/C field, and 395.23 for the amount. After you accept the transaction, the program will then display a To Balance amount of 0.00.
Display Columns
These columns hold line items you have already entered in this transaction. The cursor keys move the list of line items up and down. Use this feature to move a line item into the entry window for editing, if necessary.
General Program Operation
Creating a New Transaction
When the screen is first displayed, the Trans Date field defaults to the current date. You may change this date if you are making a prior period or prior year adjustment.
At the Num field enter a transaction number, or press ENTER and the transaction will be numbered by default. To provide a clear audit trail for consecutive transactions, allow Advanced Accounting to assign the next available transaction number from SY-A-A, Enter/Change Company/Interface.
Next, choose the type of transaction. When the cursor is in the Type field, the pop-up menu below is displayed.
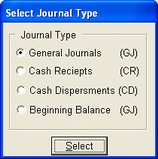
Choose the type appropriate to your transaction:
| · | General Journal: If you want to make an adjusting or correcting entry that doesn't involve your cash accounts. |
| · | Cash Receipts: When the original entry is a Cash Receipts entry, then the adjusting, correcting, or reversing entry must also be a Cash Receipts entry. |
| · | Cash Disbursements: When the original entry is a Cash Disbursements entry, then the adjusting, correcting, or reversing entry must also be a Cash Disbursements entry. |
| · | Beginning Balance: This will create a beginning balance record in the G/L Transaction file. |
The program will place one of the letter pairs displayed in parentheses above into the Type field.
Next, enter a G/J Trans Code, an identifying description of the transaction.
If the transaction type is Cash Disbursements or Cash Receipts, the program requires an entry in the Dep/Chk Num field.
The program will then bypass the Pst field. This field is filled in when you save an out-of-balance transaction or when you post the transaction (see Field Explanations above).
Next, the program places a 1 in the Line field. As line items are entered, this number is updated. As you scroll through the line items to make corrections, the Line number helps you keep track of where you are in the transaction.
After the top fields are filled in, the cursor is positioned in the Acct Code field in the entry window (those fields at the bottom of the screen used to enter line items). Now you are ready to enter the individual line items. If you are not sure what the correct account number is, the program can display your accounts. To use this feature press F2 while the cursor is on the Acct Code field to display your options.
Enter the account number in the Acct Code field. If this is the account you want, press ENTER at this point and the program will find and display the appropriate account information.
You can change the Account Description if you wish. The description you enter here will be displayed in the applicable Journals, along with the default Account Description. If you make no changes here, the default description is displayed twice.
Enter whether you want the line item recorded as a Debit or Credit in the D/C field, or use the default entry, which is the normal for the account.
Enter the Amount for the line item. This must be a positive number.
The program will now ask if the line entry is correct:
If you answer N, the cursor returns to the Acct Code field so that you can change your entry.
If you answer Y (called "accepting" the line entry), the To Balance display is updated automatically, showing you the amount and the DR or CR designation that you need in order to balance the transaction.
After the line is accepted, the information is reprinted immediately above the entry line, in the display columns. The cursor returns to the Acct Code field, and you can enter the next line item. Every time you accept a new line item, the program moves the previous entry up one line and displays the new transaction immediately below it.
Changing a Line Item: To change a line item that has been entered and accepted, you must do the following:
| 1. | Move the line into the entry window. This can be done by using the Up and Down arrow keys. |
| 2. | Treat the entry as though it were a new entry. You may change any or all of the field values. The To Balance value will be updated properly. After the line has been accepted, it will be moved up one line again. When this happens, if there are any previously entered lines below the line being changed, the next one in the list will be displayed in the entry window. |
Once the previously entered fields have been exhausted, blank fields will be displayed within the entry window and you may enter a new line if desired. You may also move the previously entered lines up by using the up arrow key.
Deleting a Line Item: To delete a line entered, you must move that line into the entry window using the method explained above and, with the cursor on the Acct Code field, press F4. The program asks if you want to delete the line. If you answer Y, the program removes that line and the other lines will be properly updated. This procedure can also be used to remove a blank line if one has been accidentally inserted.
To Save and Exit: To mark the transaction as complete, press F10 while on the Acct Code field of the entry window.
You are then asked if the transaction was entered correctly:
If you don't want to save the transaction, enter N when you are asked if the transaction is correct.
To save the transaction, press the ENTER key or enter Y. The Next G/J Number is incremented. The transaction will not be posted to the General Ledger until you run GL-C, Post G/J Transactions.
If you entered N when asked if the transaction was entered correctly, or if you press ESC at any time during entry, you will be asked if you want to exit without saving the transaction:
Enter a Y to exit. The program clears all the entries and returns you to the Trans Date field.
You can save a transaction that is not in balance. The program will alert you to this and a B will be placed in the Pst field. This can be very helpful when you have a question about the entries in a transaction and don't want to start over again after you secure the correct information. You may not post a transaction until it is in balance, however. No transactions are posted to the General Ledger unless you use GL-C, Post G/J Transactions.
Changing an Existing Transaction
A previously entered transaction may be changed repeatedly before it is posted. To find a previous transaction, do one of the following:
| · | Enter the correct transaction number in the Num field and press ENTER |
| · | Use the standard record search keys from the Trans Date or Num fields |
| · | Press F2 to display a list of G/J transactions |
If the transaction exists, all the transaction information is displayed. All the line items will be moved up until the entry window fields are blank.
To edit the line items, use the cursor control keys to pull a line item into the entry window. You can change any of the fields. The To Balance field keeps track of the amount needed to balance the transaction. From this point on, the operation of the program is the same as entering a new transaction.
Deleting an Existing Transaction
Find the existing transaction using the methods described above in Changing an Existing Transaction. Press ENTER Click the Delete Current Button or click the file menu and click the delete current option. If you answer Y when the program asks if you want to delete the entire transaction, it is deleted from the file.
You may delete any transaction until it is posted. Deleting a transaction or line item removes the record from the General Journal files.
Printing an Existing Transaction or All Transactions
This program provides the opportunity to print all transactions, selected transactions, or just the one currently displayed on the screen. To print all or selected transactions, press F3 while the cursor is on any field prior to the Acct Code field. The program will display the following:
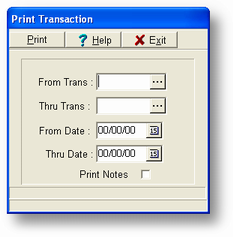
To limit the printout, you may enter From Trans # and Thru Trans # and From Date and Thru Date. If you don't enter any limits, the program will print all records available. A sample report is provided in Appendix F.
You can print the current transaction by pressing F3 when the cursor is in the Acct Code field on the entry screen above. You do not need to save the transaction before printing. After printing is complete, the program returns you to the Acct Code field.
Page url: http://www.cassoftware.com.com/adv7docs/index.html?gl_b_enterchgprintgjent.htm