|
Standard Printing Commands |

  
|
|
Standard Printing Commands |
|
In almost every program that prints a report there are some standard options:
F10 - Start Printing
Most report programs have an option to skip the entry fields and go directly to the printing routine. Any fields you don't enter will be set to the default value. So, for example, if press F10 at the beginning of AR-G - Print Customer Code & Name, all of the customer records will be printed.
Select an Index
Some reports allow you to select the index. This will control the order in which the records are found. So, for example, from AR-G again, the following index selection screen is displayed:
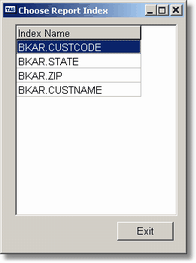
If you click on the Exit button the program will use the default index, in this case the BKAR.CUSTCODE or customer code index.
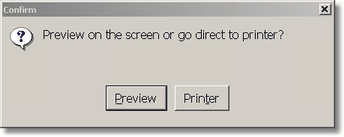
Preview / Printer
This option allows you to choose whether you want to go directly to the printer or be allowed the option to preview the report first. In many cases the Preview option will be what you choose since you won't need a printed report and you just looking for the report results, some specific information, etc.
![]() If the Allow Prt to Email + Fax is checked in Set Configuration (User Options page) then a different screen will be displayed. These are explained in Standard Printing Commands - Email & Fax
If the Allow Prt to Email + Fax is checked in Set Configuration (User Options page) then a different screen will be displayed. These are explained in Standard Printing Commands - Email & Fax
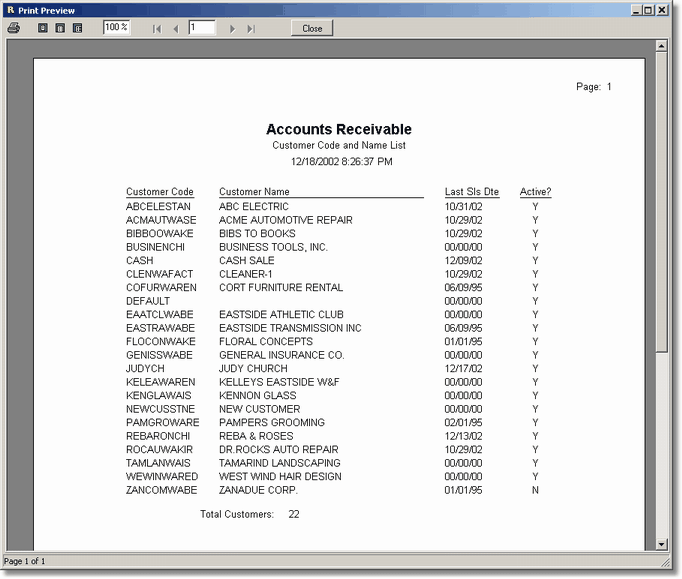
If you decide to preview the report something similar to the above will be displayed (depending on the report you print).
Starting with the far left at the top of the report the first button is a printer icon. Click on this icon if you want to print any or all of the report. The next three buttons control how the report is displayed in the preview window; fit the entire report page in the window, enlarge the report so that it fits side to side, and display the report page at actual size. The entry box that follows allows you to enlarge or reduce the side of the displayed report. The navigator buttons and window that follow allow you to scroll through the pages and the window tells you which page you're on. You can also enter a page number directly and jump right to that page. Finally is the Close button that will close the preview window and exit the report. Generally you will return to the main menu.
![]() Changes you make to the display options, such as enlargement percentage, how to display, etc will be saved and will become the default the next time you run a report and choose the preview option.
Changes you make to the display options, such as enlargement percentage, how to display, etc will be saved and will become the default the next time you run a report and choose the preview option.
The preview window, by default, takes up the entire screen. However, you can return to the main menu by clicking on the minimize button. You can return to the report by using the @F11 (Alt+F11) key, or, if the form that called the report is displayed, by clicking anywhere on that form.
If you click on the printer icon a standard Windows printer dialog box is displayed:
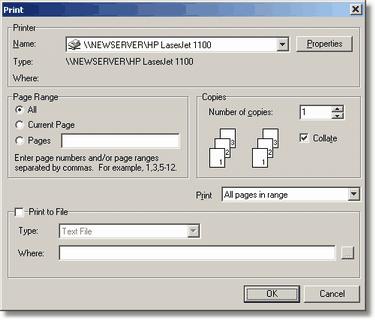
You can choose all of the standard Windows options including choosing the appropriate printer, printing a range of pages and printing multiple copies. You also have the option to print to a file. If you click on the Print to File check box you'll be able to choose the Type. These include various options such as Excel, RTF, graphical file (such as TIFF and BMP), or PDF. The PDF format is very useful in that most people have the Adobe Acrobat Reader, and, if you don't, you can download it for free from the Adobe web site.
Enter the appropriate file name, or search for a path/file by clicking on the button to the right of the Where field.
When you have made all of your choices press the ENTER key or click on the OK button. When the printing is complete the program returns to the preview screen, so you can print a different part of the report, or send it to a different printer, etc.
Page url: http://www.cassoftware.com.com/adv7docs/index.html?standardprintingcommands.htm