|
Standard Screen Elements |

  
|
|
Standard Screen Elements |
|
An Advanced Accounting 7 screen has specific display conventions that can help you use the programs more efficiently. The sales order entry screen below illustrates some typical elements of an Advanced Accounting 7 screen.
Here are two sample Advanced Accountng tool bars.
Reports

Data entry

Sample Data entry/Print Program
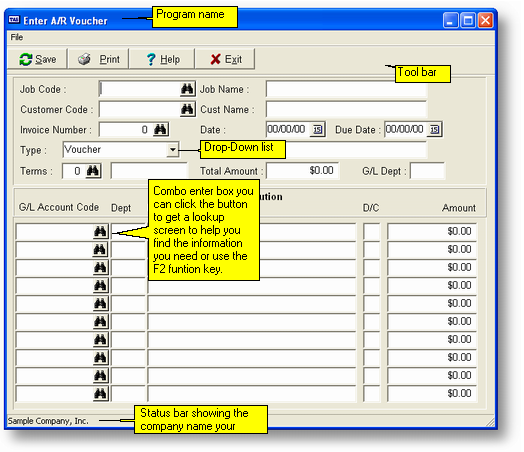
At the top or bottom of each screen is a list of some of the buttons available. You may either enter the appropriate key or click on the button with the mouse. The F1 function key displays specific help information for the particular program or a particular field on the screen. at the bottom of the screen above tells you what company your working on.
The F2 function key can also change its help message depending on the cursor position. Using the screen below as an example, F2 can change to Display Sales Orders, Display Customers, Display Salespeople, or Display Inventory depending on cursor position. To use these options, press F2 key and the items will be displayed in a list you can scroll through. For more information on this feature see Lookup Lists.
Input fields are displayed as 3D boxes. Generally, the information displayed can be modified by you.
Headers are the field identifiers located above or to the left of an input field. For example, S/O# above is the header for the field where you can enter a sales order number.
In this program there is both a list window that displays sales order lines that you have already entered and below that an entry window for adding/changing lines. You change a line by moving the cursor to the appropriate item and pressing the ENTER key. To enter a new item you either press the INS key (insert an item at the current cursor location) or move to the end of the list by pressing the END key and then move to the next blank line by pressing the DOWN ARROW key and then pressing the ENTER key.
Directly above the function key display is a set of summary information fields that provide totals as you enter items or as you complete the sales order.
Advanced Accounting 7 makes use of pop-up windows that overlay a screen to show additional information or to provide a selection list. The F2 function key often provides a pop-up window with a list for selection. In the screen above, the Terms field will automatically provide a pop-up window with the default value for that customer already highlighted. You can either choose that value by pressing the ENTER key or move the cursor to a different value.
Normal Entry Fields
There are 5 different "normal" entry field types. They are character (text), numeric, date, time and check box.
![]()
Text - Will always be a 3D box similar to the above. The text is entered from left to right and, when you enter the field, the existing text if any is automatically highlighted. This means that if you enter something the original text will be deleted. To move to a specific character you can click on the position with the mouse or move the cursor with the left and right arrow keys. The HOME key will take you to the left side of the data and the END key will take you to the right side. You can also insert characters by moving the cursor to the appropriate location and typing the characters you want to insert. The Backspace key will delete the character to the left and move the characters on the right over. Sometimes, as in customer or vendor codes, etc, the characters you enter are always in upper case. Otherwise, you will be able to choose the case. Also, in some situations, the characters you can enter are restricted to a certain few, such as Y and N for a yes/no question. In that case, if you should enter a character not allowed, the bell will sound.
![]()
Numeric - Also a 3D box, as in text, except the character enter is from right to left. Also, you may only enter numeric values (0 through 9), the decimal character (in the US this is '.') and, for negative values, the minus sign (-). As with the text field, the number is selected when you enter the field and, if you start to enter a value, will delete any existing value. To edit an existing value move the cursor to the appropriate location and enter the key(s) desired. The HOME key will take you to the left side of the data and the END key will take you to the right side. You can also insert characters by moving the cursor to the appropriate location and typing the characters you want to insert. The Backspace key will delete the character to the left and move the characters on the right over.
![]()
Date - The date is a specialized entry box that has a couple of extra features. As with the text and numeric boxes above, the date value is selected when you enter the field. If you enter 0 while the date is selected, the entire date will be set to 00/00/00 (as appropriate, could be 00/00 or 00/00/0000 depending on the size of the data field). Also, a calendar can be displayed when you click on the button on the right side of the entry field or press the INS (Insert) key. Something similar to the window below will be displayed:
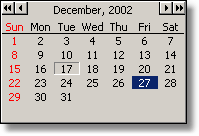
The field's current date value is highlighted in blue. Today's date is marked on the calendar with a beveled edge (the 17th in this case). The buttons at the top of the calendar go, from left to right, previous year, previous month, next month and next year. Press the ENTER key to select a date.
![]() Regardless of the current date displayed, you can always set the field to today's date by pressing the T key while in the date field.
Regardless of the current date displayed, you can always set the field to today's date by pressing the T key while in the date field.
![]()
Time - This field is similar to the date field above except that it doesn't have a drop down box attached. When you enter a time value only numeric values are accepted (0 through 9) and the characters are automatically placed from left to right. So, for example, to enter 9:30 you would enter 0, 9, 3, 0. Then the cursor stops at the A character. This represents AM. To change it to PM enter P here and the character will change to P.
![]() or
or ![]()
Check Box - This translates to False (Unchecked) and True (Checked) within the program. When the field is active there are two ways to add or remove the check mark. You can either press the SPACE bar or click on the box with the mouse.

Radio Button - This is used in advacned accounting to may the user choose from several options the program may preform for them. See the above example.
![]() If you don't specify a different color for entry mode than display mode you will never tell you're on a check box. The space around the check box changes to the entry mode color when the field is active. See UT-B - Set Configuration (ADV 7 Color page) for more information on setting entry and display colors.
If you don't specify a different color for entry mode than display mode you will never tell you're on a check box. The space around the check box changes to the entry mode color when the field is active. See UT-B - Set Configuration (ADV 7 Color page) for more information on setting entry and display colors.
GUI Entry Fields
There are a few entry fields and objects that only appear on full GUI (graphical user interface) forms. These are:
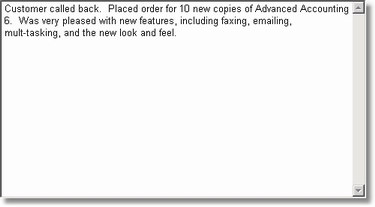
Memo - These fields are generally larger boxes that may, or may not, have scroll bars along the bottom and right side. They allow you to enter text in a free-form type fashion and the lines are word-wrapped automatically for you.
![]()
or
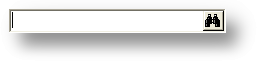
Combo Enter fields - These are very similar to the Text fields above, except they have a button attached to the field. In most cases that button will have 3 dots (ellipsis) or a Binocular. Click on the button and a lookup help of some sort will be displayed. This may be a standard lookup list or a list of program names, etc. Note: nost of these lookup type entru field are can also be activated with the standard F2 funtion key.
![]()
Navigator Bar - By clicking on the different buttons with the mouse you can move through the records in a file. The buttons, from left to right, go to the beginning of the file, go to the previous record, go to the next record and go to the end of the file.
Page url: http://www.cassoftware.com.com/adv7docs/index.html?standardscreenelements.htm