|
Part 5 - Adding a menu to a TAS Professional Program |

  
|
|
Part 5 - Adding a menu to a TAS Professional Program |
|
It's very easy to add the standard Windows® type menu to a screen form. Reload the SOEntry.DFM file in the screen editor if it's not already loaded.
From the Standard palette tab drop a MainMenu object on the screen form. This is a non-visual object and will just place the icon on the form. Right click on the icon and click on the Menu Designer option. The following property editor will be displayed:
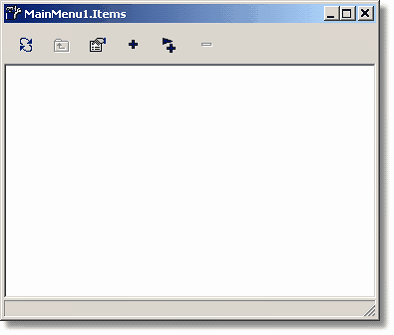
Click on the button that looks like a plus sign (hint is Add Item). A MenuItem will be placed in the tree and will appear at the top of the screen form.
NOTE: When you start adding menu items the screen may exceed the size you've allowed and horizontal/vertical scroll bars will appear. Stretch the screen out from the lower right corner and the scroll bars will disappear.
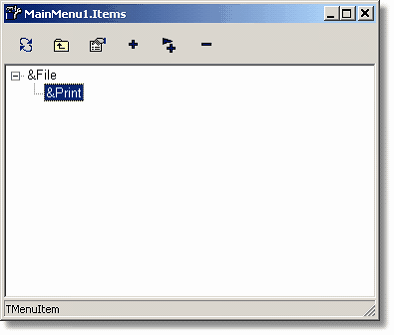
Click on the item (in the tree box) and you can change the Caption property directly. Enter &File as the new caption. The "&" (ampersand) before the F in File tells Windows® to allow the user to enter ALT-F to choose this menu item. Press the ENTER key and File should replace MenuItem at the top of the screen form. This is a standard first file menu in any Windows® program.
To add an additional top level menu item you would click on the Add Item button again. To add a sub-level item, one that won't appear until the user clicks on the top level item, click on button to the right of the Add Item (it looks like an arrow over the + symbol). Once again, click on the tree item that says MenuItem and change the caption to &Print. The property editor should now look like this:
In the OI change the Name property value to mniPrint (menu item Print). Now exit from the property editor (click on the X in the upper right corner). Save the form by clicking on the Save button.
NOTE: If you click on the File menu item, at the top of the screen form, the Print option should display just like a standard drop down menu.
Reload the source file (SOEntry.SRC) if it isn't already loaded. Add the event label mniPrint.Click: directly after or before the existing event label btnPrint.Click:. This will allow the user to either choose the item from the menu or by clicking the Print button.
NOTE: You cannot have two objects on the same screen with the same name. This means that you must have multiple event labels if they both/all call the same routine.
Compile the program and run it. When you click on File and then choose the Print option the report should print just like it does when you click on the Print button.
The only difference between this simple example and more complex menus is the number of MenuItems and the event labels you add to your program.
NOTE: The Tutorial, completed through this section, is in the subdirectory \TutComp. If you installed TAS Professional in C:\TASPro \ then you would look for C:\TASPro \TutComp\. You can set the up as a Dev Path just like you did the Tutorial itself.
Page url: http://www.cassoftware.com/tas/manual/part5_addingamenutoata.htm