|
Part 6 - Modifing an existing data file |

  
|
|
Part 6 - Modifing an existing data file |
|
Some times it is necessary to modify a data file that contains active records. In this section you will add a field, Part Number, to the Sales file. You will use Maintain Data Dictionary to add the field and the Restructure utility to actually modify the data file.
Maintaining the Data Dictionary
Select the Program->Maintain Data Dictionary menu item. Enter SALES as the FD name (directly or from the drop down list). Click on the Edit button and the screen should look like the following:
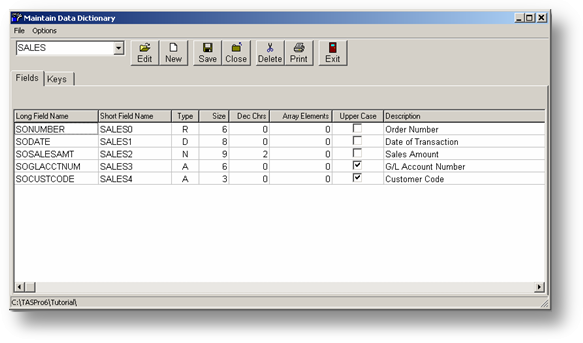
The file layout for the SALE file is shown above. Press the ^END (CTRL+END) key. This will take you to the Description column for the last line. Press the ENTER key twice (the first time will put you in edit mode, the second will add a new line). Enter the following information for the new field:
Long Field Name: SOPARTNUM
Short Field Name: Use Default Value
Type: A
Size: 15
Dec Chrs: 0
Array: 0
Upcase: Checked
Description: Leave blank
Click the Save button. Press ENTER or click on the Yes button at the question about saving the changed FD.
Restructuring a Data File
After you have modified the file layout you can restructure the data file. Use this instead of the Initialize routine when there is data in the file you want to keep. This process will make the changes to the actual data that you have made to the FD. You would use the Restructure option to add fields, remove fields, make them smaller, larger, add or remove indexes, etc. It can even add or subtract array elements. The only thing Restructure can't do is change a field from one type to another. If there are no active records in the data file, you should use the Initialize option instead.
NOTE: In normal operation it is wise to make a backup of your data before you restructure the file. What is going to take place is on a par with major surgery. If anything goes wrong you will not be able to recover your data without that backup. In this case you won't because this is only test data.
Click on the Options menu item. You should still be at the initial screen from the process above. If you are not please run the Maintain Data Dictionary program again.
Choose the Restructure File option. A message will be displayed about making a backup first. Click on the Yes button to continue. You cannot just press the ENTER key since the default is No. The following dialog will be displayed:
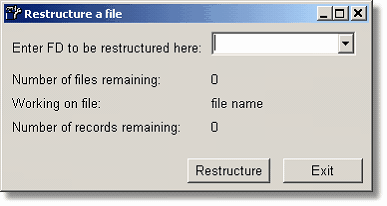
Enter SALES directly or choose the file from the drop down list. Then click the Restructure button. A screen is displayed showing the records being moved to a temporary file and then saved back to the original file. Since there are so few records this will happen very quickly. When it's finished click the Exit button. Finally, click on the Exit button to quit the program.
Modifying the Sales Entry Program
After the data file has been modified and restructured you can easily add the new field to the screen and report formats. By now you should feel comfortable enough to accomplish this without further assistance. Just load the screen format, drop a TTASEnter object on the form, (don't forget to set the FieldName property), save the form and you're done. In the Report Editor, load the format, place a TppDBText object on the SubReport1 page Detail band. Again, don't forget to put the field name in the DataField property, save the report format and that's done also. You do have to recompile the program since the field is not referred to anywhere else and, if you don't, it won't show up. Once the program is compiled you can enter values into the field and print those values out without writing a single line of code!
As an exercise you may want to create a part number file and do a lookup when entering a sales order so you cannot enter an erroneous part number. The part number file might contain a description for the part number, the current selling price, the last sale date and the total sales to date.
As you can see from this tutorial, TAS Professional has the flexibility to be used as a simple data manager and the power to build sophisticated applications. With the utilities available we think you will agree that TAS Professional is just the tool for today's demanding data management and GUI application development requirements.
If there is anything we can do to help you or your Company in your MIS needs. From Customizing TAS Professional for your Business to writing or converting your business applications to TAS Professional. Please feel free to contact us by Email at support@cassoftware.com or Call our office at (800) 358-4222 or (928)257-1236.
Thank you for taking this tour of our software solution Computer Accounting Solutions. We the Staff of Computer Accounting Solutions Look forward to working with you in the future.
Page url: http://www.cassoftware.com/tas/manual/part6_modifinganexisting.htm