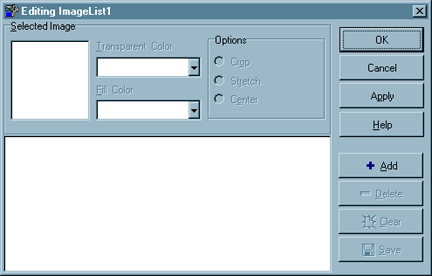
This editor is displayed when you right click on the TImageList object and choose the ImageList Editor option. You will load .BMP and .ICO files using this editor that can be used in other objects (such as TMenuItem) that have Image properties. When the editor is first called (if there are no images already loaded) the following will be displayed:

OK
Choose this button when you are finished manipulating the image list and you're ready to return to designing the form.
Cancel
Undo the changes you have made and return to the design phase.
Apply
Save the changes you have made and remain in the image editor.
Add
Choose this button to add a new image to the list. When you do, a standard Open dialog (with a preview pane) will be displayed, allowing you to choose the file you want to include.
Delete
When you have images already loaded, you can click on one of those and then choose this button to remove it from the list.
Clear
This will remove all images from the list and allow you to start over again.
Save
This allows you to choose one of the images and save it to a file on the disk.
Selected Image
When you select an image it will be displayed in small form in the large panel and larger in the Selected Image panel.
Transparent Color
This is the color portion of the image that will disappear when it's displayed. Generally, you will make no changes to this value since it will be filled in automatically.
Fill Color
This will be used to fill in any spaces around the image when it's smaller than the size than the Height and Width specified in the TImageList object.
Options
Depending on the size of the image and the values you entered for Height and Width in the TImageList object, you may be able to choose: Crop - reduce the size of the image to fit the size specified; Stretch - increase the size of the image; or Center - put the image in the center of the size specified.
Page url: http://www.cassoftware.com/tas/manual/imagelisteditor.htm