|
Client/Server Setup |

  
|
|
Client/Server Setup |
|
Setting up the Client/Server option for CodeBase is very easy. Just follow the steps below:
NOTE: You must be licensed for the client/server before you will be able to use it. To tell if you are licensed look at the screen that appears upon start-up. The second character in the License Type field must be C or U. If not you will have to upgrade your license to use client/server. All TAS Professional development licenses are ready for client/server since they have a 'C' License Type.
1. Download the TP6CS.EXE file from www.business-tools.com/downloads/tp6cs.exe. Note: Business Tools Inc. Closed there doors in May 2003 If you need support for Codebase and CS Please Contact us at support@cassoftware.com
2. Execute the file, click on the Unzip button, and install the programs in a subdirectory on the same computer that will act as the server. The default subdirectory is \CBServer.
3. Copy the C4DLL.DLL file from the server directory to the computer/subdirectory where you have TAS Pro installed. This should replace the file that is already there. If you are not asked to log-in when you start TAS Pro you have not copied this file correctly.
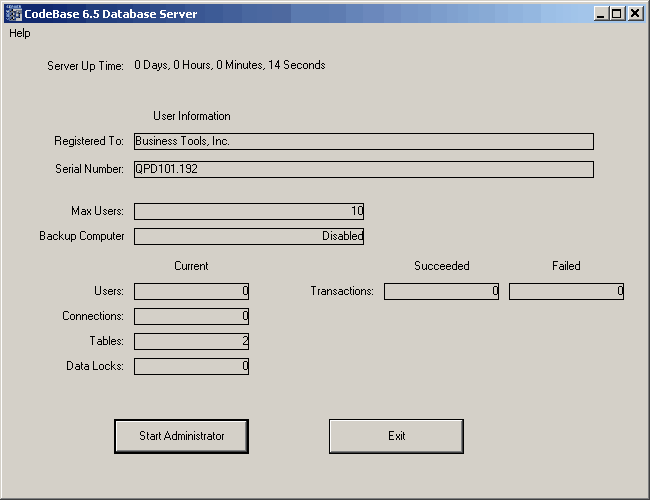
4. Start the server program by executing the file S4SERVER.EXE. The following screen should be displayed:
5. You need to determine the name of the computer where the server is running. How you do this depends on the OS you are running:
| Win 98 | a. Right click on Network Neighborhood. |
b. Click on Properties.
c. A dialog box with tabs should be displayed, click on Identification.
d. The Computer Name value is what you are looking for.
| Win 2k | a. Click on the Start button. |
b. Move the cursor to the Settings option.
c. Click on Control Panel.
d. Click on the System icon.
e. A dialog box should appear that says System Properties at the top.
f. Click on the Network Identification tab.
f. The Full Computer Name is what you are looking for. NOTE: This might have a period at the end of the name. Unless you put that period there, you can ignore it.
| XP | a. Click on the Start button. |
b. Move the cursor to the Settings option.
c. Click on the Control Panel.
d. Click on the System Icon.
e. A dialog box should appear that says System Properties at the top.
f. Click on the tab that says Computer Name.
g. The Full Computer Name is what you are looking for. NOTE: This is actually after the Computer Description. Also, this might have a period at the end of the name. Unless you put that period there, you can ignore it.
NOTE: The above assumes you have changed the standard XP setup back to something that is recognizable. If you like the standard XP setup, or haven't changed it yet, then do the following:
a. Click on the Start button.
b. Click on Control Panel.
c. Click on Performance and Maintenance.
d. Following the title: "or pick a Control Panel icon" click on the System icon.
e. Click on the tab that says Computer Name.
f. The Full Computer Name is what you are looking for. NOTE: This is actually after the Computer Description. Also, this might have a period at the end of the name. Unless you put that period there, you can ignore it.
6. The name you get in step 5 above is the Server Name to be used when logging in (see below).
7. VERY IMPORTANT - If you have a fixed IP address for each computer (most importantly, the server) the network won't be able to find that computer unless you tell the network where it is. This is accomplished with the LMHOSTS file. A sample of this file is on your computer with the extension .SAM. Use the Start->Search->Find Files... program to search for the LMHOSTS.SAM file. This is a text file that can be edited with NOTEPAD or something similar. You should create your own version of the file in the same subdirectory without the .SAM extension. Follow the instructions in the .SAM file and you should have no problems. HOWEVER, the simplest process is to allow the network to assign an IP number automatically. This is the default setup for Microsoft TCP/IP and is the recommended procedure unless you have a network professional at your disposal.
What to do from the client computer
1. Make sure you have copied over the C4DLL.DLL from the server subdirectory to the subdirectory where you have installed TAS Pro. This can be on the server machine. You're not required to have multiple installations of TAS Pro.
2. Run TP7SETUP.EXE.
3. If you have copied over the correct DLL you should now see two new fields on the General page. These are Server Name and User Name. The User Name will default to PUBLIC.
NOTE: The server automatically creates a user with the name of PUBLIC and no password required. You should replace this with user entries that are appropriate to your company.
4. The names you enter here will be used as default values when you log in. There is no requirement to put anything here.
5. All file settings need to be made in relation to the server location. For example, assume that you have created a stand-alone server (recommended), and all of the data files, including the data dictionary, are on that server (again, recommended). Assume that the data dictionary location is \TAS7 and the data files are in \TAS7\DATA. Normally, if you accessed the server as, for example, G:, then you would set your data dictionary to G:\TAS7, etc. However, since the server software is running on that machine, the software would look at that as C:\TAS7, which is what you must use.
So, the step here is to change the Data Dictionary drive letter if you have been using a peer-to-peer version previously. If this is a new installation, enter either the drive letter as appropriate.
NOTE: Something very important to consider: You don't have to give the user access to the server computer. Even if the user can't "see" the files on the server they can still access the data through the server software. This will give you absolute control over which files the user can access by controlling the programs they can run, etc. If the user doesn't have access to the server, you will have to put a copy of the EXE files someplace where he/she does. This would also include the TASPRO.INI file.
NOTE: The TP7SETUP (and TP7RTSETUP) program will not attempt to check for a set of data dictionary files at the specified location if the client/server version of C4DLL.DLL is active in their computer. This means you have to make sure the data dictionary is properly setup yourself before starting up the user.
Logging into the server
After you have completed the steps above you are ready to restart TAS Professional. When you start either TAS Pro or the runtime the following form will be displayed:
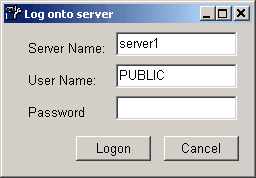
The values in Server Name and User Name depend on what you have entered in TP7SETUPSETUP above, if anything. The User Name will default to PUBLIC unless you have entered a different value in TP7SETUPSETUP. There is no default for the Password, it must always be entered.
If you have entered the correct Server Name you should be able to click on Logon without entering a Password (for PUBLIC only). The start-up process will continue and the license screen will be displayed. From that point on there is no visible difference between client/server and peer-to-peer.
When you exit from TAS Pro or the runtime you are automatically logged off the server.
Modifying server settings
Download the CodeBase Administrator from www.business-tools.com/downloads/cbadmindl.exe. Execute the program, click on the Unzip button, and install the programs in the CBADMIN subdirectory. You do not have to install this program on the server. If you want to control who has administrative access then control access to this program. Also, you must be logged into the ADMIN user. Initially, this user doesn't exist. To add the user to the Accounts file you must log into the CB Admin program on the same computer where the server is installed. Once the ADMIN account has been added, you will be able to log into the user from any computer. The ADMIN account controls who can make changes to the Accounts file.
You will need to log into the server from the administrator just like you do from TAS Pro. However, the defaults displayed are not from the TASPRO.INI file. Also, a Port ID is one of the entry options. Just ignore this field.
Once you've logged into the server you will be able to add new accounts, change the log file, disconnect users, check and see which files are opened, etc. This program can be run from any client, it does not have to be run from the server.
Before you can enter accounts you must setup the location of the System files. To do this, after you have logged into the server, click on Server->Settings. The following screen should be displayed:
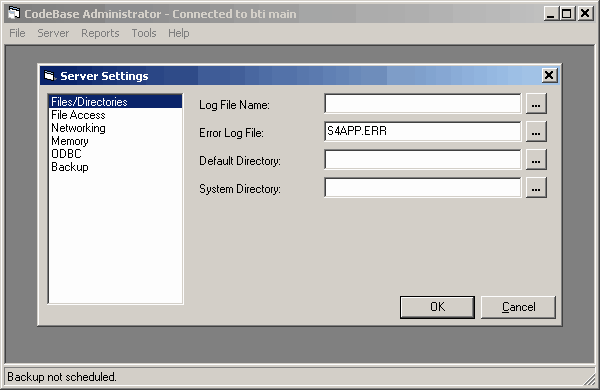
You must enter a value for System Directory. It should be the same directory where you installed the CB Server software (default is C:\CBServer). And, just like all the other files, is relative to the server location. You should save the information by clicking the OK button, then exit from the CBAdmin program. Exit the Server (by clicking on the Exit button on the server screen) and restart the program. Then you will be able to update all the other information for the server.
You may modify the server settings by clicking on the Start Administrator button on the server screen or by clicking on the CodeBase Admin icon. The file name is CBADMIN.EXE. A full help file is included at CBADMIN.CHM.
Take the time to read through the documentation that comes with the CodeBase Administrator program. The options aren't extensive or difficult to understand.
NOTE: The CBAdmin program will access any server running on your network.
VERY IMPORTANT: The CBADMINDL.EXE contains a version of COMDLG32.OCX that may overwrite what you already have in your Windows\System (or WINNT\SYSTEM32) subdirectory. You should probably make a backup of that file before you install this program.
Comments
Once you have installed the server program you'll be very surprised, and pleased with how easy it is to install and run, especially compared to other client/server programs you may be familiar with. Don't forget that the CodeBase server may be run on ANY Windows 98, NT, or XP computer. You do not have to set this up on a computer running a server version of Windows. Also, you can have multiple servers running at one time on multiple computers. However, at this time, you can access only one server at a time from your programs.
The "C" license limits you to 10 users at one time per server. The "U" license allows you to have an unlimited number of users at one time per server.
Page url: http://www.cassoftware.com/tas/manual/clientserversetup.htm