|
JC-A - Estimates/Change Orders |

  
|
|
JC-A - Estimates/Change Orders |
|
Purpose of Program
This is where all jobs start. Use this program to enter general and cost information about each job. You have the opportunity to add to, change or delete any estimate before it is converted to a job. Once a job is created, use this program to record changes that affect costs. You can also get a report of current estimates that haven't been converted or change orders that haven't been added.
Once an estimate/change order is converted/added to a job it is deleted from the current file and, if appropriate, added to the history file (see JC-F, JCMS Configuration Info).
![]() An estimate must be converted to a job before you will be able to post transactions for that specific job.
An estimate must be converted to a job before you will be able to post transactions for that specific job.
Field Explanations
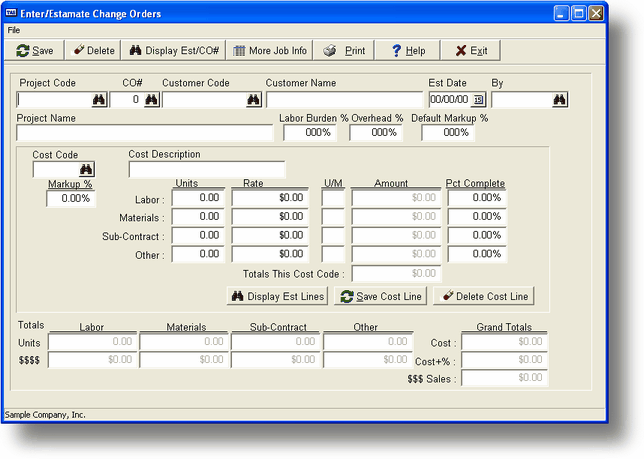
Project Code
This is the code that will be used when accessing this estimate, and will also be used if the estimate is converted into a job. If you have the option set to create codes automatically you can just press the ENTER key here and the next Project Code will be displayed (see JC-F for more information). If not, you will have to enter some sort of code. Press the F2 key to get a list of current jobs; press the F3 key to get a list of other estimates.
CO#
Change order number. If this is the original estimate then the CO# will be 0. If this is an existing job the program will automatically increment this number to the next one available for this job.
Customer
The customer code associated with this estimate. Press the F2 key to get a list of customers. You can also enter a new customer from here.
Customer Name
The name of the customer from the customer file.
Est Date
The estimate date. Will default to today's date.
By
The initials or code for the person entering the estimate. Press the F2 key to get a list of employees.
Project Name
The name to be assigned if this estimate is converted into a project.
Labor Burden
This percentage is multiplied by the direct labor cost and added to the total cost figure that is used when calculating the sale price for the job. This generally takes into consideration costs of employees not paid by the employee, i.e., health insurance, taxes paid by employer, etc. This is not considered a normal part of overhead. The default value comes from the entry in JC-F, JCMS Configuration Info and can be changed here.
Overhead
This percentage is multiplied by all direct costs to get an estimate of the indirect cost involved with doing any job. This is added to the total cost figure used when calculating the sale price for the job. Normally included would be management expense, rent of general office space, utilities for that space, etc. The default value comes from data entered in JC-F, JCMS Configuration Info and can be changed here.
Dflt M/U
This is the default markup for each cost code that will make up this estimate. You can change the actual markup for each cost or just accept this value. The default value comes from data entered in JC-F, JCMS Configuration Info and can be changed here.
Cost Code
This is a single line in the estimate. Press the F2 key to get a listing of available cost codes. See JC-D, Cost Codes for more information.
Cost Description
The description for the cost code. Comes from the cost code file.
Markup %
This is the markup percentage that will be used for this specific cost code. Will default to the value in Dflt M/U.
Cost Categories
Each cost code has four major categories. These are Labor, Materials, Sub-contract, and Other. You may enter Units and Rates (or just a flat Amount) for each category for each cost code. The U/M (unit of measure) comes from the cost code file; Amount is the Units X Rate. If this is a change order you may enter a value in Pct Cmp (percentage complete) to update the value in the job record.
Total This Cost Code
The total of each category for the cost code on the screen.
Totals
The screen will display totals for each of the categories, both dollars ($) and units (#).
Grand Totals
Cost
This is the total direct cost for all cost codes and categories.
C+%
This is the total direct cost for all cost codes and categories plus the calculated labor burden and overhead costs.
$Sls
This is the calculated sale price using the markup for each Cost Code X the C+% figure for each cost code.
Job Information Screen (displayed when converting estimate to job)
(pic)
Proj Code and Name
This is the same information as on the main estimate screen.
Project Description
A 5 line description area designed to keep any general information you wish.
% Complete
This is used after the project is started. You can set this value to any percentage from 0 to 100. The program will use this value when calculating expected costs and comparing these to actual costs recorded. The difference between the actual and estimated is shown as a variance amount and percentage. This data is displayed on the main screen in JC-B, Projects
Job Type
A 2 character field that can be used as you wish to specify the type of job. This can be used in reports to restrict the print out.
Est Start and Est Cmplt
The estimated start date and estimated completion date.
Act Start and Act Cmplt
The dates the project was actually started and completed.
Contract Number, Project Contact, Project Location, Telephone
For your information only, not used anywhere else. You will be able to easily retrieve this information from the JC-B, Projects screen.
Salesperson, Project Manager, Field Supervisor, Administrator
Also for your information. If you press the F2 key while the cursor is in the small field the program will display a list of employees and you can choose the appropriate employee code. The employee's name will be placed in the larger field to the right of the number.
General Program Operation
Adding a New Estimate
| a) | If you have the option to automatically create job codes set to Y in JC-F you can press just the ENTER key here to get the next available job code or enter a job code now. If a project already exists with that code it will be displayed. |
| b) | The CO# will automatically be set to 0. |
| c) | Enter the appropriate customer code or press the F2 key to get a listing of available customers. When you choose a customer the name will be displayed in the Customer Name field. If you need to you may enter a new customer at this time. |
| d) | The Est Date will default to today's date. Press ENTER to accept it or enter a different date. |
| e) | Enter the appropriate employee code or initials for the person entering the estimate. Press the F2 key to get a listing of employees. |
| f) | You may enter a short one line name for this estimate or change order. |
| g) | The Labor Burden, Overhead and Dflt M/U percentages default to values entered in JC-F. If you need to change these do so now. |
| h) | Each item on the estimate must be associated with a cost code that is in the cost code file. Press the F2 key to get a list of codes or enter the appropriate code in the Cost Code field. You may have as many different cost code lines in an estimate/job as desired. The Cost Description from the cost code file will be displayed. Please see JC-D, Cost Codes for more information. |
![]() Once you have entered cost code lines for this estimate you may display a list of those lines on the screen by pressing the F3 key.
Once you have entered cost code lines for this estimate you may display a list of those lines on the screen by pressing the F3 key.
| i) | The Markup % will default to the value in Dflt M/U. This rate will be used when determining the sale price for this job. Each cost code can have a different Markup %. |
| j) | Enter the number of units for each of the major categories as applicable. The Rate will default to the value in the cost code record. The Amount will be calculated automatically. If you don't place a value in Units, you can enter a dollar figure directly in the Amount column for any of the categories. |
| k) | As you enter each cost code the program will update the Total This Cost Code field and the Totals at the bottom of the screen. |
(pic)
| l) | When you have finished entering the cost code lines press the F10 key. The dialog box above will be displayed and you will be able to convert this estimate into a project. For more information about converting please see Convert Estimate to Job further in this section. If you're not ready to convert to a job then enter N. |
| m) | When you are finished, the estimate/change order will be saved and you will be returned to the Project Code field. If you wish to enter a new estimate/change order you may do so now, or press the ESC key to return to the menu. |
Changing an Estimate
| a) | You may change an existing estimate as many times as desired until it is converted into a project/job. Enter the job code or press the F3 key to get a list of existing estimates. |
| b) | Once the estimate is on the screen you may change any of the values entered originally. |
| c) | Change Cost Code Entries |
To change cost code entries move the cursor to the Cost Code field by pressing the ENTER key only.
To change an existing cost code entry for this estimate enter the appropriate cost code value or choose one from the list displayed when you press the F3 key. Once the cost is displayed you may change any value.
Delete Cost Code Entries
To delete a cost code entry currently a part of this estimate enter the cost code or press the F3 key to get a list. Press the ENTER key so that the cursor is in the Markup % field. Press the F4 key to delete the cost entry.
Adding New Cost Code Entries
You may add new cost code entries to this estimate using the same method explained in Adding a New Estimate above.
| d) | When you are finished making changes you may save those changes by pressing the F10 key or convert the estimate to a project by pressing the F5 key. If you don't want to save the changes made press the ESC key. |
Deleting an Estimate
| a) | Find the proper estimate record as described in Changing an Estimate above. |
| b) | When the cursor is in the Customer Code field press the F4 key. |
| c) | You will be asked to verify your choice. If you answer Y the program will delete all records pertaining to this estimate. |
Entering a Change Order
| a) | Enter an existing Project Code or press the F2 key to get a list. |
| b) | The program will automatically increment the CO# (change order number) to the next one for that job. |
| c) | All other entries are the same except when saving the change order you will be asked if you wish to add the change order to the job. You can continue to make changes to the change order or delete it entirely until it has been added to a job. |
Converting an Estimate to a Job
| a) | You need to convert an estimate to a job before you will be able to enter transactions for that project. If the estimate is not currently displayed on the screen enter a code in the Project Code field or press the F3 key to get a list of existing estimates. |
| b) | Press the ENTER key so that the cursor is in the Customer field and press the F5 key. |
(pic)
| c) | The dialog box above will be displayed, enter Y. |
(pic)
| d) | Enter your initials/employee number, the date of approval (defaults to today's date), and the actual sale price of the job (defaults to calculated price). |
(pic)
| e) | Next the screen above will be displayed. Enter the appropriate information or press ESC to continue with the save process. |
| f) | When the process is complete the program will return to the initial screen and you can enter a new estimate. |
Print Estimates
| a) | This option will print the estimate/change order information. To choose this press Print reports when the cursor is in the Project Code field on the main screen. |
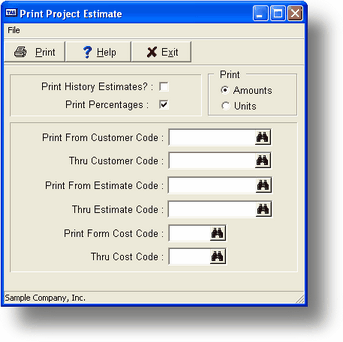
| b) | The screen above will be displayed. The first choice is whether to print units or dollar amounts when printing the report. You must choose one or the other. |
| c) | If you want to print from the estimate history file then enter Y at the Print History Estimates? field; for current data enter N (the default). |
| d) | You can restrict the print out by Customer Code, Job Code and Cost Code. Also, if you want to print percentages of amounts in the report enter Y at the Print Percentages? field. |
| e) | A sample of this report is in Appendix A. When the report is completed, the program returns to the main estimate screen. |
Return to the Menu
From any field prior to Cost Code press the ESC key and the program will return to the main menu.
Page url: http://www.cassoftware.com.com/adv7docs/index.html?jc_a_estimateschangeorders.htm