|
GL-O - Format Custom Statements |

  
|
|
GL-O - Format Custom Statements |
|
Purpose of Program
Use this program to create specialized financial statements for your business. You can customize the statement titles, add headers, label your total lines, place information in up to nine different column locations, print G/L accounts, account numbers, and descriptions, and use blank lines and page break commands for a custom appearance for your statements. You can enter as many sub-divisions as you want for dividing your statement totals. Be sure to consult your accountant when creating these financial statements to be sure that the statement totals properly reflect your Chart of Accounts.
This section is divided into a summary of the screen fields and their functions, a short tutorial to help you create your first simple statements, and examples of the what the finished statements you have created should look like. Scan the tutorial before using the field descriptions below for the first time.
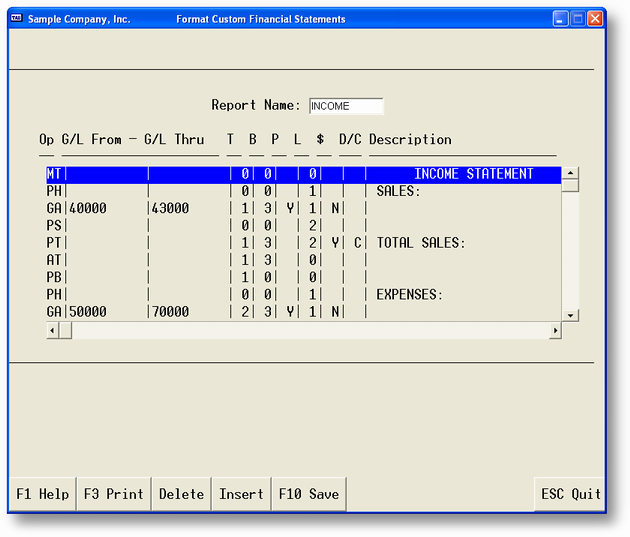
The screen below is an example of what you will see when you request this program. The screen fields are initially blank.
Field Explanations
Report Name
The 10 character name you give to your custom financial statement so that you can retrieve it after saving (This does not print as a title on the statement itself). This is not an actual file name.
Op
The operator or command code. You can choose your operators from an on-screen menu. The operator chosen determines which of the screen columns (T, B, P, L, etc.) you are allowed to fill in. These are summarized in General Program Operation below.
G/L From
The starting value to use when printing or totaling G/L accounts.
G/L Thru
The ending value to use when printing or totaling G/L accounts.
T
This report utility allows up to 20 uniquely identified totals. Assign a number (1-20) for one of the functions below:
| · | If you are printing blank lines, this is where to enter the number of lines. |
| · | The program totals the amounts in the G/L account range requested with a command to 'Get G/L Accounts' (Ga), then places this amount in the total field which you assign a number (1-20) here. For any of the Total commands (add, print, or clear), this field identifies which of the assigned totals (1-20) is to be operated upon. |
B
In this column, you put the number (1-20) of the total field you want to use a base to calculate percentages against when you choose the Calculate %'s option in GL-P, Print Custom Statements. For example, if you want to show each Asset account amount as a percentage of the Asset total, you would put the number you have assigned to the Asset total into the B column.
The B column also serves the purpose of holding the sum of the amounts when using an At (Add to Total) command.
P
If the command in the Op field is Ga, this field determines whether the accounts are to be printed on the statement or not. This gives you the option of reading G/L accounts into your statement without printing every one. Enter a Y or N.
L
If you choose to print only one category of account amounts (e.g. Current amounts only) when you run GL-P, Print Custom Statements, then use this column to enter the locations where the fields will print on the statement. Advanced Accounting controls the column layout if more than one category is selected for a report (e.g. Current amounts and 1 Year Past amounts).
You can use this location flexibility to print account amounts in one location and then print the total offset slightly. The locations for a single column format are based on increments of 5 character positions from left to right margin. Enter a number between 1 and 9. You will see examples of column location formatting in the report samples at the end of this section.
$
Specifies if a dollar sign is printed before the amounts specified in the current line. Enter Y or N.
D/C
When entering a pT (Print Total Field) command, you must enter the debit or credit status of the total into this field. Consult your accountant to confirm this status, as it depends on the types of accounts totaled.
Description
Use this field to enter the text of a title or header. Account totals, when printed, can also be given a text heading.
Other operations are available in the menu listed across the bottom of your screen. These options vary as to their availability. As always, you need to watch the bottom line on your screen to know which options are currently available.
General Program Operation
To begin a new format, or to display an existing one, type the format name into the Report Name field (the F2 option is also available to display a list of existing report formats).
If this is a new format, the Mt (Main title) command is automatically placed on line 1 and the program asks for the format title.
The cursor is placed on the first line for editing. To change a line move the cursor to the appropriate line and press the ENTER key. To insert a line move the cursor to the line you want to insert before and press the INSERT key. To add to the end of the format press the END key to move the cursor to the last line, press the DOWN ARROW key to get to a new line (blank) and press the ENTER key. To delete a line move the cursor to the appropriate line and press the DELETE key.
The first item is the Op or operation code. A menu of the options will be displayed. To choose the option move the cursor to the appropriate item and press the ENTER key or enter the marked character. The options for this item are as follows:
| tO - top Of form: | Go to the top of the next page. |
| Mt -Main title : | The statement's main title. This is only allowed once within the format and is always the first line. |
| pH - print Header: | Print a format header line. |
| Ga - Get G/L accounts: | Get a specific account or group of accounts and print them and/or total them. |
| At - Add to total: | Add one total field to another. Generally used to keep track of running totals or subtotals. |
| pS - print Single line: | Print a single dashed line (). |
| pD - print Double line: | Print a double dashed line (========). |
| pB - print Blank line: | Print blank lines; you specify a number of lines in the T column. |
| pT - print Total field: | This command will print a total that has been accumulated from the G/L account records or from the Add Total command. |
| Ct - Clear total field: | Sets an assigned total to zero if you need to re-use it. |
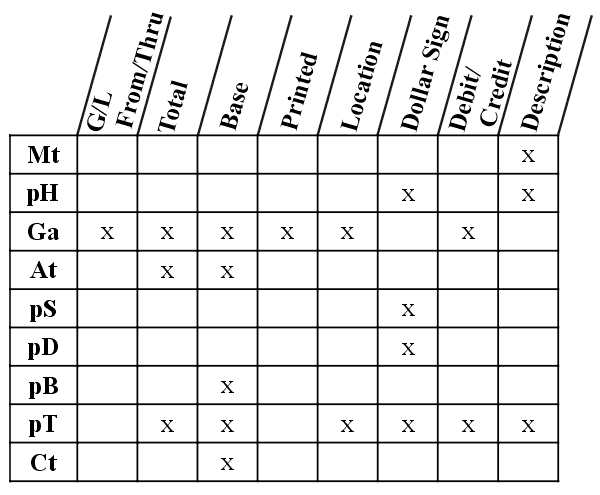
With each command you use a different combination of the screen columns to specify the parameters for the command. During format entry, the cursor only goes to the columns needed for the current command. For example, only the 'Get G/L Accounts' command uses the G/L From/Thru column; the main title command does not use a $ option. Below is a simple table of the command codes along with the columns they use.
Once you have entered all the lines for a specific format you can save it by pressing the F10 key. To exit this program without saving the format (or changes made) press the ESC key and answer Y to question of whether to exit without saving.
Sample Formats
To give you an idea of how this format specification works, simple examples will be presented, with the steps involved and the underlying reasons detailed. The three sample formats shown in this section take you from a very simple to a reasonably complex format.
The following is the format for a simple financial statement, a Trial Balance. Try to enter this statement yourself to get a feeling for the program. The two sample formats following this one ('BAL' and 'INCOME') are also included with your sample data, so you can print or modify them if you choose.
Trial Balance Format
This format consists of 7 different lines.
| Line 1: | This is the title of the format. This will always print along with the company name and date at the top of each statement page. It is entered when you choose to create a new format. |
| Line 2: | This is a header line. It will be printed starting in the leftmost position, specified by the 1 in the Location column. |
| 1. | Press the DOWN ARROW key to get to a blank line and then press the ENTER key. |
| 2. | Enter H to choose pH from the Operations menu. |
| 3. | Type a 1 into the L field. |
| 4. | Type the words TRIAL BALANCE ACCOUNTS: into the Description column. |
| Line 3: | Prints 1 blank line. The number of blank lines printed is specified in the T column. |
| 1. | Press the ENTER key then choose pB from the Operations menu (enter B). |
| 2. | Type a 1 (for 1 blank line) into the T column. |
| Line 4: | Prints the G/L accounts starting with account number 10100 and ending with number 32000, inclusive. The amounts printed (P=Y) will be summed into the Total field 1 (T=1). Any percentages to be calculated will use this assigned total as a base (B=1). Because the statement printing program (GL-P) offers the option of calculating percentages, you must set up a percentage base here. Each item will print starting in the leftmost column (L=1), and no dollar sign ($=N) will be printed. There is no Description because the descriptions entered in the Chart of Accounts will be used. |
| 1. | Choose Ga from the Operations menu (enter G). |
| 2. | Type 10100 into the G/L From column. |
| 3. | Type 32000 into the G/L Thru column. |
| 4. | Type 1 into the T column. |
| 5. | Type 1 into the B column. |
| 6. | Type Y into the P column. This prints the account amounts. |
| 7. | Type 1 into the L column. This prints into the first column space on the statement. |
| 8. | Type N into the $ column. |
| Line 5: | This line will print the accounts from 37000 through 70000. This will leave out the account 36000, Current Earnings, the closing account. If we were to include this account in the report our balance would be off by the amount in this account. For this line the entry is the same as line 4 except for the change in the account numbers. |
| Line 6: | Prints a double line before the total (==========). This will be printed at the column location 1 (L=1). |
| 1. | Press the ENTER key and choose pD from the Operations menu (enter D). |
| 2. | Type a 1 into the L column. |
| Line 7: | Prints the assigned total 1 (T=1) using itself as a calculation base (B=1); the percentage will always be 100 (the Income Statement later in this section shows a more complex use of the calculation base column). The assigned total 1 is specified to print in column location 1 (L=1), with no dollar sign ($=N), and the heading to be printed is Trial Balance Total. |
| 1. | Press the ENTER key and choose pT from the Operations menu (enter T). |
| 2. | Type a 1 into the T column. |
| 3. | Type a 1 into the B column. |
| 4. | Type a 1 into the L column. |
| 5. | Type an N into the $ column. |
| 6. | Type a C into the D/C column. |
| 7. | Type the words Trial Balance Total: into the Descriptions column. |
Balance Sheet Format
The following is a slightly more complex statement, a balance sheet. If you still have your sample data available, you can view this report format by requesting report BAL. Notice that only ten lines can display at one time. Use the Up and Down arrow keys to move the line marker to the line you wish to view or edit.
Note how in line 7 the total field 1 is cleared (Ct) so that it can be used for another account total, after the current account total has been printed in line 5.
In line 13, the Add Total command adds the total identified in column T (1) to the total identified in column B (2), and the sum is retained in column B. Then total 1 is cleared in line 14. Total 2 saves the total Liabilities, so that it can be added later to the Owner's Equity total. Lines 13 and 14 demonstrate how you can re-use total 1 for each account and accumulate the sum of all these totals in the total 2 field.
Adding the Liability and Owner's Equity is done by the Add Total command in line 20, where total field 1 (which was cleared and now is being used for the Owner's Equity total) is added into total field 2 (containing the Liability total).
In line 23, total field 2 is printed. This prints Liabilities + Owner's Equity, to complete the Balance Sheet.
The method of using one total field over and over, "emptying" it, so to speak, into other total fields which are holding the totals you wish to keep is a useful way to limit the number of unique operations in your format.
Income Statement Format
Finally, the most complex statement yet, an income statement. If you still have your sample data, you can see this statement format by requesting INCOME. An example of this statement is also provided at the end of this section.
Notice the similarities between this statement and the earlier balance sheet.
In this format, the G/L account amounts that are read into total fields 1 and 2 (income totals and expense totals) are all added to total field 3, which is then used as both the net total and as the calculation base for percentages. In other words, this statement will show income and expenses as a percentage of net income.
Whether you keep one total field and add all the others into it or keep multiple totals will depend on the kind of statement you are trying to create.
![]() To correctly calculate the total amounts, the program will actually process the statement twice. The first time the program is calculating totals in order to print the percentages the second time through. This means you will not want to clear the field or fields you are using as a base. Be careful not to use your calculation base as a "bucket" field that you continually fill and empty.
To correctly calculate the total amounts, the program will actually process the statement twice. The first time the program is calculating totals in order to print the percentages the second time through. This means you will not want to clear the field or fields you are using as a base. Be careful not to use your calculation base as a "bucket" field that you continually fill and empty.
There are also differences between this statement and the earlier ones. Notice, for example, that the totals are to be printed with dollar signs (column $). Notice also that the account amounts are printed in column location 1, the subtotals in location 2, and the net total in location 3 (column L).
You will probably need to try to use this program a few times, print some statements, then improve your format until you are happy with it. With a little practice you will be preparing sophisticated formats that give an individualized look to your company's financial statements. You can specify specific account balances and the percentage printing option in the statement printing program (GL-P), once the report is saved. You can easily use this program for all of your statements, bypassing the standard statements in GL-F, Enter Financial Statements.
Page url: http://www.cassoftware.com.com/adv7docs/index.html?gl_o_formatcustomstatement.htm