|
FL-K - Maintain Menu Access Records |

  
|
|
FL-K - Maintain Menu Access Records |
|
Purpose of Program
This program is used for adding, deleting, or modifying Menu Access records. These are the records that control what the user will see in the main menu when they log in.
Field Explanations
General Program Operation
When you choose this option the following screen is displayed:
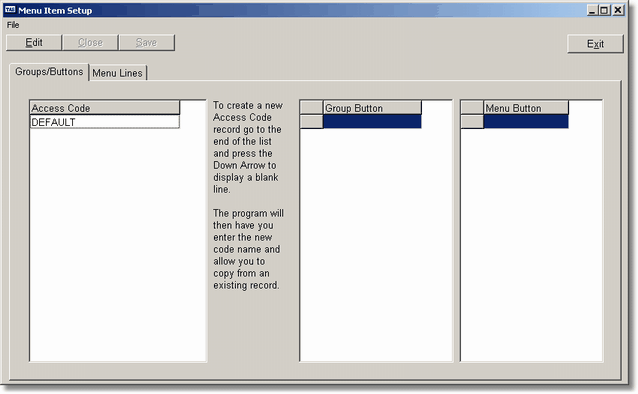
The number of lines in the Access Code list depend entirely on the number of different menu setups you have created. The file provided by CAS contains just the DEFAULT setup. This includes all of the items in the menu.
The other two lists on this page are for Group Buttons and Menu Buttons. The Group Button is an easy way to control the number of menu buttons that are displayed at one time. If you have too many menu buttons, or you just want to reduce the number displayed, you can create a Group Button and then create Menu Buttons for that Group. Then, the user will see a Group Button on the menu and when they choose the group the appropriate Menu Buttons will be displayed.
If you want just a single group of Menu Buttons then set the Group Button to (NONE), the default value. The values displayed in these lists are the captions that will be displayed on the Group and Menu Buttons.
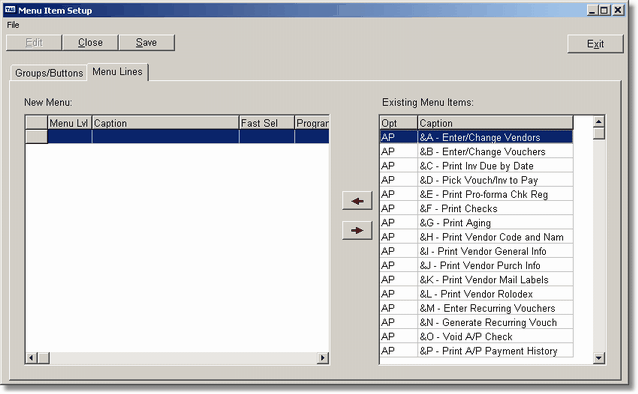
The screen above is the second page, or the Menu Lines page. This can only be accessed if the menu setup is in edit mode and you have chosen a Menu Button. The list on the left has the options you have chosen for this Menu Button. The right contains a list of default menu items for this application. You can move menu items from one list to another by double clicking on the Existing Menu Item or deleting (press the DEL key) when you have chosen a New Menu item. You can also click on the appropriate left (from Existing to New) or right (from New to Existing) arrow.
![]() These Existing Menu Items are displayed automatically when you choose to create a new Menu Setup and you have not copied from an existing record. They are maintained in the BKMENUSU.TXT file.
These Existing Menu Items are displayed automatically when you choose to create a new Menu Setup and you have not copied from an existing record. They are maintained in the BKMENUSU.TXT file.
The New Menu item list allows you to define the following items:
Menu Lvl
This determines whether the menu item is in the popup menu directly attached to the button or a submenu. All main menu items start at level 1, the default value. Sub menus may range from 2 to 9. Typically you won't have more than 2 sub menus (Level 2 and 3) since they become difficult for the user to manage. Also, you must return to Menu Level 1 from the last sub menu or the menu item must be the last option. For example, the following menu item list will create a three level menu. Note that menu item F returns to level 1 instead of level 2. You must always return directly to level 1 after your last sub menu item or, the last sub menu item must be the last menu item in the list.
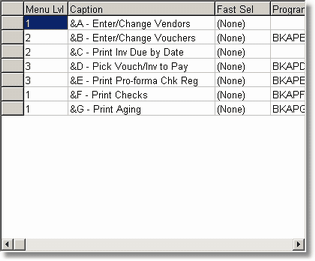
This will create a menu that looks like this:

Caption
This is the text that will be displayed on the menu item. This can be anything you want and the menus will expand and contract automatically depending on what the widest item is. Also, you can specify a choice character by putting an ampersand (&) before the appropriate character.
FastSel
This is the fast select key. Generally, this will be a F function key or some combination of ALT and/or CTRL and a key. A list of the keys available is provided in a drop down list when you're editing this field.
![]() This fast select key is always active. So, you should use the chosen character combination only one for each menu. Even if you use groups, and the group is not active, the Fast Select key is. This means you can press the appropriate key from the main menu and execute that program even if the group or button has not been pressed.
This fast select key is always active. So, you should use the chosen character combination only one for each menu. Even if you use groups, and the group is not active, the Fast Select key is. This means you can press the appropriate key from the main menu and execute that program even if the group or button has not been pressed.
![]() Don't assign a Fast Select key to a sub menu header item.
Don't assign a Fast Select key to a sub menu header item.
Program Name
This is the name and extension of the program to be run. An older style program will have the extension of RUN, a new style, RWN and you can run non-TAS executable's by using their extension, generally, EXE.
No Saves, No Deletes
These are two options that you can enter after the Program Name and are not displayed above. Each option has its own check box. If checked, when the program is run, the user will not be able to save records or delete records as appropriate. This way you can allow the user to run the program and check records without worrying about whether they will change the data when they shouldn't.
New Runtime
If you find a report takes a long time to process and you want the program to create a sperate runtime for this to the program run independent you may want to check this option. NOTE: if this is checked this program become an independent program outside of the menu so if you close your main menu this program will not close in the MDI interface the program will continue till it is closed.
General Program Operation
Create A New Menu Setup Record
To create a new menu setup record click on the Access Code list, press the END key to get to the end of the list, and then press the DOWN ARROW key. The following screen will be displayed.

You must enter a unique name for the New Menu Access Code of up to 30 characters. This is what you will use to refer to the menu setup in the user control records. If you want to start with an existing setup you may choose that in the Copy From drop down box. By clicking on the drop down arrow a list of available setups will be displayed.
Click on the OK button and the new record will be saved.
Edit an Existing Menu Setup Record
To edit the menu setup record click on the Edit button when the cursor is on the appropriate Access Code item. The Group and Menu button lists will be displayed as appropriate. And the Close and Save buttons at the top of the program will be enabled.
You can move the Group and Menu buttons around by clicking on the grey button in the first column and, while holding the left mouse button down, move the item up or down. A green bar will be displayed showing you where the item will be moved. By changing the position of the Menu Button you will change where it is displayed on the screen.
The caption for the Group or Menu Button may be changed anytime. Just click on the appropriate line and change the value, save the menu setup and the next time the menu is loaded the change will be displayed.
To delete a Group or Menu Button click on the appropriate item and press the DELETE key. A dialog box will be displayed asking you if you're sure you want to delete the item. If you click on Yes the button and all sub buttons and menu line items for that button, will be deleted. If there are menu line items that came from the Existing list they will be returned to that list to be used again.
![]() You may also delete the Button or Group by selecting the appropriate line, click the right mouse button, and select the Delete option from the popup menu.
You may also delete the Button or Group by selecting the appropriate line, click the right mouse button, and select the Delete option from the popup menu.
To change a menu line item, choose the Group and Menu Button and then click on the Menu Lines tab. You may then change any of the line items for that Menu Button.
To save changes made you must click on the SAVE button at the top of the program. To close the menu setup record without saving the changes you should click on the CLOSE button. You must either SAVE the changes or CLOSE the record before you can edit or add a different menu setup record.
To move a button from one Group to another click on the Group that contains the button you want to move. Next select the Button you want to move and then press the right button on the mouse (right click). Select the Move to Group menu item. The following dialog box will be displayed:
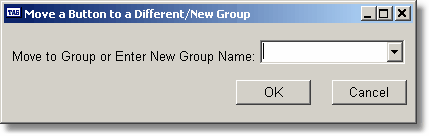
Enter the name of the Group you want to move to or click on the drop down arrow and select the Group from the list provided. Click on the OK button and the Button will be removed from the current Group and moved to the selected Group.
![]() If the Button being moved is the last one for that Group it will be moved, along with all the menu line items, but the Button header will still be displayed. To remove the last Button, after it has been moved, you must either delete it or delete the entire Group.
If the Button being moved is the last one for that Group it will be moved, along with all the menu line items, but the Button header will still be displayed. To remove the last Button, after it has been moved, you must either delete it or delete the entire Group.
![]() There must be a Group record before a Button can be transferred.
There must be a Group record before a Button can be transferred.
Page url: http://www.cassoftware.com.com/adv7docs/index.html?fl_k_maintainmenuaccessre.htm