|
A- Dispatch Jobs |

  
|
|
A- Dispatch Jobs |
|
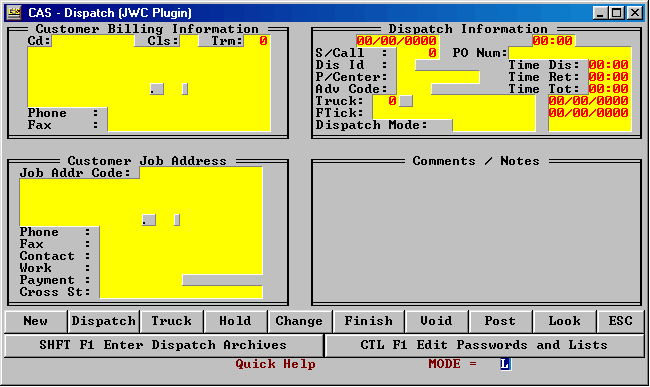
A DISPATCH JOBS
The "Dispatch Jobs" screen is the heart and soul of the dispatching software. From here every phase of the dispatch is completed except for tendering. There are multiple "modes" that the program can operate in. Each "mode" corresponds to a different step in the dispatch process.
Modes
In the "Quick Help" window is found a "Mode = " field. This field allows you to select the mode the dispatch program is in. It also reports which mode you are in when you have selected a process. When the program begins simply press the first letter of the mode you want to start. The available modes are:
| • | N = New dispatch |
| • | D = Dispatch |
| • | T = Truck report |
| • | H = Hold dispatch |
| • | F = Finish dispatch |
| • | V = Void dispatch |
| • | P = Post dispatch |
| • | L = Look or search for a dispatch. |
We will now look at each mode in the order of our dispatch procedure.
New Dispatch
When a customer calls for service and this is the first time you are dispatching a truck for this service request, you need to use the "New Dispatch" mode.
þ You may want to check to make sure that this call has not already been entered into the system. If you are not sure this call is new you should first "Look" option (page 16-11). If you suspect the call is old and has been finished then it will be found in the "Dispatch Archives"
To begin a new dispatch press the "N" key or click the "New" button with the mouse.
The Customer Window
The customer code field allows you to select a customer code. This field works the same regardless of which "Mode" you are in throughout the software.
Keys that are active in this field are: F2 List, F3 Clear, F5 =First Customer, F6 Last Customer, F7 Previous Customer, F8 Next Customer and F9 Search Customer.
þ Notice that in most all fields, the buttons at the bottom of the screen will display the keys that are active for that field.
To bring up a customer you must know the "Customer Code", part of the customer code or select the customer from a list. If you have the entire customer code you may simply type the code and press the enter key to select the customer. If you only remember part of it you may type in the "Partial Customer Code" and press the "F9" key to select the closest match. If you don't know the code or even part of the code use the "F2 List" feature to select the customer.
| • | If you use the "F9" feature it is sometimes helpful to be able to scroll through the customers. You may do this with the "F7" and "F8" keys. The customer codes will be sorted alphabetically so the next customer and previous customers to the partial search result will display after evoking these keys. In most circumstances if you don't know the customers full code the easiest way to find a customer is with the "Customer List". |
The Customer List
While in the customer code field use the "F2 List" feature to search for a customer whose code you are not sure of.
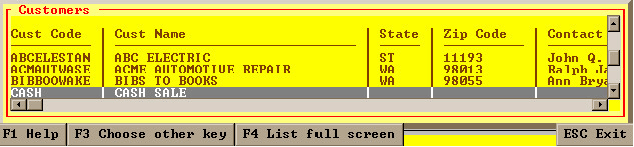
The customer list has many useful features including:
| • | Multiple field sort "Keys" "F3 Choose Key You can see a list of customers sorted by "Name", "Address 1", "State", "Phone" or "Zip". |
| • | Type searching After you select a "Key" you can type in the "Key Field" and the computer will scroll the list to the character or string you are typing. |
| • | Full / Partial screen "F4 List Full Screen" allows the user to select how much of the screen is occupied by the list. |
While in the customer list the following keys are useful.
| • | Up arrow and down arrows Use the up and down arrows to scroll the customers on the list |
| • | Page up and Page down These keys will scroll the list page by page. |
| • | Escape Quits the list and leaves the customer code field blank. |
| • | Enter Quits the list and selects the highlighted customer. |
Editing The Customer Information
After you have selected a customer code. The computer asks if you want to edit the customer information. If you select "yes" you will be able to go into the customer fields and change them. If you select no the program continues to the "Job Window".
The Customer Window Fields
Below is a list of the "Customer Window" fields.
Field Description
Name
The company name of the customer.
Class
The class of the customer.
Address 1
First line of the street address
Address2
Second line of the street address.
City
Customer's city
State
Customer's state
Zip
Customer's zip code
Phone
Customer's phone number
Fax
Customer's fax number
Customer's email address
Terms
Customer's billing terms
þ Please be aware that if you do change the customer information in the dispatch it will not change the customer master file. If you want to make a permanent change to a customer, please do so in the "Customer Maintenance" section of the program, which is located under "A/R" item "A".
The Job Window
The "Customer Code" selects the "Bill To" customer. The "Job Addr Code" selects the "Ship To" or "Dispatch To" information. In this way a billing customer can be responsible for multiple job sites. The program associates the "Job Site" with the "Bill To" customer each time a dispatch is entered. As soon as the program enters the "Job Window" it asks, "Do you want to select a job site other then the one shown?" The job that is shown is the first job that is associated with the selected customer. If a customer only has one job then chances are you can answer "No" to the above question. If the correct job is not shown, answer "Yes" to select the proper job information.
The Job List
The customer and job lists are examples of the two different kinds of lists in our software. The customer list is a view only "Search List". This type of list allows the user to search for a customer using different search criteria. The job list is an "Edit List", which allows the user to add entries from within the list.
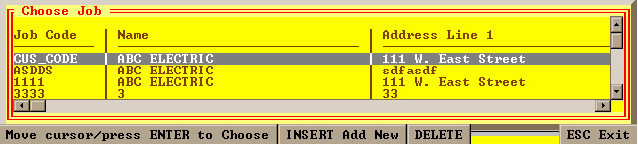
From the "Job List" there are 3 functions that can be performed.
| • | A "Job Addr Code" can be selected. Use the arrow keys and press enter to select that job. |
| • | A new "Job Addr Code" can be entered. Use the "INSERT Add New" button or the "INSERT" key on the computer or select the blank line at the bottom of the list. |
| • | A job can be deleted with the "DELETE" button or by pressing the "Delete" key on the keyboard. |
Adding a New Job
When in the job list simply press the "Insert" key at any time to add a new job to the list of jobs associated with the customer. You will see the screen below.
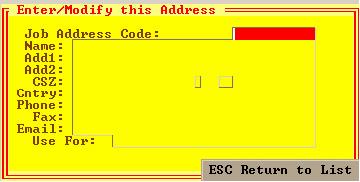
þ Cool Tip When in the screen to the right any information you enter will be recorded in the job database and will update the master job record permanently. If you enter or change a job in the dispatch it will only be changed in that dispatch.
Simply enter all of the information associated with the job and then the program will return you to the job list. Select the new job you entered on the list to copy the job information into the dispatch.
The Job Window Fields
Below is a list of the "Job Window" fields.
Field Description Features
Name
The company name of the customer.
Address 1
First line of the street address
Address2
Second line of the street address.
City
Job site city
State
Job site state
Zip
Job site zip
Phone
Job site phone number
Fax
Job site fax number
Contact
Job site contact
Work
The type of work to be performed Leave the field blank and press "Enter" for a list. This list can be modified in "Edit Passwords and Lists" .
Payment
The agreed upon payment type. This can be changed latter Leave the field blank and press "Enter" for a list. This list can be modified in "Edit Passwords and Lists".
Cross Street
The cross street for the job site
Dispatch Notes Window
Often times it is necessary to record notes that are given to you over the phone at the time of the service call. The "Dispatch Notes Window" will automatically format any note that you type. Simply enter the note and press "F10 " to save. The note is limited to a total of 400 characters in 10 lines. You can actually enter more then 10 lines and it will print correctly but it will not display more then 10 lines on the screen.
The Dispatch Window
In order to complete a new dispatch there are a few fields in the "Dispatch Window" that must be entered. The fields are described below.
Field Description Features
PO Number
The Customer's PO number (if any).
Dis ID
The dispatcher's ID code.
Adv Code
The Advertising code.
"Enter" while the field is blank will pull up a list of ADV codes that have been entered in the system from the "Edit Passwords and Lists" program.
Truck
The "Truck" or "Tech" whom you are dispatching to perform the call. If you leave the field blank or do not type in a valid truck dept number the program will produce a list for you. You can add to this list in the "Payroll" section item "A". This field corresponds with the "Employee Number" field in payroll.
Date of dispatch
The date the call was taken.
Mini Note
An extra field to enter an appointment time or small note. None
Completing a New Dispatch
To complete the "New Dispatch" procedure answer the next 3 questions.
| 1. | Do You Want To Save? If you do not save, the dispatch will not be recorded and you will need to start over. |
| 2. | Do You Want To Print? Normally you would print a ticket to hand to the dispatcher in the next step called "Dispatch". You can print it over at any time using the "C- Change" or re-dispatch the call using the "D Dispatch" . |
| 3. | Do You Want To Dispatch This Order? If you answer yes the program will automatically bring this call over to the next process in the dispatch program. If you answer no you can take another call immediately. |
The computer will automatically assign the next available number to your dispatch. You're done, that's all there is to it.
Look
If you intend to dispatch a call or simply pull up the call you just entered, look is the tool to find the call. There are several ways to find your call using "Look." Since "Look" makes heavy use of the "F2 List" features in the software, let's examine that first.
The Dispatch List
By far one of the nicest features of our software is the ability to search for calls by multiple "Keys". A "Key" is a sort order. If you select "City" as the key then the calls will be sorted by city alphabetically. You can type in the "Key Field" and the program will scroll to the nearest match to your keyboard entry. The available keys when listing all dispatches are:
| • | Date |
| • | Service Call |
| • | Customer Code |
| • | Customer Name |
| • | Truck |
| • | Address 1 |
| • | City |
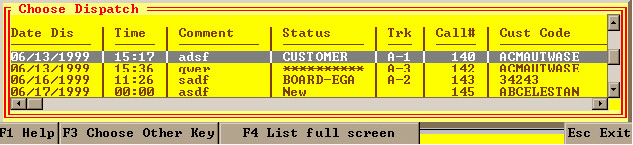
While in the dispatch list the following keyboard keys are useful.
| • | Up arrow and down arrows Use the up and down arrows to scroll the calls on the list |
| • | Page up and Page down These keys will scroll the list page by page. |
| • | Escape Quits the list and leaves the field blank. |
| • | Enter Quits the list and selects the highlighted call. |
| • | F4 changes the list so it takes up more or less of the screen. |
| • | F3 changes the search key. |
Narrowing The Search By Customer
Another list method will filter the calls from the list by a single customer. Follow the procedure below.
| 1. | Use "L" to evoke the look feature from the "Mode = " field. |
| 2. | Select a customer by typing the customer's code in the customer code field or use the "F5 F9" keys to search the customer database. |
| 3. | Press the enter key to go to the "S/Call" field. |
| 4. | Press "F2 List". You will see only the calls for the customer you selected. |
| • | Just a review, If you don't know the customer code you can search the customer base by typing a partial code and pressing "F9". The closest match to what you typed will come up in the code field. Then, it is sometimes helpful to be able to scroll through the customers. You may do this with the "F7" and "F8" keys. The customer codes will be sorted alphabetically so the next and previous customers to the partial search result will display after evoking these keys. You may use these features whenever the cursor is in the "Customer Code" field. |
While in "Look" once a call is selected the program will ask if you want to "Send To Dispatch". If you select "No" the program will return you to the "Mode = " prompt. You may print the dispatch at any time using the "CTL P" option.
Dispatch
After a call is entered using the "New" feature the next step is to send a truck to the job site. This process is referred to as "Dispatch Call". The "Dispatch" mode allows you to assign a truck to a call and print a "Dispatch Ticket" to give to the tech on the truck. It also starts the "Clock" running on the service call. The "Dispatch" mode may also be used to "Re-dispatch" a call that has been put on hold for some reason. For more information on "Hold"
From the "Mode = " field select "D" to dispatch a call. Notice that the "Mode =" will change to "Look". Before you can dispatch a call you must select one. For help using look see the last section.
Dispatch Fields
The Dispatch fields are very basic due to the fact that most of the hard stuff was entered when the call was "New". Below is a table of fields found in the dispatch mode.
Field Description Features
Dis ID
The dispatcher's ID code.
Adv Code
The advertising code helps you track advertising budgets If you leave this field blank and press enter the program will produce a list for you. You can add an item to this list in the "Edit Passwords And Lists"
Truck
The "Truck" or "Tech" whom you are dispatching to perform the call. If you leave the field blank or do not type in a valid truck dept number the program will produce a list for you. You can add to this list in the "Payroll" section item "A". This field corresponds with the "Employee Number" field in payroll.
After all of the fields have been entered, the program will ask if you want to save and print. It is customary to print a dispatch ticket to hand to the tech.
Congratulations you have learned how to enter a call and dispatch that call. Continue reading and we will examine the rest of the features of the program.
Change
Nikki Giovanni an American poet of the 1940's wrote " Mistakes are a fact of life, It is the response to error that counts."
The most logical response to any error is to correct it. In this section we will cover both how to correct errors and make changes to dispatches that have been entered into the system.
"Change" really is an extension of "New". The fields and steps are the same. The only difference exists in the first step, selecting a call.
Select A Call To Change
By now you should be familiar with the search features of the software. Suffice it to say the "Change" search and the "Look" search are identical. You may also use the "F5 F9" keys to bring up the call you want to change.
As mentioned above the "Change" features and the "New " features are the same. "Change" will place all of the old data in the fields for you, simply scroll through them with the "Tab" key or the "Enter" key. If you type in a field the data that was in the field is automatically erased. If you make any mistakes during a change simply answer "No" to the "Do You Want To Save?" question. You may re-print the dispatch at any time using the "CTL P" option.
Hold
There are always situations that can potentially prevent a service call from being finished. The "Hold" feature will put a service call in a "hold status" until such time that the call can be finished. There are many types of "Holds" that could potentially come up. One of the most common is "Will Call" or "Customer". Another one that often comes up is "Waiting for a Part" or "Inventory".
Inventory Hold
Our software features a special "Inventory" hold procedure that is outlined in the chart below:
To begin an "Inventory Hold" select "H" from the "Mode = " field. Select the service call you want to hold using the features discussed in the "Look" section of this manual.
Once a call has been selected a "Hold Type" list will come up select "Inventory" from the list.
Press "Enter" and your inventory will display on the screen. Select the part that is holding up the service call.
Enter the date of the hold (remember you can use CTL M to select the date from a calendar.)
Answer "Yes" to save the dispatch and print it (if desired).
þ If you select an inventory item that is in stock the program won't stop you. You will be advised that the part has come in the next time you do a "L" or "D". The program will automatically select the first dispatch it finds that is holding for that part and allow you to dispatch it. If there is more then one dispatch holding for that part the program will remind you again the next time you press "L" or "D" from the "Mode = " prompt.
Other Holds
You can place a service call on any type of hold you like. The "Hold Types" list can be modified from the "Edit Passwords and Lists" program.
Select "H" from the "Mode = " field.
Select the service call you want to put on hold using the search features discussed in "Look".
A "Hold Type" list will appear. Select an item from the list. The "Hold Type" will be copied to the "Dispatch Mode" field of the dispatch; this field is also called "Status" in the lookup lists.
Press the "Enter" key and then enter the date of the hold. Like all date fields you can use "CTL M" to select from a calendar.
Save the dispatch and print if necessary.
Finish Dispatch
William Shakespeare wrote in Macbeth "If it were done when 'tis done, then 'twere well It were done quickly."
Finishing a dispatch is both quick and easy.
Select "F" from the "Mode = " prompt and then pull up a service call to finish.
Enter the "Finish Password". By default when the software is first installed the password is "owner". You may set the password in the "Edit Passwords And Lists" program
Enter the "Field Ticket" number for this dispatch.
You may edit the notes if you like then press F10 to save.
þ When the note screen opens up and there are notes already in the screen you can press "Page Down" then "End" to move the cursor all of the way to the end of the existing notes in order to add new ones.
Save the dispatch and then print it if necessary.
þ Once a dispatch is "Finished" then it can not be changed without the "Finish Password".
Post Dispatch
Posting removes all finished dispatches from the "Dispatch List" and copies them to the "Dispatch Archive". Once posting has been done the only place to view finished dispatches in is the "Dispatch Archive" or the "Sales Order" program.
Posting is real easy. Press "P" from the "Mode = " prompt and answer the question: "Are all other dispatchers logged of off the system?"
If you answer "No" to the question above then the posting will not occur. All other dispatchers must be logged off in order that the program can modify any call that it needs to. As with any network software, two different users can't make changes to a single record at the same time.
If all dispatchers are logged off and you answer "Yes" then posting will occur.
If you answer "Yes" and a call is open on another PC then the computer will report an error "A record is locked by another user. Do you want to try again? " Simply go to each PC and clear the dispatch screen then return to the "Posting PC" and answer "Yes". If you cleared the offending PC the dispatch will be posted, if not you will be asked the same question over. If you answer "No" the program will quit and return you to the "Mode = " prompt.
Truck Report
The truck report will allow you to print truck activity for a given date range. You can select a single truck or a range of trucks as well as a single date or a date range.
From the "Mode = " prompt select "T".
A "View Schedule" box will appear asking for a "From Date. You may type the date or select it from a calendar using.
Select the "To Date".
Enter the "From Truck" and then the "To Truck". If you leave these fields blank all trucks will print.
Void Dispatch
A service call can be voided with the "Void Password" .
Enter "V" from the "Mode = " prompt and then select a service call for voiding.
You will be prompted for the "Void Password" then the call will be deleted permanently. You may set the "Void Password" in the "Edit Passwords And Lists" program (page 16-18).
| • | Be careful with "Void". Once a service call has been voided it can not be retrieved. |
DISPATCH ARCHIVES
After a dispatch is finished it is moved to the "Dispatch Archives". There are many advantages to "archiving" including program speed, easy of use and convenience. Most users are in the archive program often. It is a complete history of every call that has gone out since the program was installed.
In order to streamline the "Archive" program we made it very simple. The archive program serves as a "Look, but don't touch" entity. You can't modify a service call once it is archived unless you "Transfer It Back" to dispatch. An archived call that has been "Transferred Back" behaves just like a dispatch that has been finished but not yet posted. You may change or void the dispatch with the proper passwords.
Finding a call in Archive works just like the "Look" feature in dispatch. Archive makes extensive use of the "F2 List" feature. There are two ways to list calls.
1. List all calls.
| 2. | Narrow the list by customer. |
List All Calls
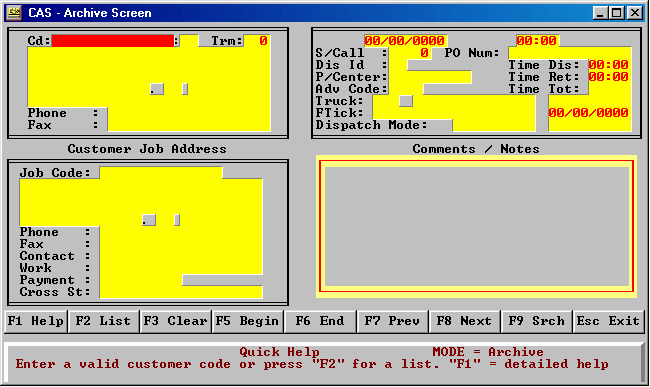
To list all calls start the archive program either by pressing "A" at the "Mode = " prompt in dispatch or by selecting "Dispatch Archive" from the main menu.
The program starts in the "Customer Code" field; press enter to go to the "Service call" field.
Use the search keys F5 F9 if you know part or all of the call#.
If you don't know the call# then use the F2 List feature.
The available keys for searching all calls in the list screen are "Customer code" ,"Customer Name", "Date", and "Service Call".
List Calls By Customer
To list calls by customer start the archive program either by pressing "A" at the "Mode = " prompt in dispatch or by selecting "Dispatch Archive" from the main menu.
Enter a customer code in the "Customer Code" field (Cd). You can pull up a customer list by using F2 List or use the F5-F9 search features.
Press "Enter" to go into the "Service Call" field (S/Call).
Use the F2 List feature and the computer will display only the service calls for the customer you selected.
Transfer Back To Dispatch
When you have selected a call in the Archive program you can transfer it back to dispatch by pressing "CTL T". At that time the record will be removed from the "Archive" and then re-inserted into the "Dispatch" program for editing.
The Archive program will return to the "Customer Code" field so you may look up the next record.
Page url: http://www.cassoftware.com.com/adv7docs/index.html?a_dispatchjobs.htm