|
TppGroup |

  
|
|
TppGroup |
|
Use this feature to section your report. Each group can start on its own page and you can force group items to stay together.
MENU ACCESS
Report -> Groups
PROCESS
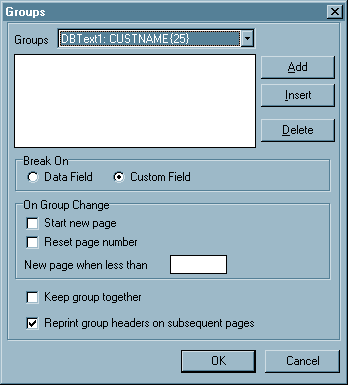
When you choose the Group menu item the following screen is displayed:
ACTIONS
| Groups | This is the list of fields that is available to be chosen as the group control. When the value in this field changes the report considers the group to have changed. You must choose a field of type TppDBText as your control. To get a list of fields available click on the down arrow. |
| Add | This will add a new group to your report. You may have multiple groups and groups within groups. |
| Insert | This will insert a new group at the cursor location. If we had chosen one or more groups above that group would be listed in the box below the listing field. You can choose an existing group by clicking on it before you click on the Insert button. |
| Delete | This will delete the group at the cursor location. Make sure you want to do this since all fields in the group bands will be deleted if you delete the group. |
| Break On | The radio button Custom Field must always be chosen. If you choose Data Field the group will not work. |
On Group Change
Start new page - This will begin a new page when the group changes regardless of how many lines have currently be printed.
Reset page number - If you are using a TppSystemVariable to print the page number on your report this will reset that page number to 1 each time the group changes. However, it only applies if you have chosen the Start new page option.
New page when less than - This will start a new page when the number of remaining lines is less than the value entered here. This option and Start new page are mutually exclusive.
Keep group together - If you check this option the report will always see if there are enough lines remaining to print the entire group. If there aren't the report will start the group with the next page.
Reprint group headers on subsequent pages - If the group requires more than one page to print, and this option is checked, then the GroupHeader band will be reprinted for each line. If this is not checked, the GroupHeader band will be printed only once, when the group starts.
| OK | Save the group information you have entered. |
| Cancel | Don't save. |
COMMENTS
A group can be defined by an TppDBText field. The field doesn't even need to be printed on the report, however, it does need to be on the page.
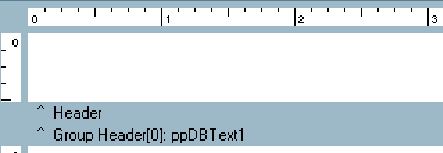
When you click the Add button and a new group is created the group field name will be inserted into the box below the field list. The program will also create two new bands on the active page. These are GroupHeader and GroupFooter. They have the same options as the TppHeaderBand and TppFooterBand. However, when the Group Bands are created there is no space between these new bands and the one above. The only way you can tell is by the additional name that is displayed and the line appears thicker. An example is shown below:
To separate the two bands works the same way as increasing or decreasing the size of a band. Just place the mouse over the header band, and, when the mouse cursor changes to a double headed arrow, press the left mouse button down and drag the band down. If you've chosen the correct band specifier you should see an increasing space between the original header (or whatever the band was) and the new Group Header. If you don't you've probably grabbed the wrong band. Release the left mouse button, move the mouse down a little bit and (as long as you have the two headed arrow) try again.
Page url: http://www.cassoftware.com/tas/manual/tppgroup.htm