|
OnPrint |

  
|
|
OnPrint |
|
This is a special property that will display above the normal OI (object Inspector) if it applies to the object you are editing. Generally, this would be all objects that actually print and doesn't include the bands themselves.
The OnPrint process is made up of two parts:
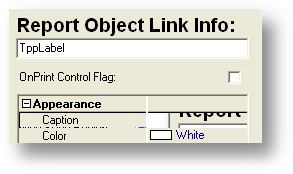
1. Make sure the OnPrint Control Flag check box is checked.
2 Make sure that you have a defined field by the name of the object (and/or options).
EXAMPLE
In the case above, assume that the "Tax" field is in the Region named "regTax". If there's no tax on the order you may, or may not want to print the region. Now, when you're setting up the data for the report the output lines might look something like this:
Define Regtax type a size 3
Regtax = 'OFF' // make this invisible
OUTPUT_REPORT_DATA RB_NUM 1
Define RegtaxCL type a size 10
RegTaxCL = '[RED]' // Change Background of the Field to Red
OUTPUT_REPORT_DATA RB_NUM 1
Define RegtaxLT type I
RegTaxLt = 100 // Put the Tax Reg 100 to the Left
OUTPUT_REPORT_DATA RB_NUM 1
EXAMPLE 2
Change Report Objects at runtime.
When reporting with the Report Builder you may find that you need to change the color , Font , Size at the program level.
1 Step one Setup changes to the RTM
In the report writer make the dbtext object OnPrint Control Flag is checked.
Make sure you name this object.. for this tutorial we will set the name property to "chkamt"
2 Step 2 your code.
Define a fld Named Object name + FC for this tutorial we will define it as chkamtFC the FC stands for Font Color
Define chkamtFC type A size 10
3 Step 3 Make it work.. put this some where in your report just before the Output_Report_Data
scan @myfile_hndl key @1
If bkgl.chk.amt < 0 then chkamtFC = 'ClRed'
if bkgl.chk.amt => 0 then chkamtFC = 'ClBlack'
Output_Report_Data Rb_Num 1
ends
NOTE : you can control
FC - Font Color
FS - Font Size
FN - Font Name
Note: If you add the Options you can control other characteristics:
Extension What it does
------------------------------------------------------------------------------------------
LT Changes the Left Position.
TOP Changes the Top Position
CL Changes the Font Color
WD Changes the Width
HT Changes the Height
FN Change the Font
FC Changes the Color of the Font